HPE ProLiant Security Experience
Jump to:
- Overview
- HPE ProLiant Security Experience
- Task 1 - Accessing the HPE Compute BU Enablement Environment
- Task 2 - Embedded Server Management with HPE iLO7
- Task 3 - Managing Local Users
- Task 4 - Firmware Verification
- Task 5 - Applying a Web Proxy configuration
- Task 6 - Connecting to HPE Compute Ops Management
- Task 7 - Secure Login Options for Enterprise IT Administrators
- Task 8 - Establishing a connection from HPE iLO7 to HPE GreenLake
- Task 9 - Securing your Server Fleet with HPE Compute Ops Management
- Task 10 - Creating server groups and associating server settings
- Task 11 - Advanced Security settings for HPE iLO7
- Task 12 - HPE iLO7 SSL Certificate Management
- HPE Compute Ops Management Secure Gateway
- Task 13 - Configuring the Secure Gateway and connecting to COM
- Task 14 - Connecting our HPE iLO7 to COM via the Secure Gateway
- Summary
- Want more?
Hands on Lab Guide
Overview
HPE ProLiant Gen12 servers are designed with a security‑first approach and deep remote manageability. In this lab, you will:
- Use Omnissa Horizon to access the lab environment.
- Explore HPE iLO 7 for embedded server management.
- Onboard servers to HPE GreenLake / Compute Ops Management (COM).
- Apply security best practices, verify firmware, and manage certificates (ACME).
- Deploy and use the COM Secure Gateway.
HPE ProLiant Security Experience
HPE is accelerating time to value with our robust portfolio of IT infrastructure management solutions. These tools are certified and optimized for managing HPE hardware and solutions. HPE ProLiant Gen12 servers are designed from the ground up with security, remote manageability, and lifecycle management in mind.

Here is an overview of our Compute management portfolio.
-
HPE Compute Ops Management delivers unified operations as-a-service from edge to cloud. In this HOL you will work with this technology.
-
HPE iLO7 is embedded server management that enables you to securely configure, monitor, and update your HPE servers from anywhere. Again, in this HOL you will work with this technology too.
-
HPE OneView is integrated IT infrastructure management software that automates IT operations and simplifies infrastructure lifecycle management across compute, storage, and networking. It is an onsite management strategy and is not the focus of this workshop.
This HOL takes a technical approach to how these tools can be used to manage HPE ProLiant Servers with a strong focus around Security.
Task 1 - Accessing the HPE Compute BU Enablement Environment
We will use Omnissa Horizon to access the lab environment and view server details in HPE Compute Ops Management.
Follow these steps:
-
Open the Horizon Access Portal
Using your Chrome browser, navigate to the appropriate URL based on your network location:-
External to HPE (not connected to HPE VPN):
https://labs.compute.cloud.hpe.com -
Internal to HPE (or connected to HPE VPN):
https://techenablement.hpecorp.net
-
-
Launch the Web Client
On the Horizon login screen, click the Omnissa Horizon Web Client button.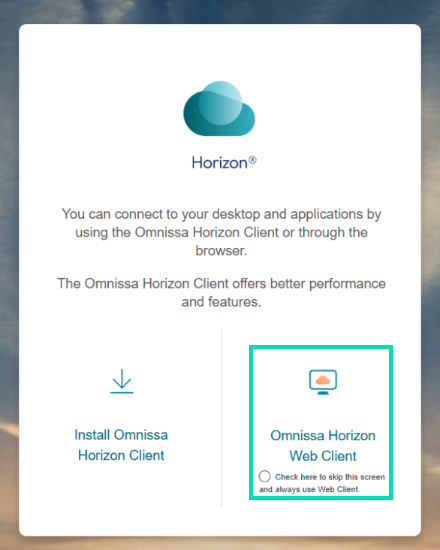
-
Enter the username and password supplied by your instructor and click the Login button.
-
Username:
HOL02-T01@labs.compute.cloud.hpe.com through HOL02-T25@labs.compute.cloud.hpe.com, (depends on your team assignment) -
Password:
Supplied by instructor
-
-
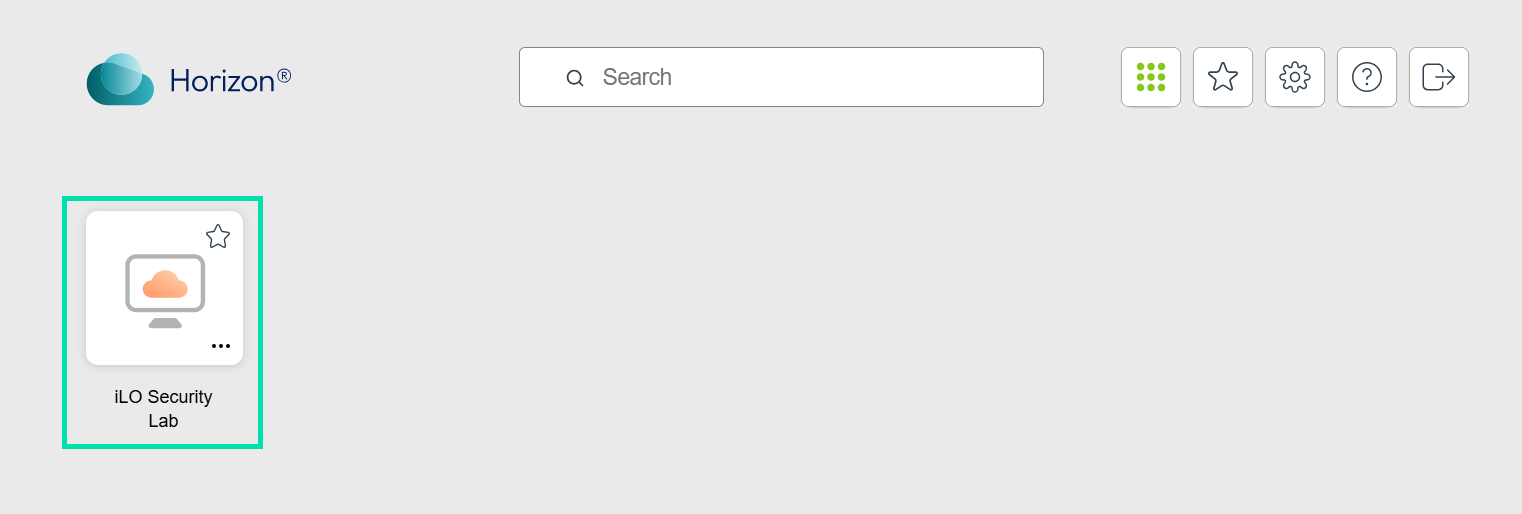
Click on the graphic that represents your Lab environment.
-
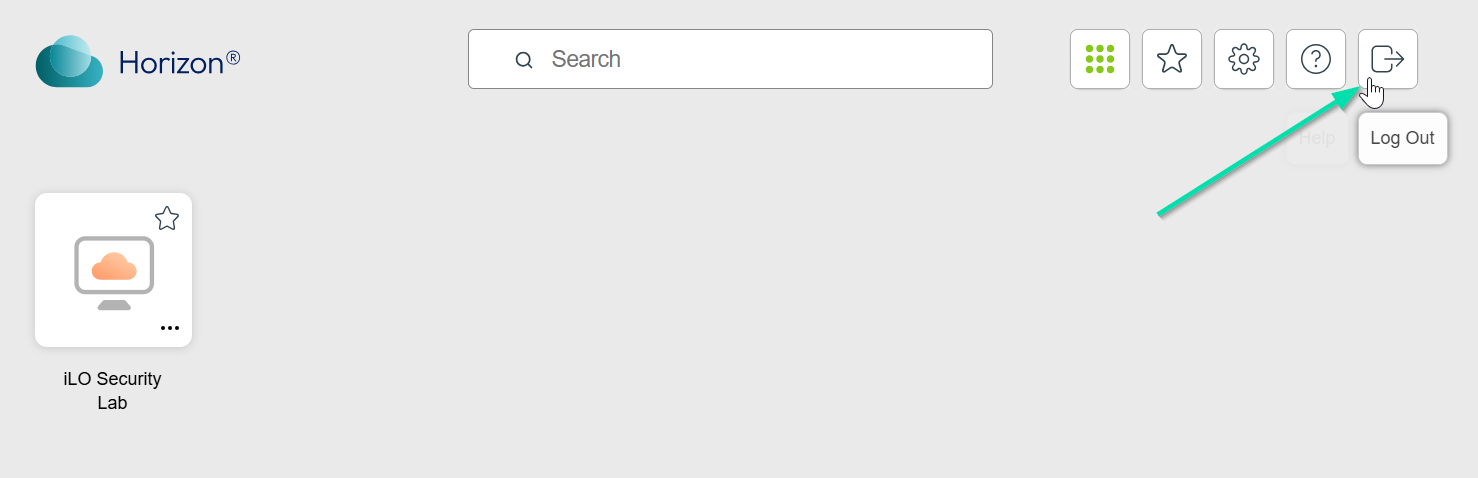
When you are finished with the lab, please use the logout button.
You are now in a VPN-enabled Chrome browser session. For these labs to function properly, you must remain within this browser session. You have a secure connection to our remote lab in Houston, but it does not operate like a traditional VPN. Only the applications you launch from this browser session are connected to the remote environment.
This concludes this section of the lab.
Task 2 - Embedded Server Management with HPE iLO7
HPE Integrated Lights-Out (iLO) is an embedded server management technology from HPE that provides out-of-band management capabilities. Key features of HPE iLO7 include a virtual KVM console, virtual media, power management, console record-and-replay, and comprehensive remote console functionality. It enables administrators to manage servers remotely, regardless of the state of the operating system or the condition of the server itself, if power is available to the system. This remote management is facilitated through a dedicated HPE iLO7 port on the server, but you can connect via the HPE iLO7’s ethernet port as well.
This portion of the lab assumes the server has power, HPE iLO7’s ethernet port is connected to a management network switch and the default password information has been gathered from the toe-tag on the front of the server.
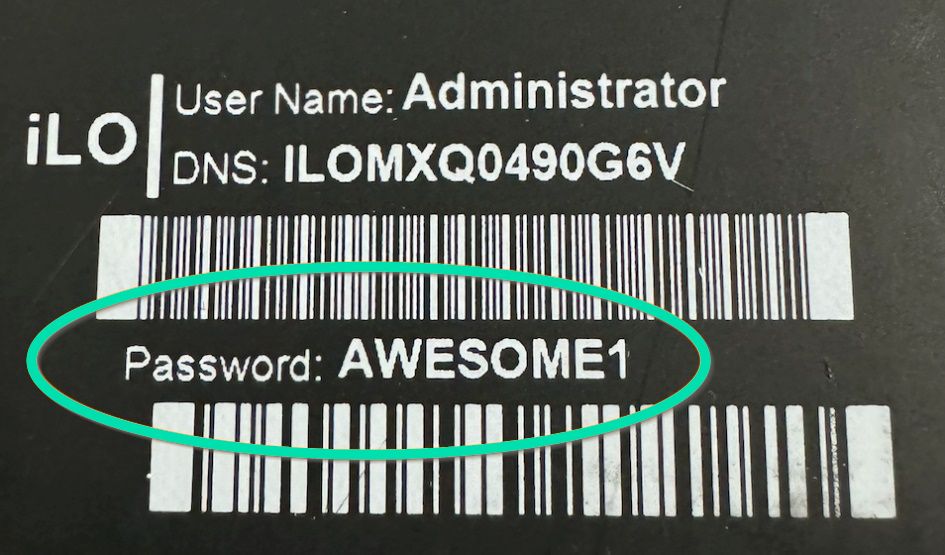
In this lab environment, a DHCP server assigns IP addresses to known hosts using DHCP reservations. This ensures that the lab unit you access receives the same IP address each time it boots after the lab is reset. Refer to the table below for your team’s name and number, as well as the default Administrator credentials for the HPE iLO7 you will be using. Be sure to also record your server’s serial number.
| Team Name & Number | HPE iLO7 FQDN | Username | Default Factory Password |
|---|---|---|---|
| Team-01 | holgen1201-ilo.hol.enablement.local | Administrator | hpent123 |
| Team-02 | holgen1202-ilo.hol.enablement.local | Administrator | hpent123 |
| Team-03 | holgen1203-ilo.hol.enablement.local | Administrator | hpent123 |
| Team-04 | holgen1204-ilo.hol.enablement.local | Administrator | hpent123 |
| Team-05 | holgen1205-ilo.hol.enablement.local | Administrator | hpent123 |
| Team-06 | holgen1206-ilo.hol.enablement.local | Administrator | hpent123 |
| Team-07 | holgen1207-ilo.hol.enablement.local | Administrator | hpent123 |
| Team-08 | holgen1208-ilo.hol.enablement.local | Administrator | hpent123 |
| Team-09 | holgen1209-ilo.hol.enablement.local | Administrator | hpent123 |
| Team-10 | holgen1210-ilo.hol.enablement.local | Administrator | hpent123 |
| Team-11 | holgen1211-ilo.hol.enablement.local | Administrator | hpent123 |
| Team-12 | holgen1212-ilo.hol.enablement.local | Administrator | hpent123 |
| Team-13 | holgen1213-ilo.hol.enablement.local | Administrator | hpent123 |
| Team-14 | holgen1214-ilo.hol.enablement.local | Administrator | hpent123 |
| Team-15 | holgen1215-ilo.hol.enablement.local | Administrator | hpent123 |
| Team-16 | holgen1216-ilo.hol.enablement.local | Administrator | hpent123 |
| Team-17 | holgen1217-ilo.hol.enablement.local | Administrator | hpent123 |
| Team-18 | holgen1218-ilo.hol.enablement.local | Administrator | hpent123 |
| Team-19 | holgen1219-ilo.hol.enablement.local | Administrator | hpent123 |
| Team-20 | holgen1220-ilo.hol.enablement.local | Administrator | hpent123 |
| Team-21 | holgen1221-ilo.hol.enablement.local | Administrator | hpent123 |
| Team-22 | holgen1222-ilo.hol.enablement.local | Administrator | hpent123 |
| Team-23 | holgen1223-ilo.hol.enablement.local | Administrator | hpent123 |
| Team-24 | holgen1224-ilo.hol.enablement.local | Administrator | hpent123 |
| Team-25 | holgen1225-ilo.hol.enablement.local | Administrator | hpent123 |
-
Use your Horizon enabled Chrome browser session that you connected with in the previous section. Remember that for these labs to work, you will need to stay within the context of this browser session.
-
Using the table above, open the Chrome browser and type in the FQDN of your assigned server HPE iLO7.
Note: DO NOT USE IE or EDGE.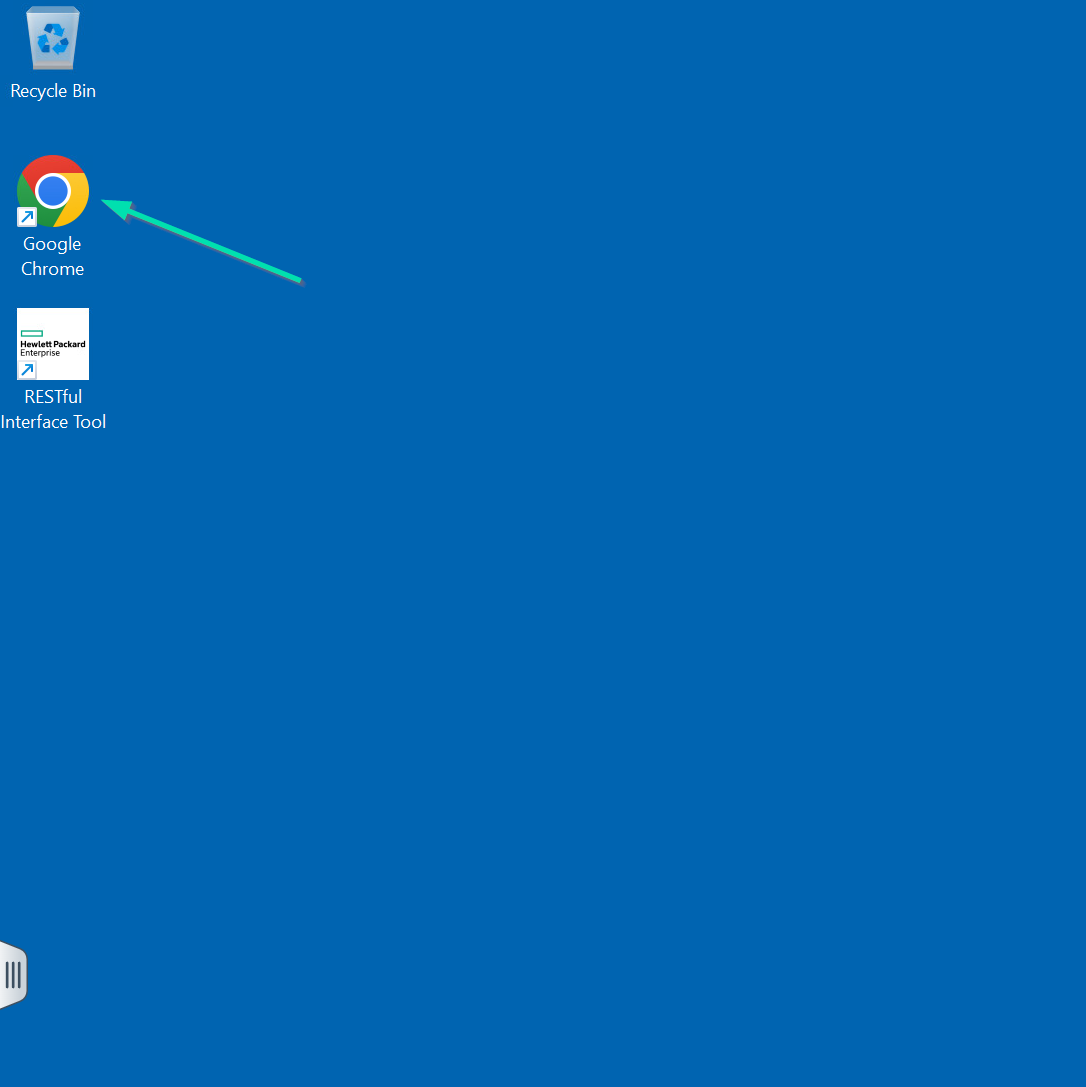
-
Now using the URL for your assigned HPE iLO7, type that into the navigation bar.
-
If presented with a message saying, “Your connection is not private”, this is the self-signed SSL certificate presented to you for the HPE iLO7 you are about to use. Click Advanced.
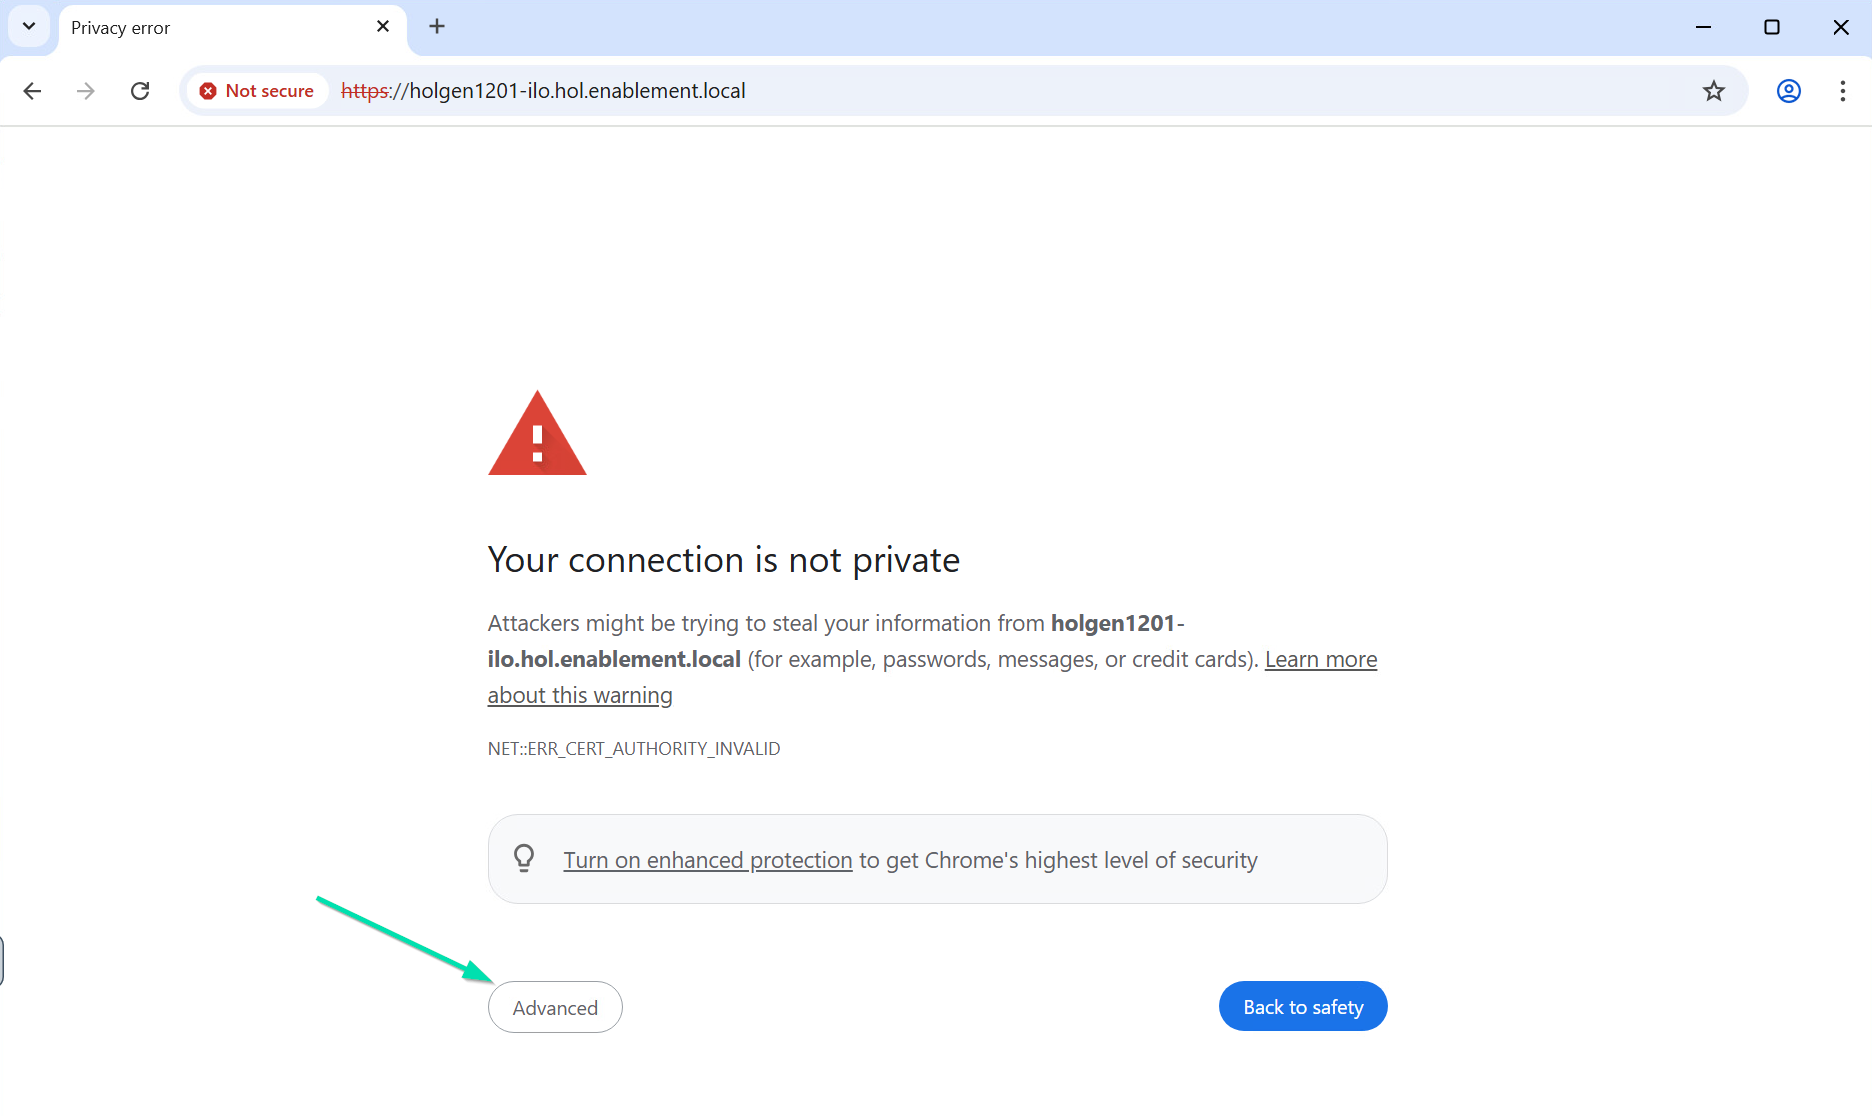
-
On the newly displayed prompt, click on the Proceed to holgen12XX-ilo.hol.enablement.local to continue to the HPE iLO7 login screen.
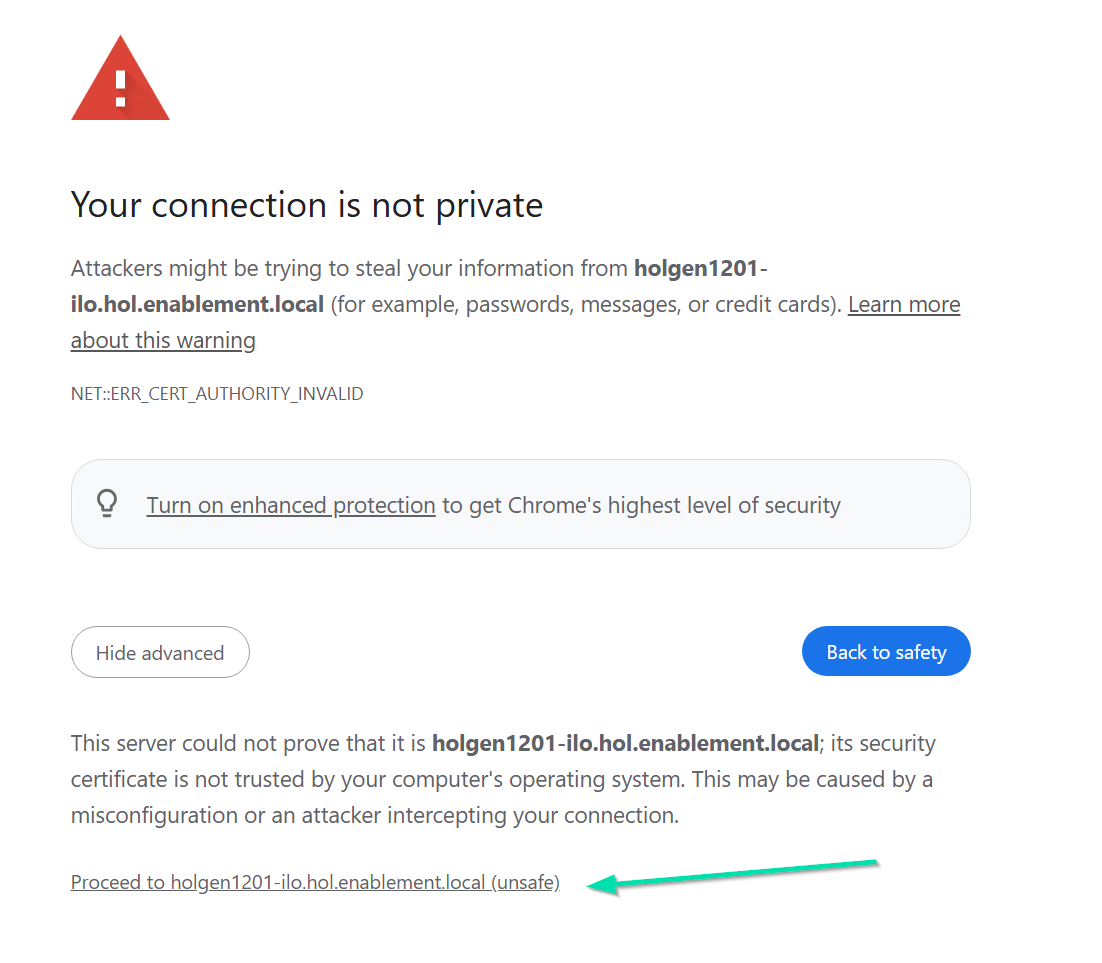
-
Now enter Administrator and the factory password from the table above, into the Local login name and Password fields.
-
Click Log In.
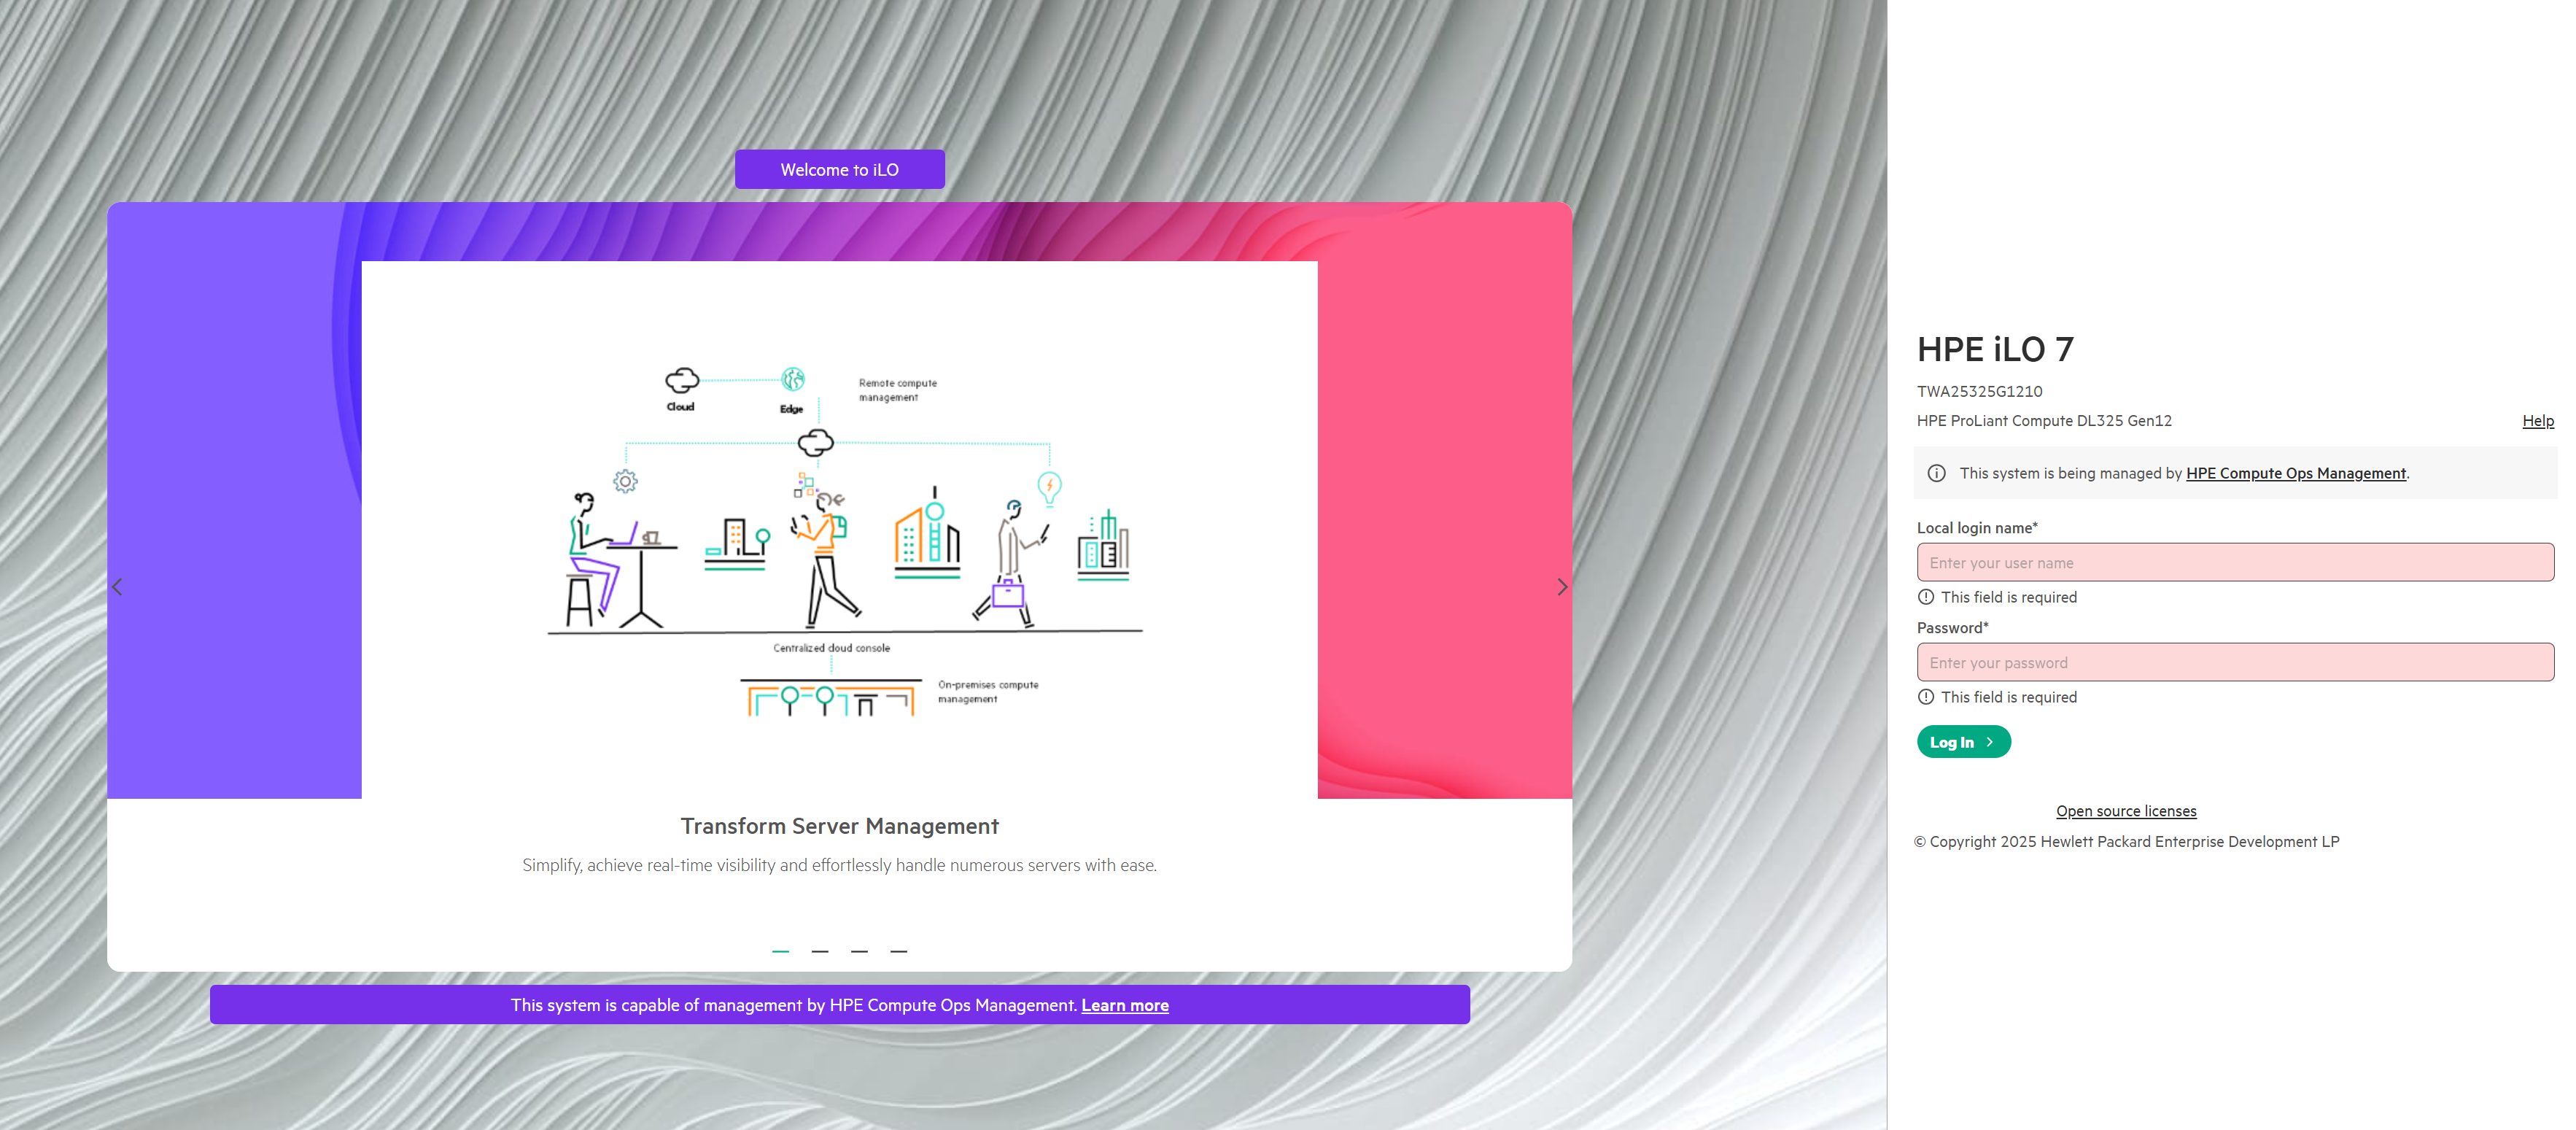
-
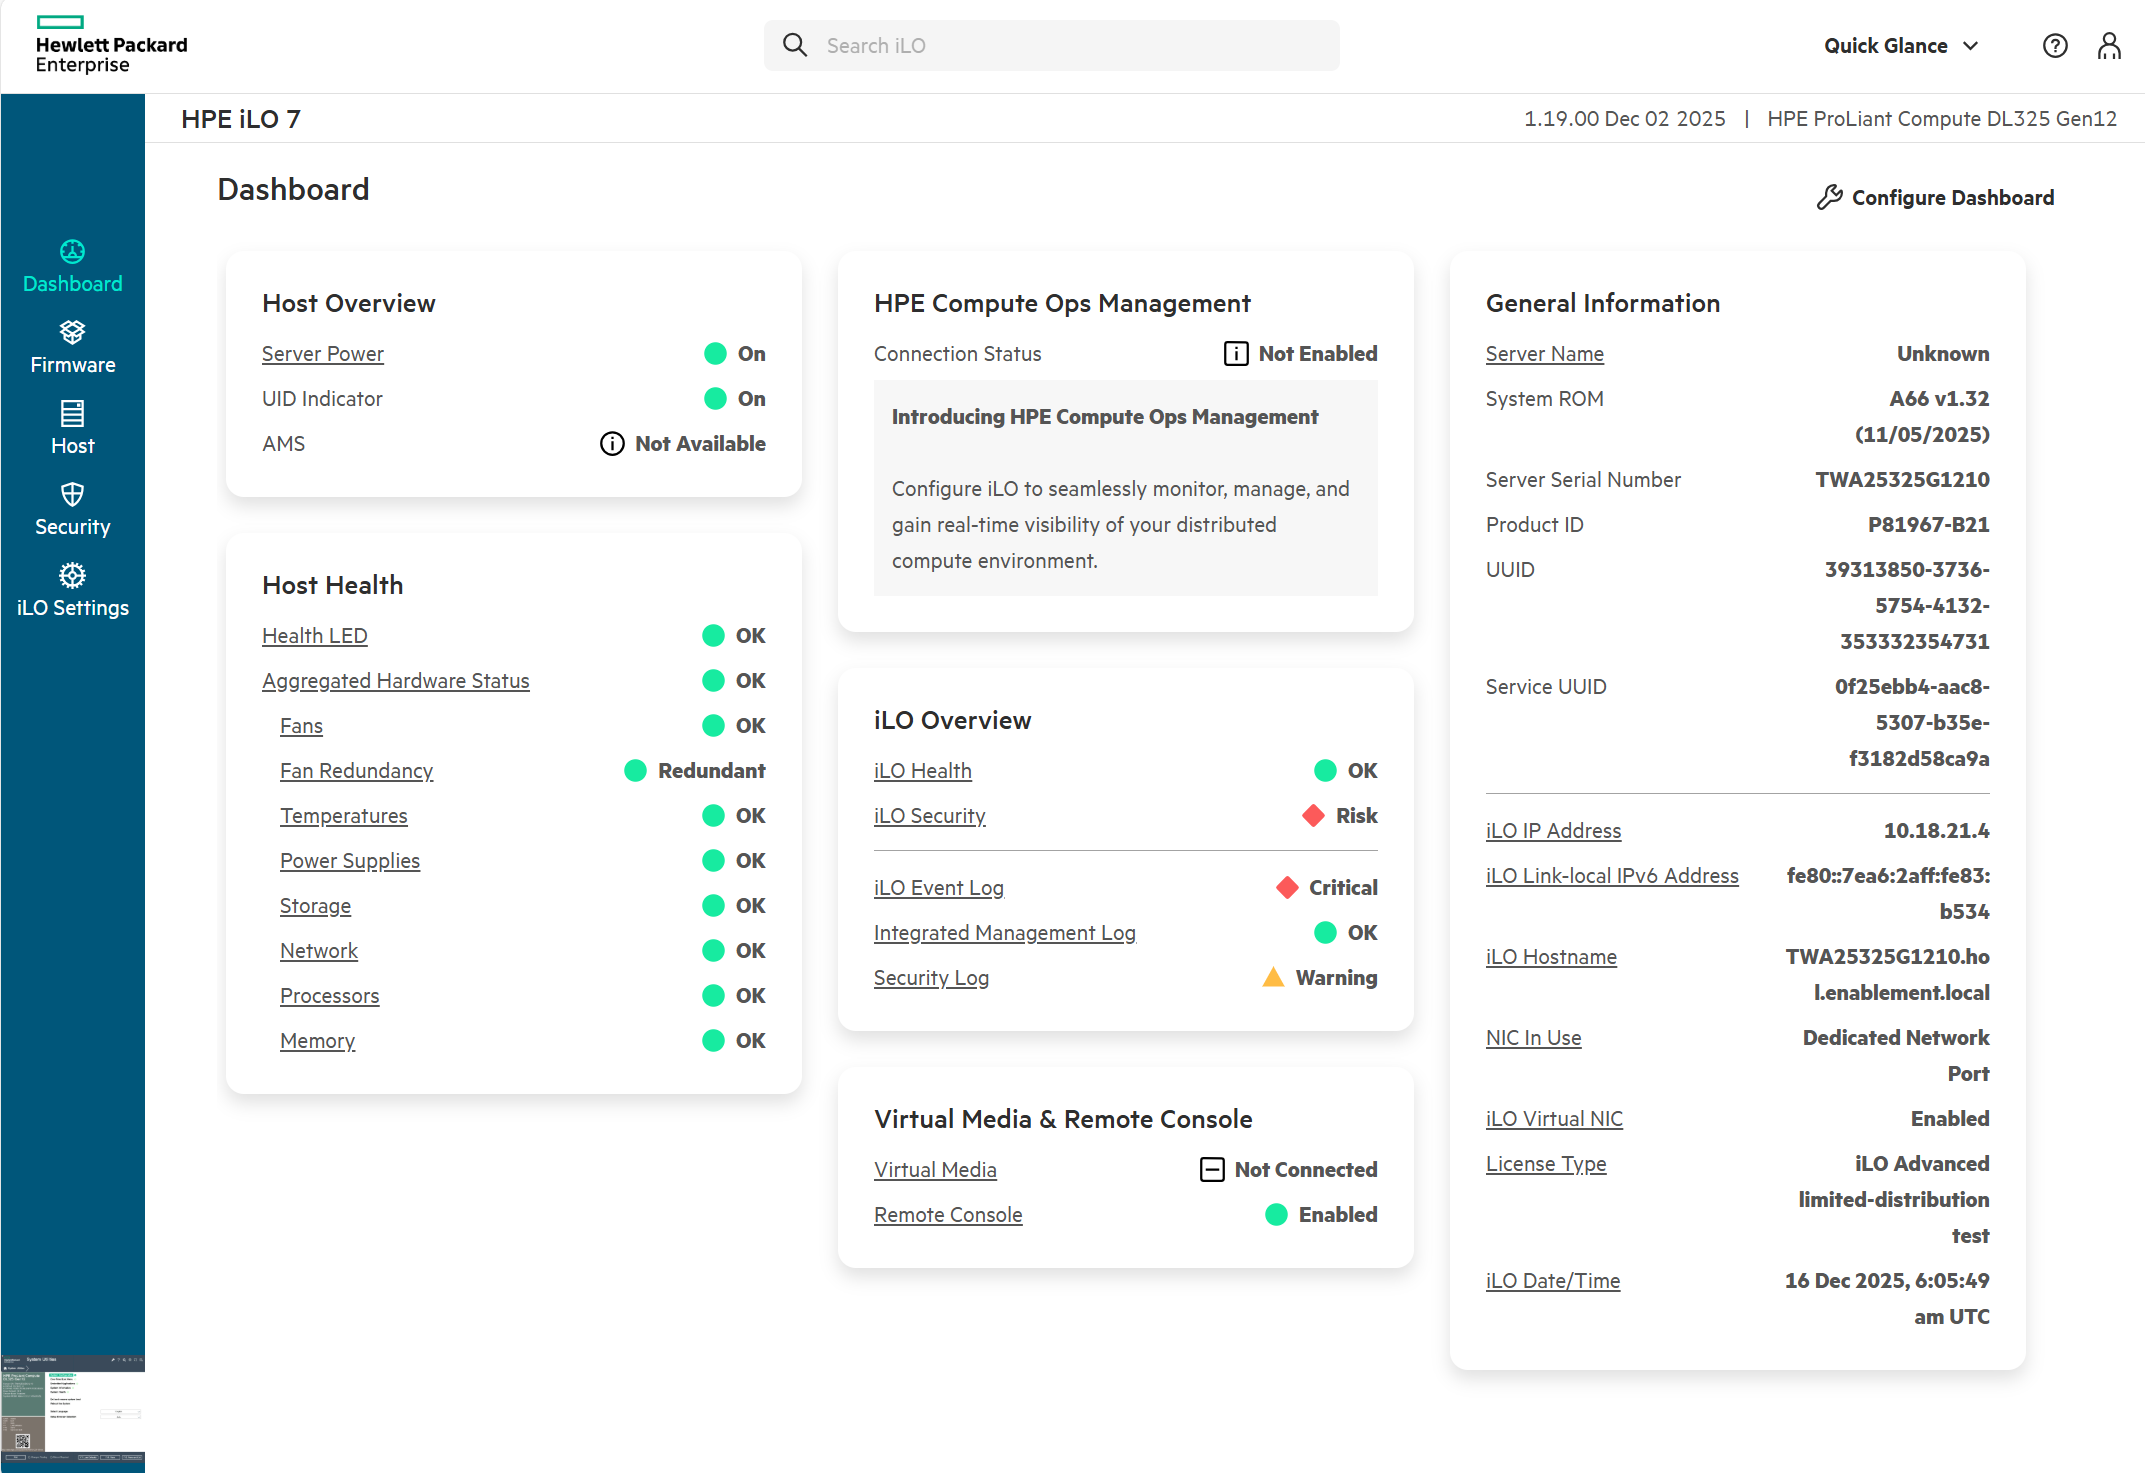
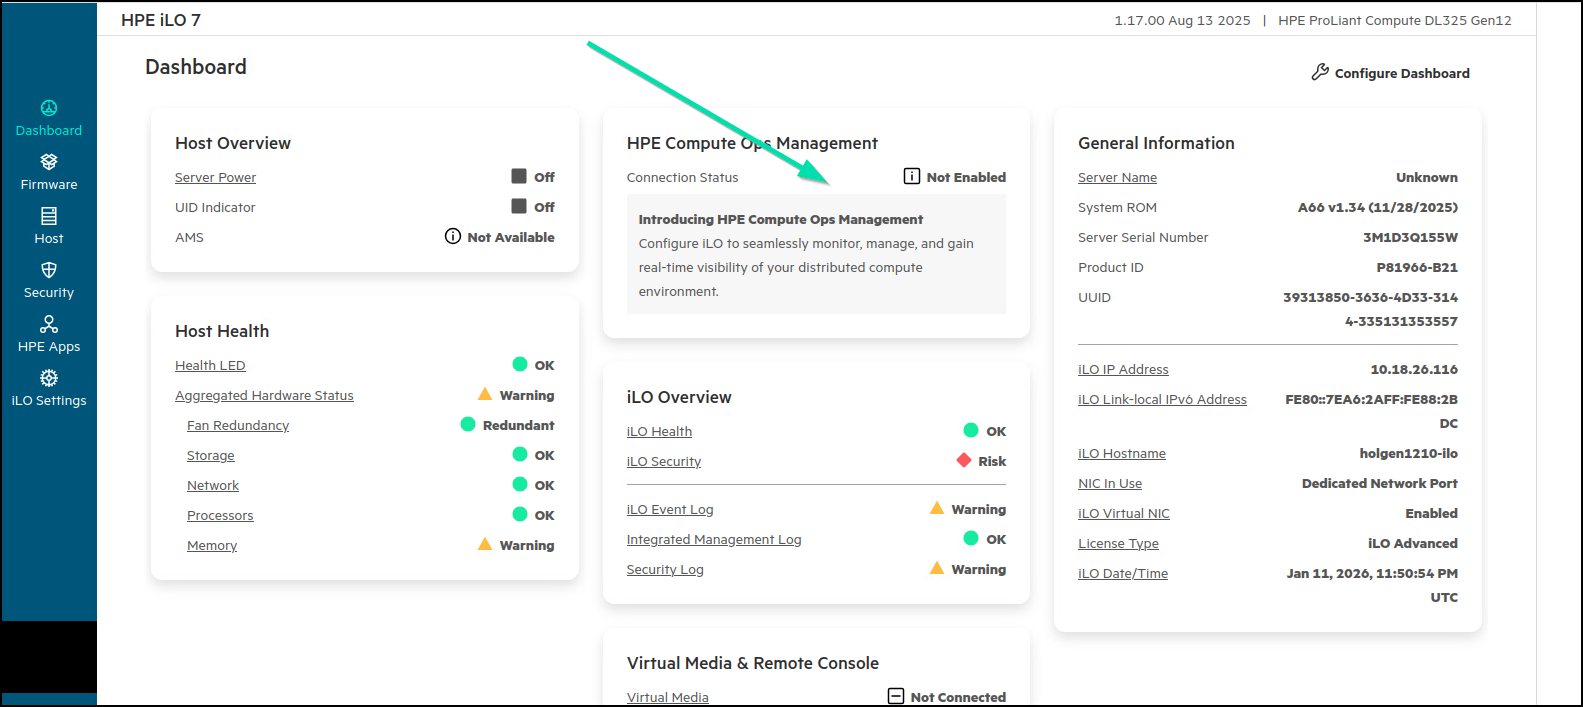
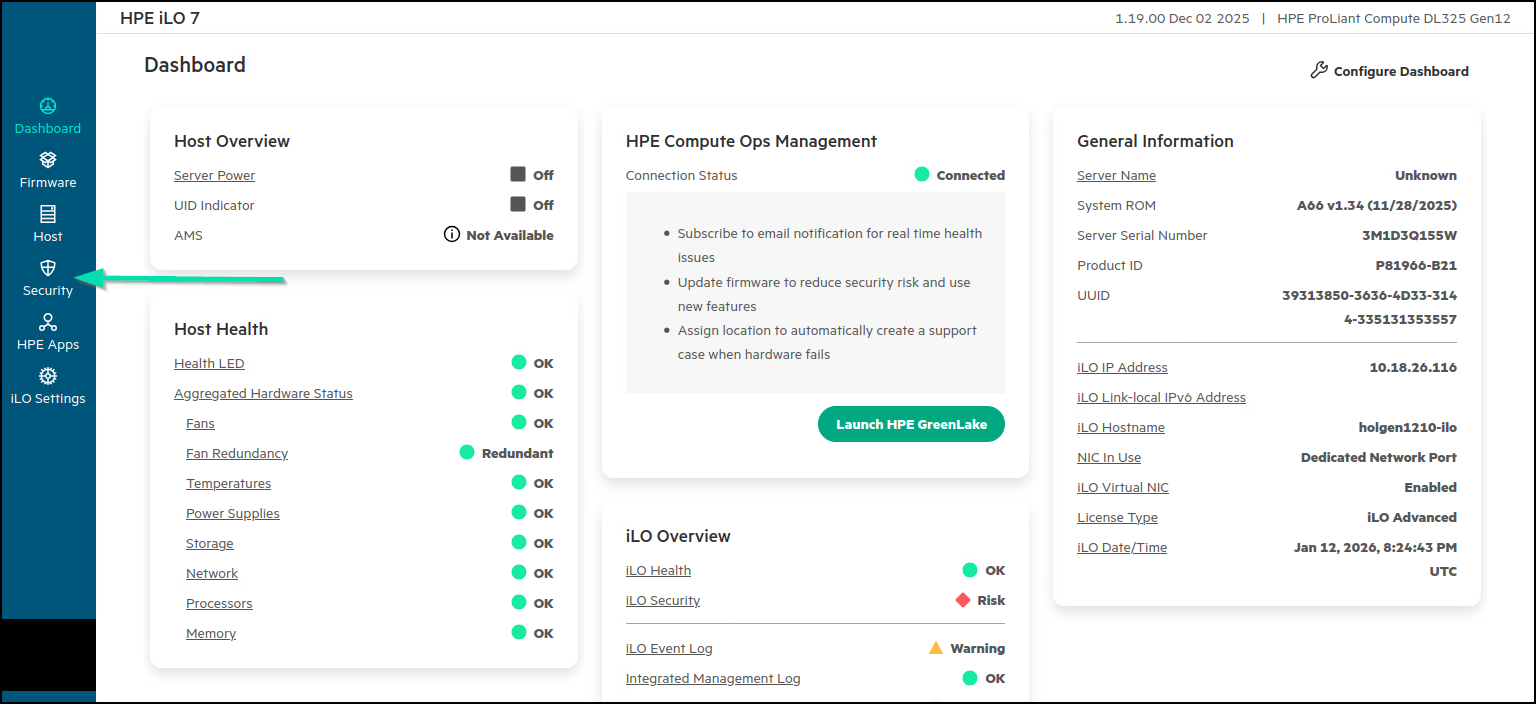
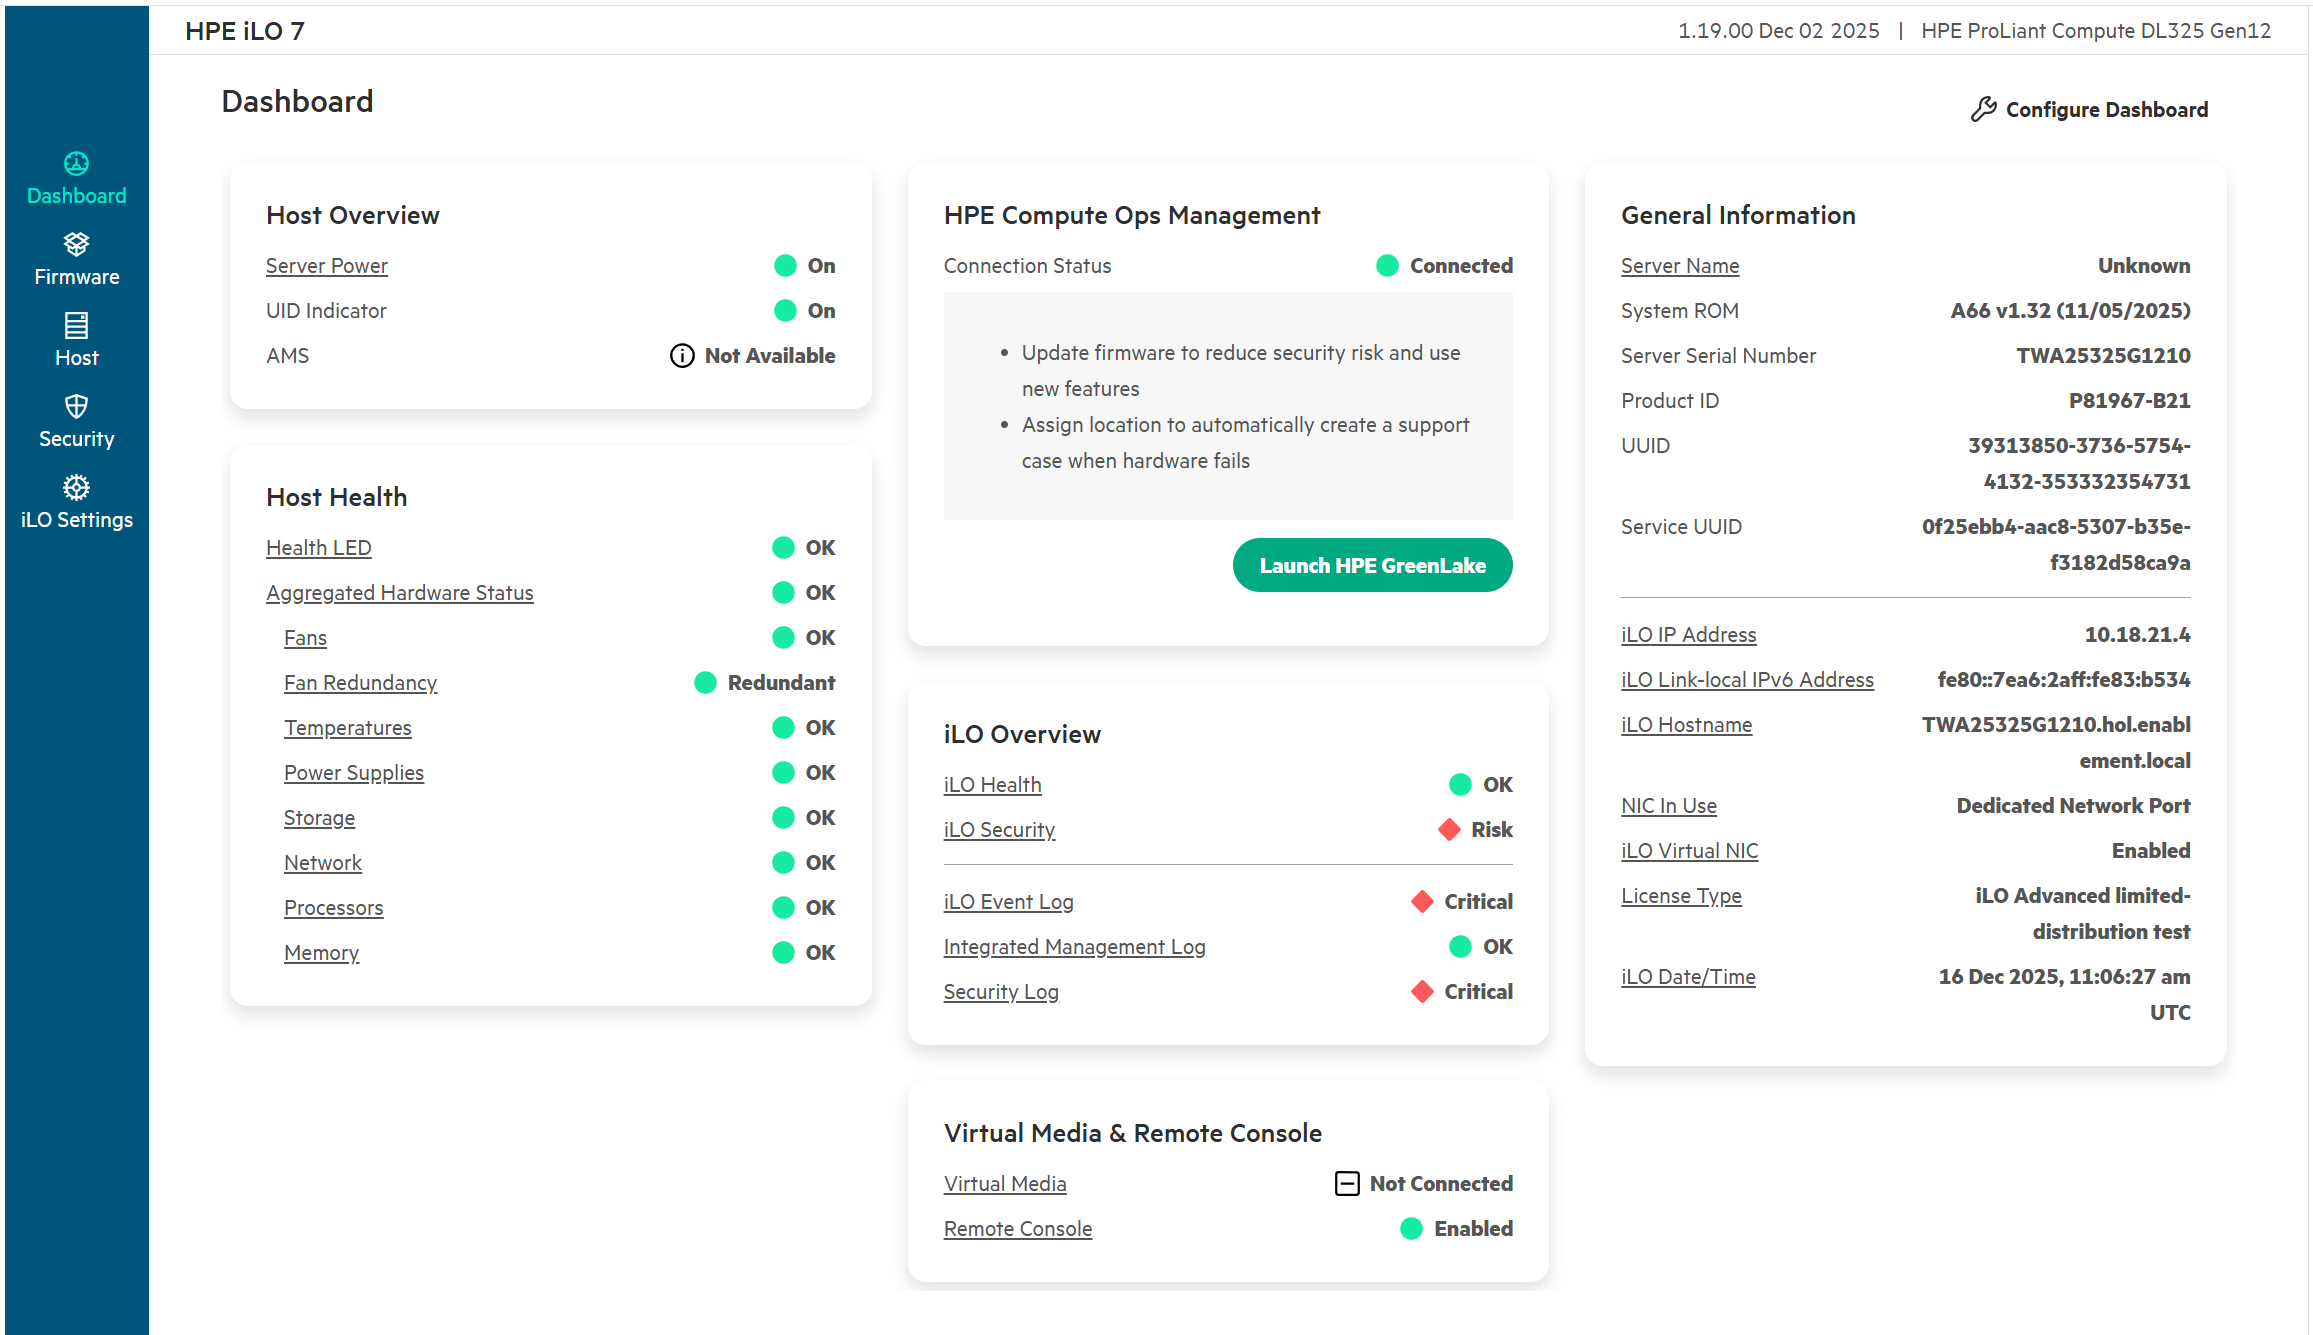
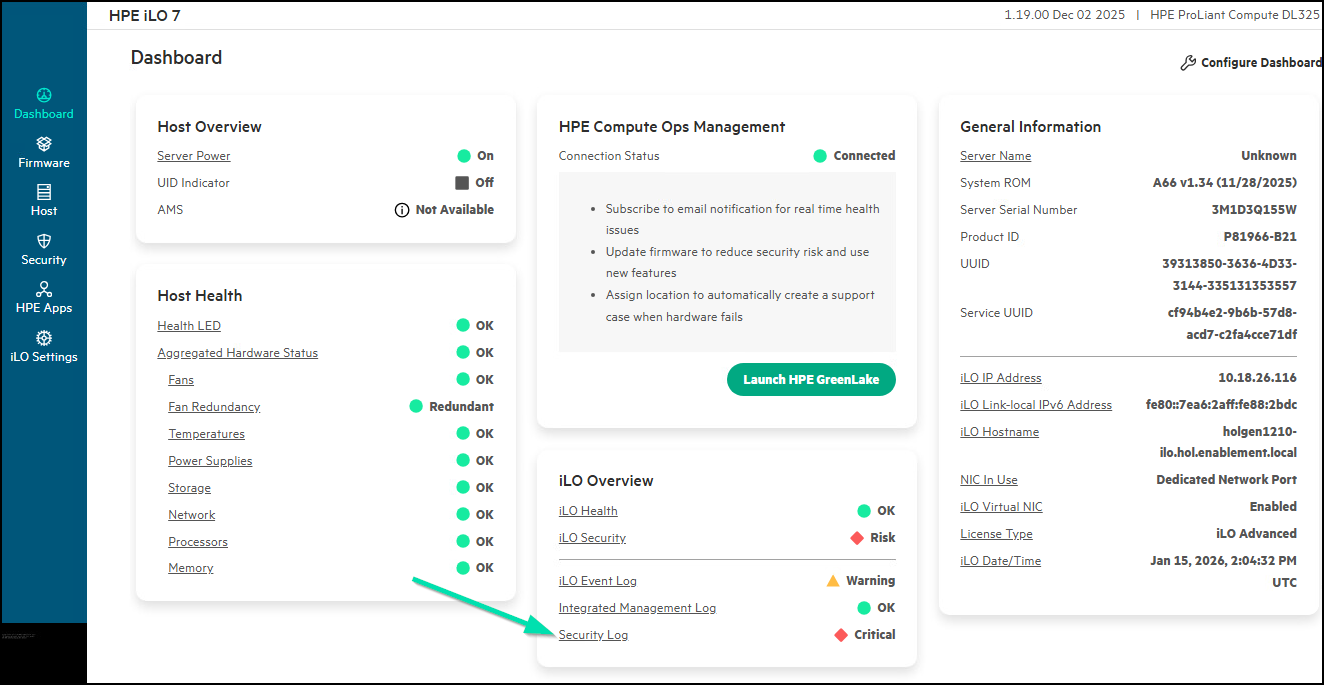
Administrators are presented with valuable information about their server on the Dashboard. The Host Overview and Host Health cards immediately provide relevant information as to the status of the managed system. Notice that the HPE Compute Ops Management section shows that the Connection Status has not been enabled.
This concludes this section of the lab.
Task 3 - Managing Local Users
One of the initial tasks for administrators when deploying systems in their environment is to ensure compliance with established corporate standards. This typically includes provisioning local user accounts within HPE iLO7 and configuring HPE iLO7 network settings, such as assigning static IP addresses. Administrators may also need to modify additional HPE iLO7 parameters that ship with factory‑default values to align the baseboard management controller with organizational security and operational requirements.
-
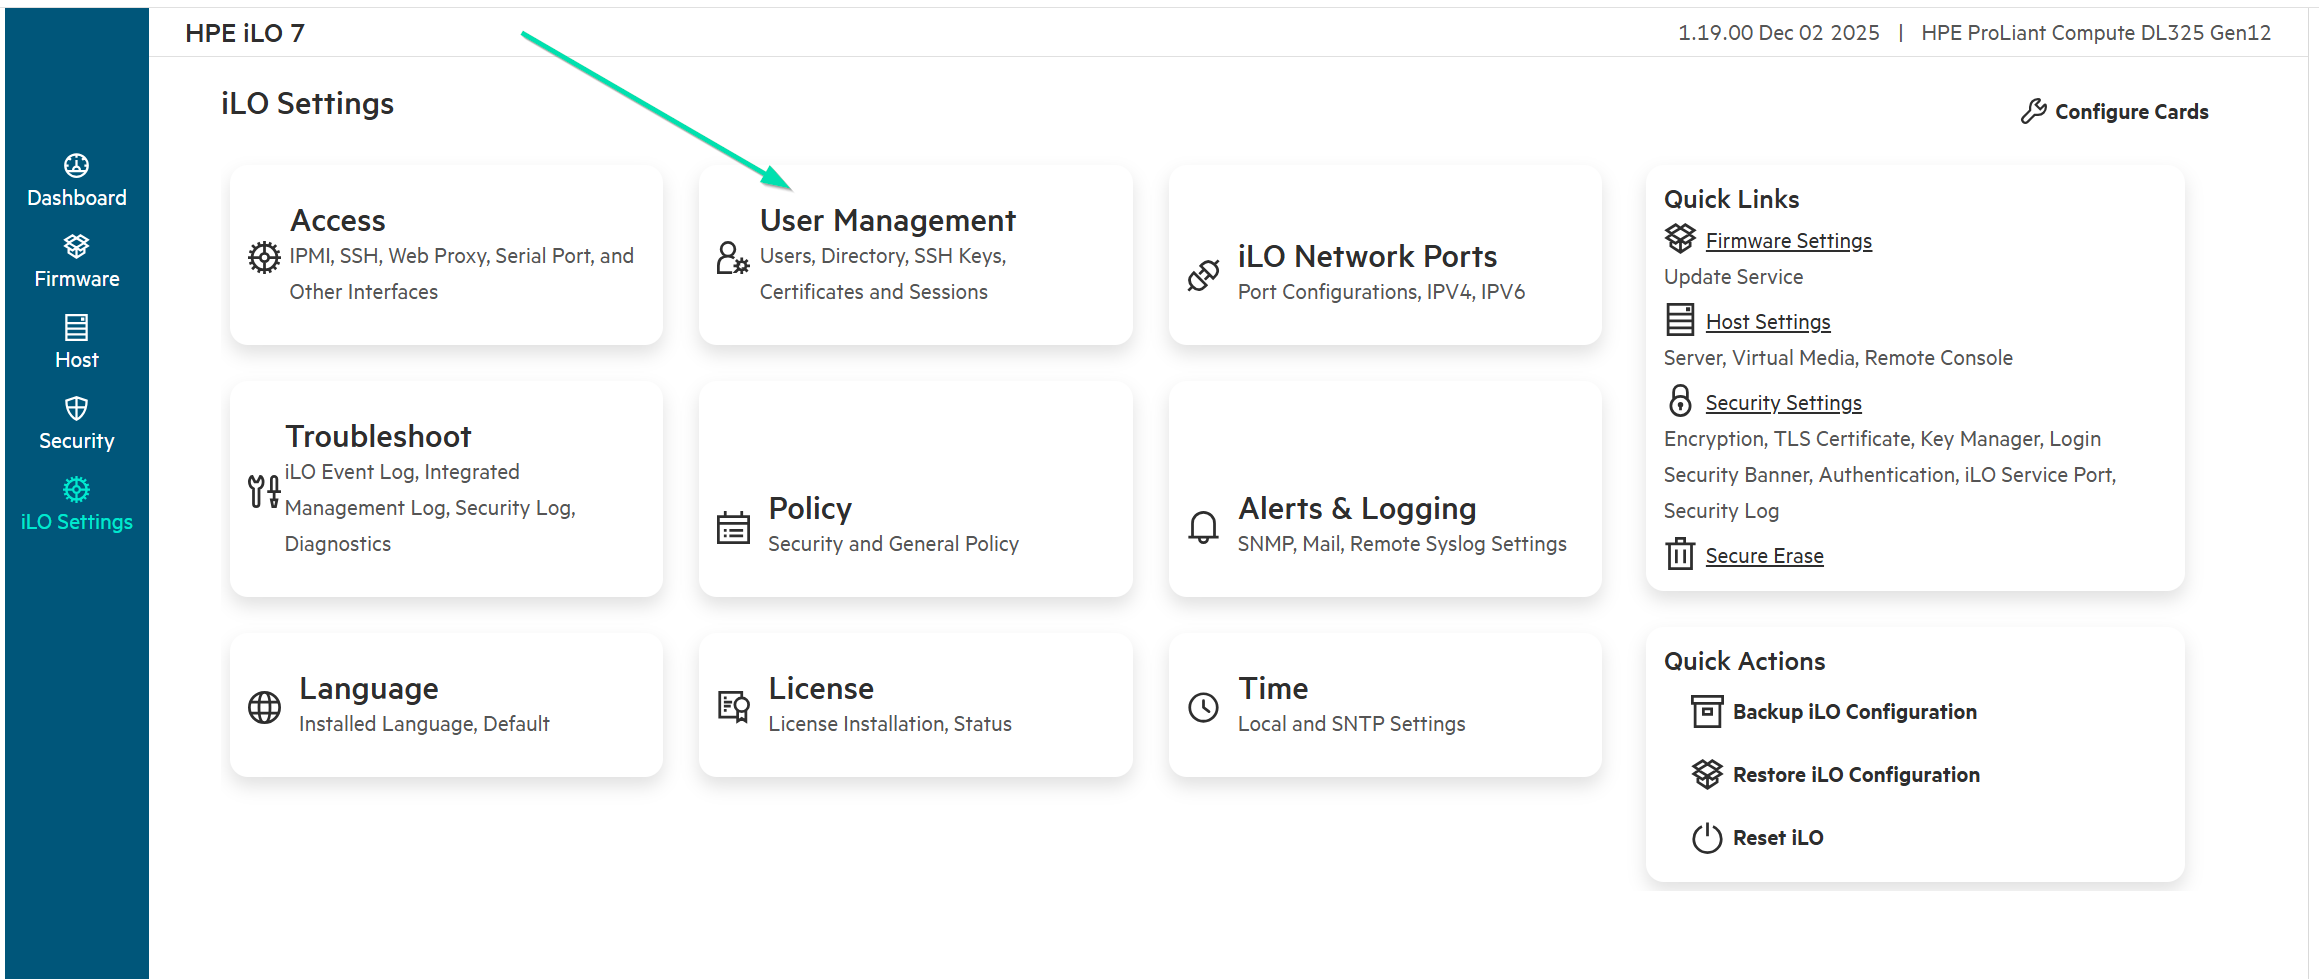
From the Dashboard screen.

-
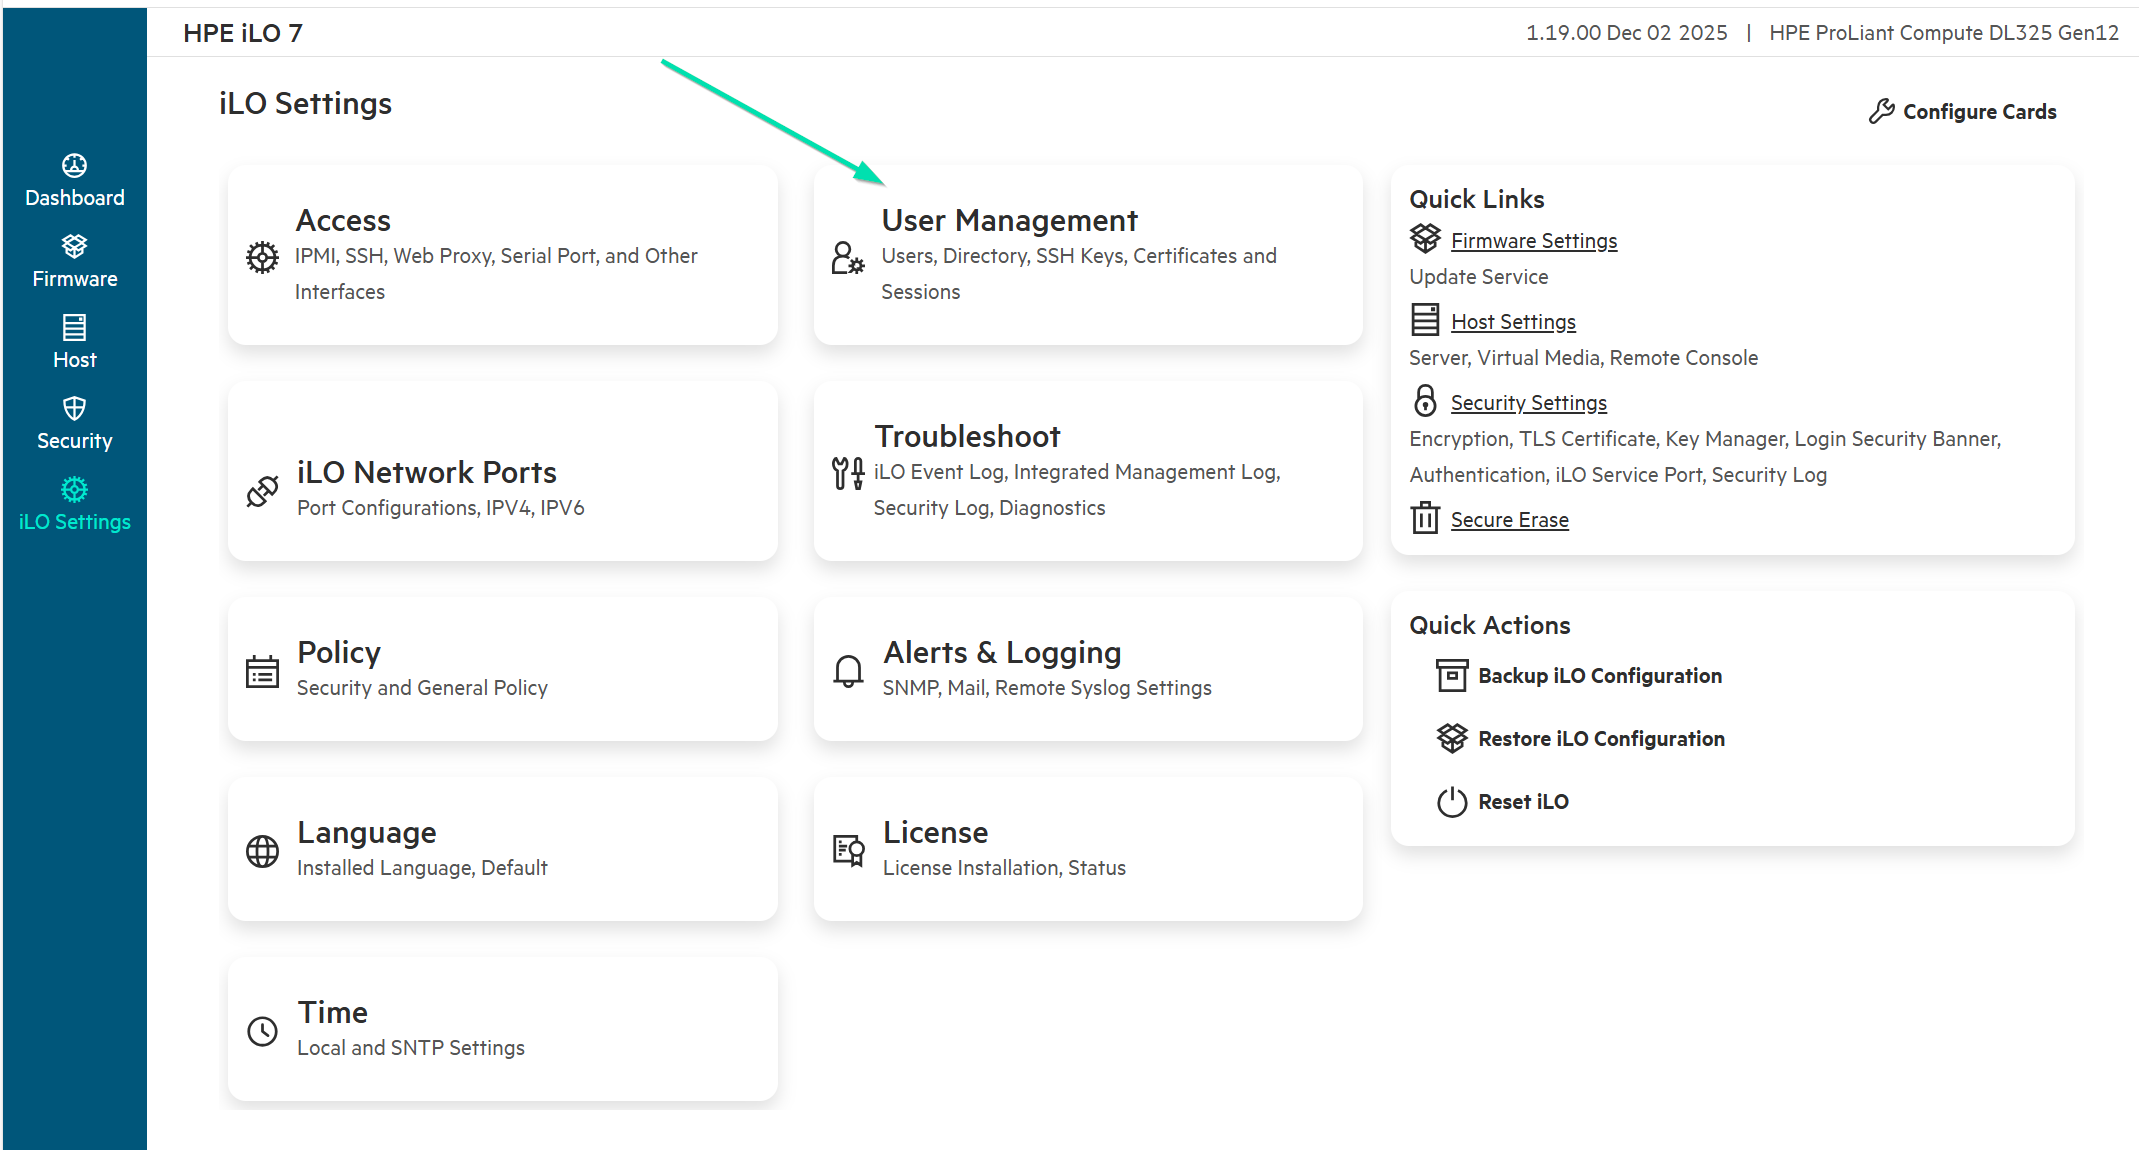
In the left-hand navigation pane, click iLO Settings.
-
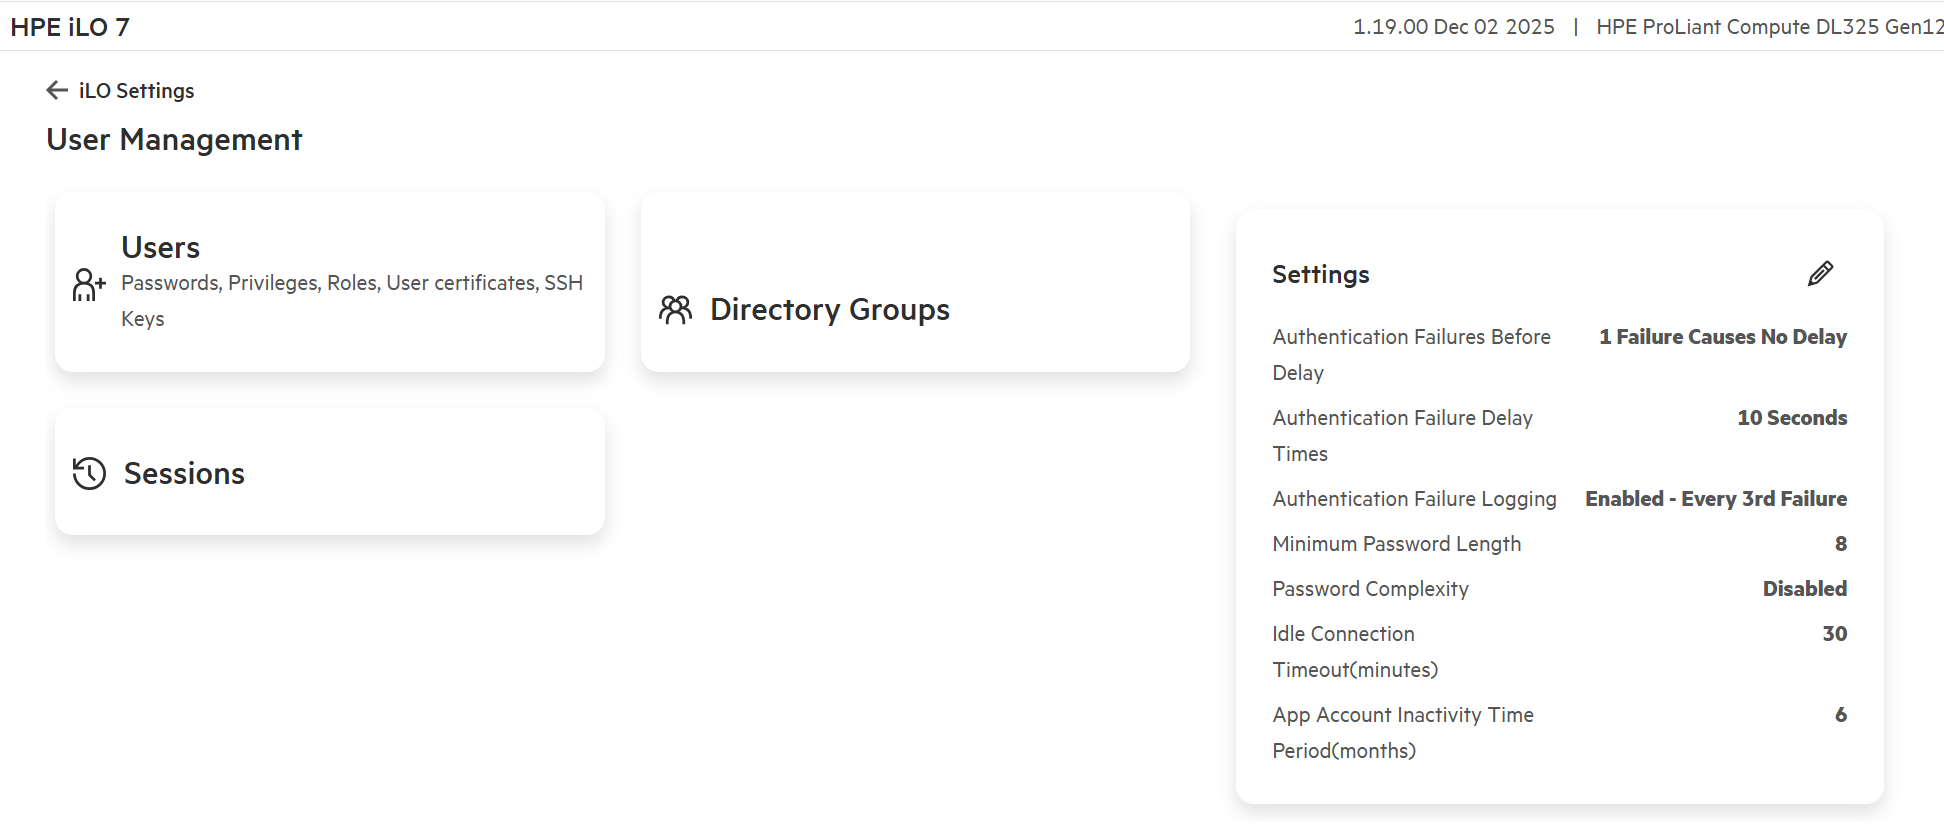
Now click on User Management.
-
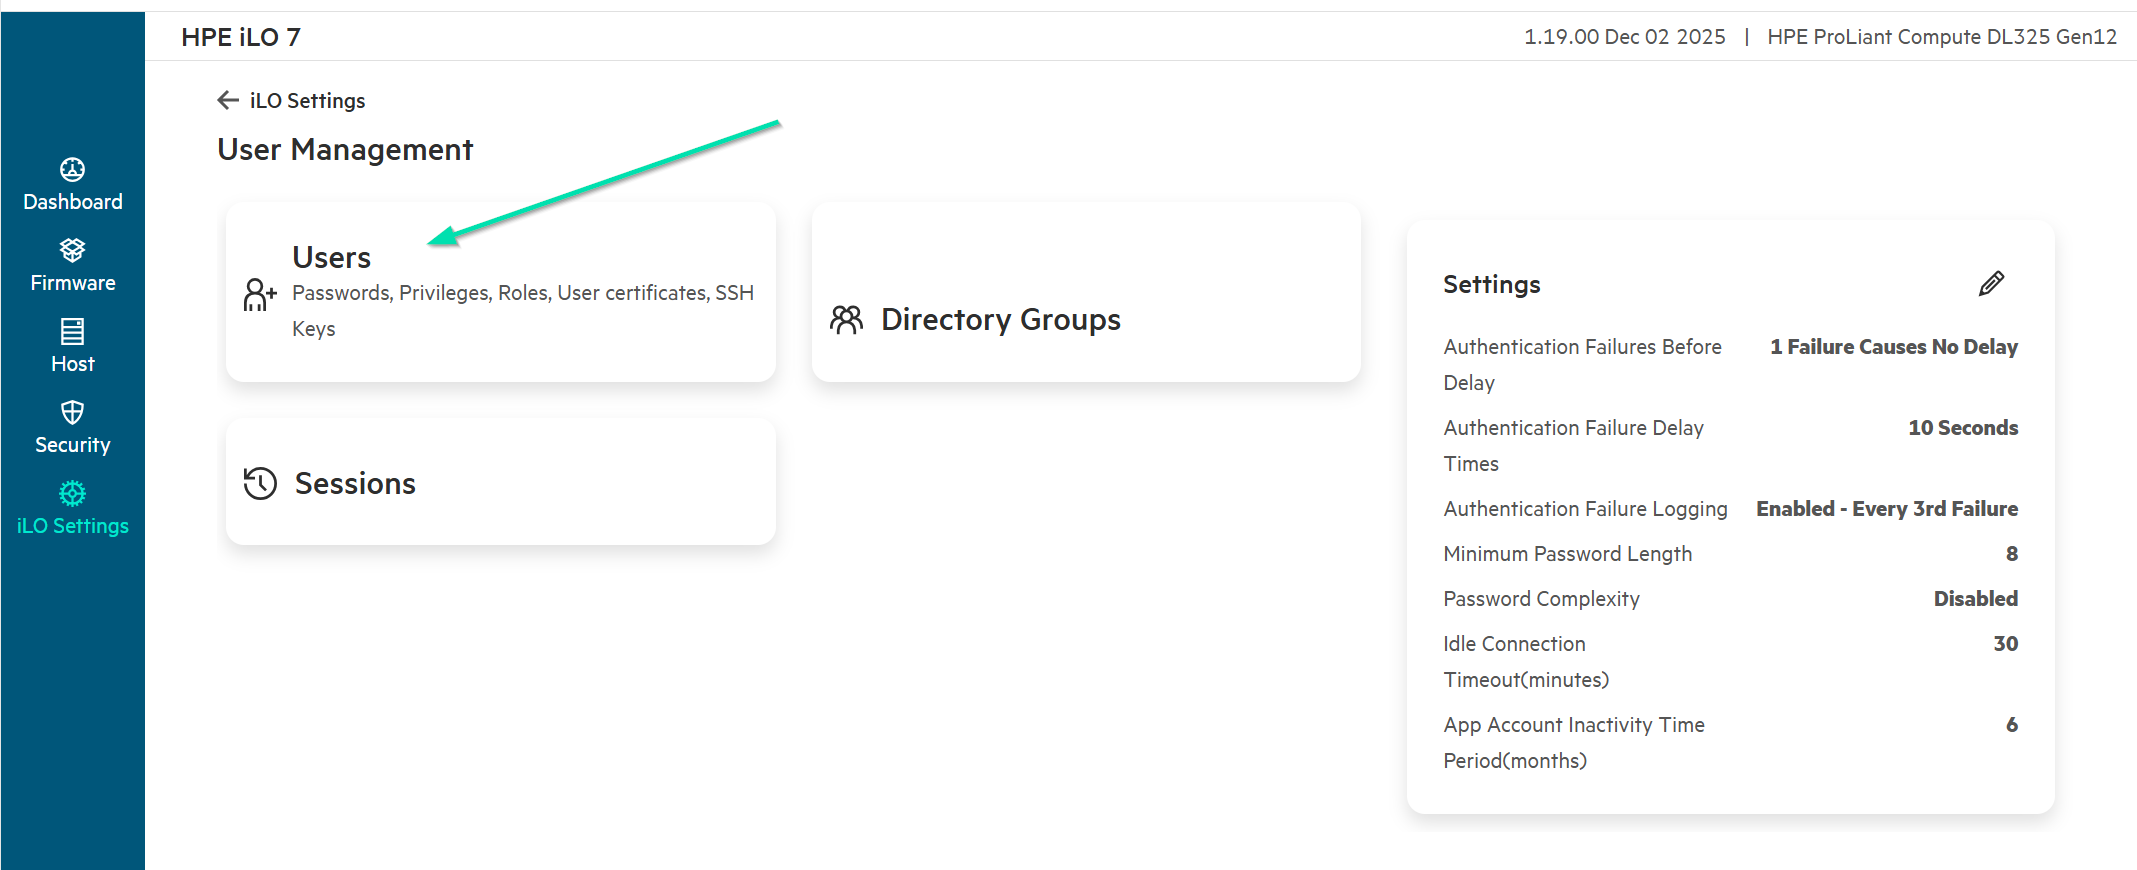
Click on Users.
-
For the purposes of this lab, we will leave the Administrator account with the default toe-tag password and set up another administrative user account to access the HPE iLO7.
-
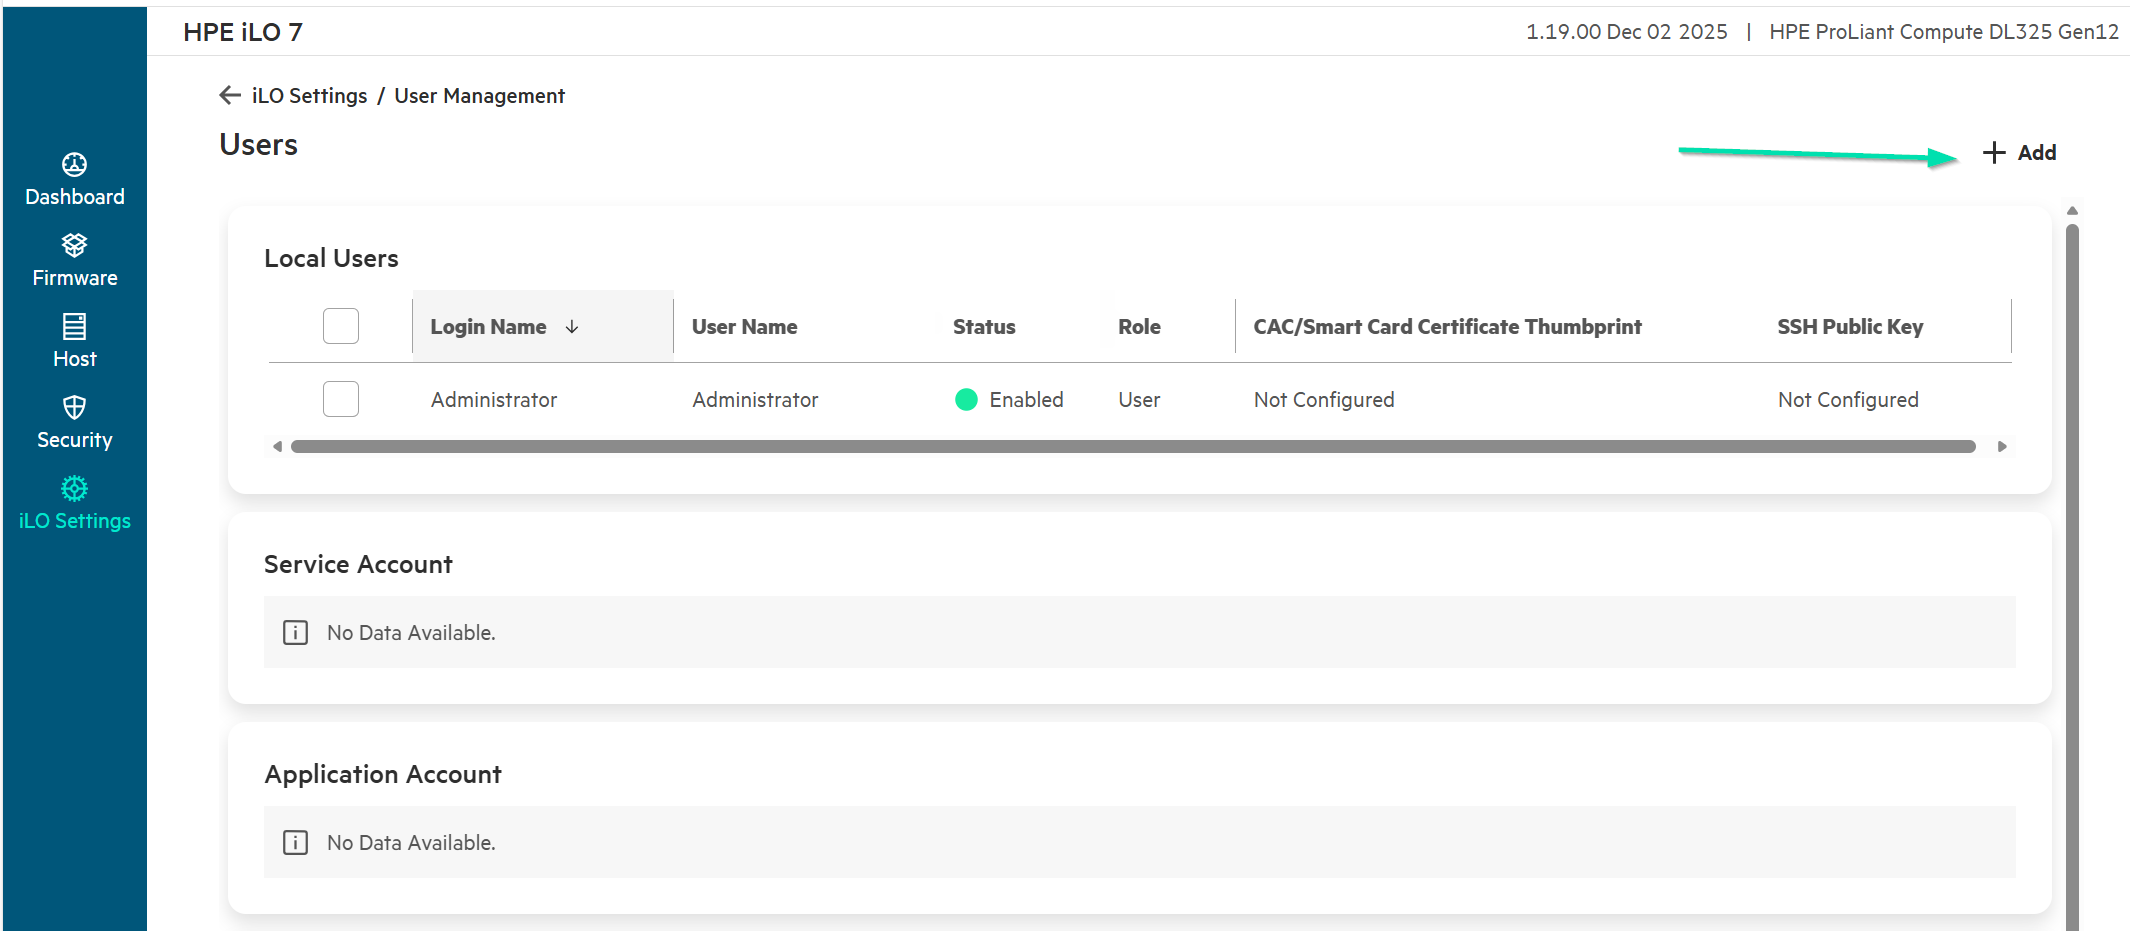
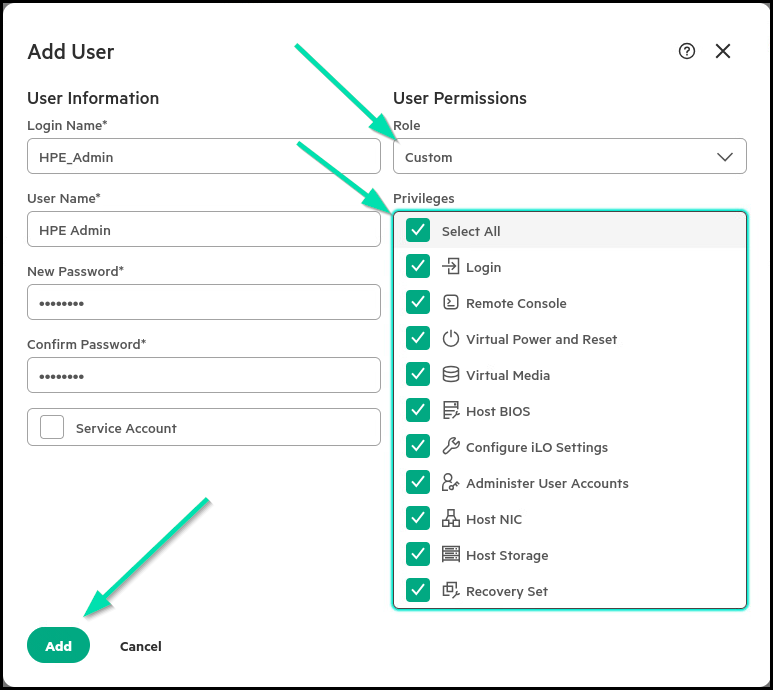
In the upper right card of the Local Users frame, click + Add and enter the following settings to create your new user account.
User Information Login Name HPE_Admin User Name HPE Admin New Password hpent123 Confirm Password hpent123 User Permissions Role Custom Privileges Select All -
Click on Add to save the new account.
-
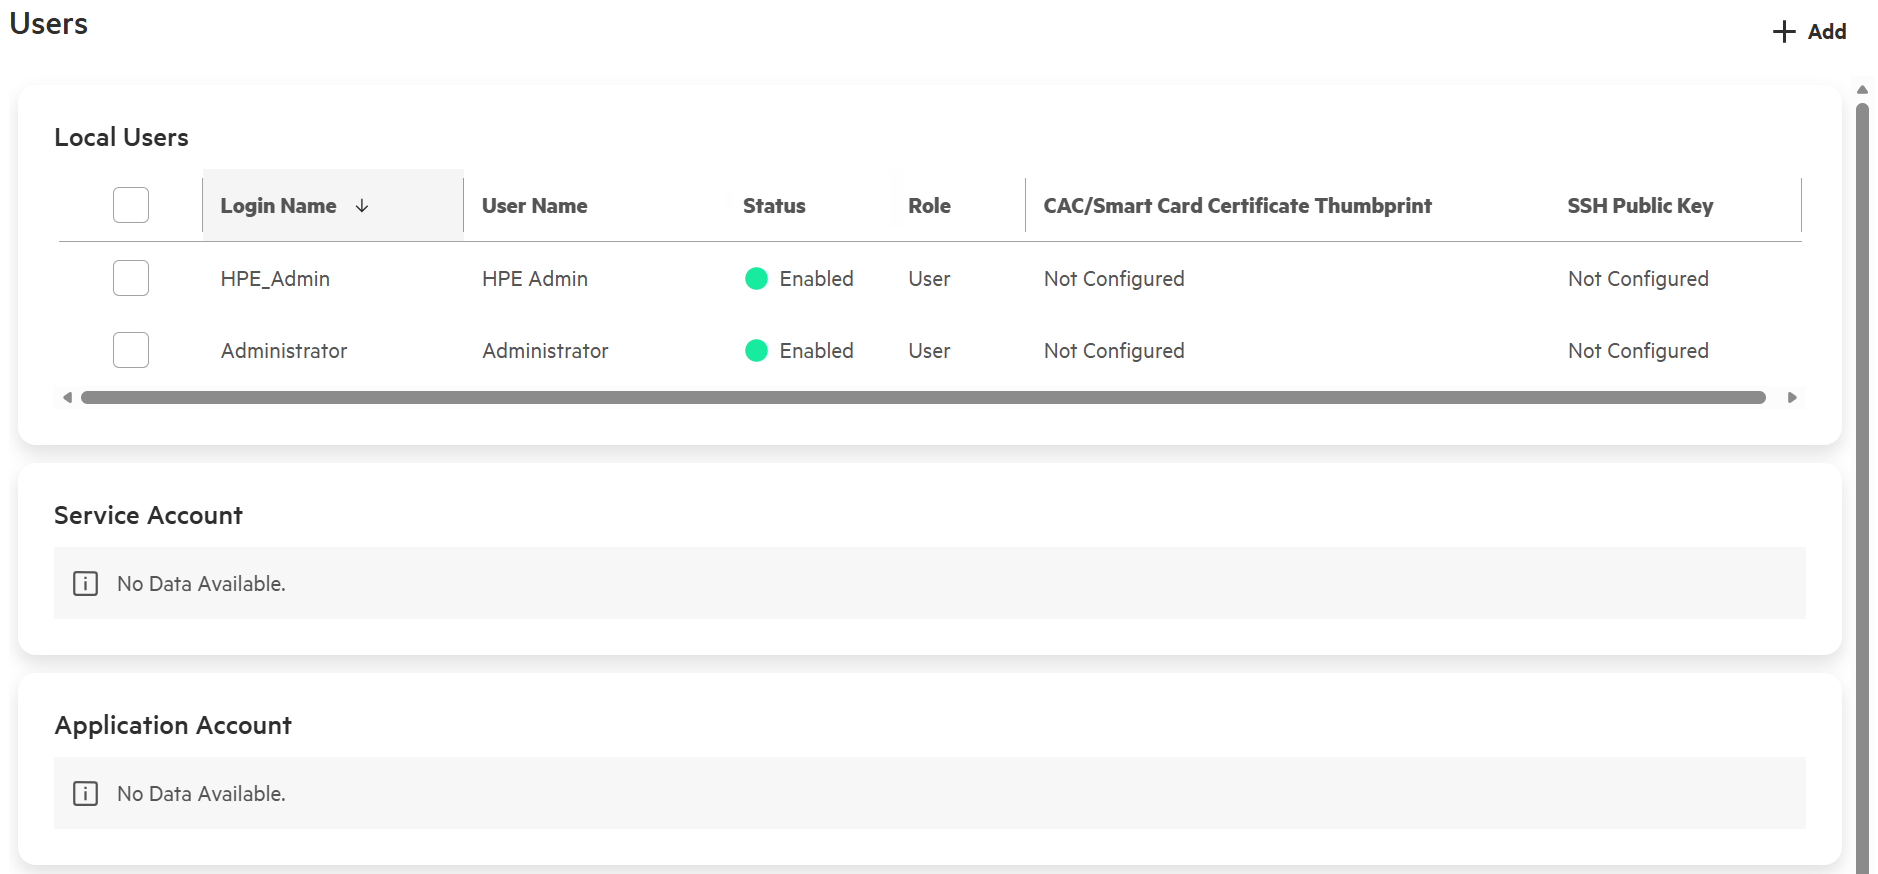
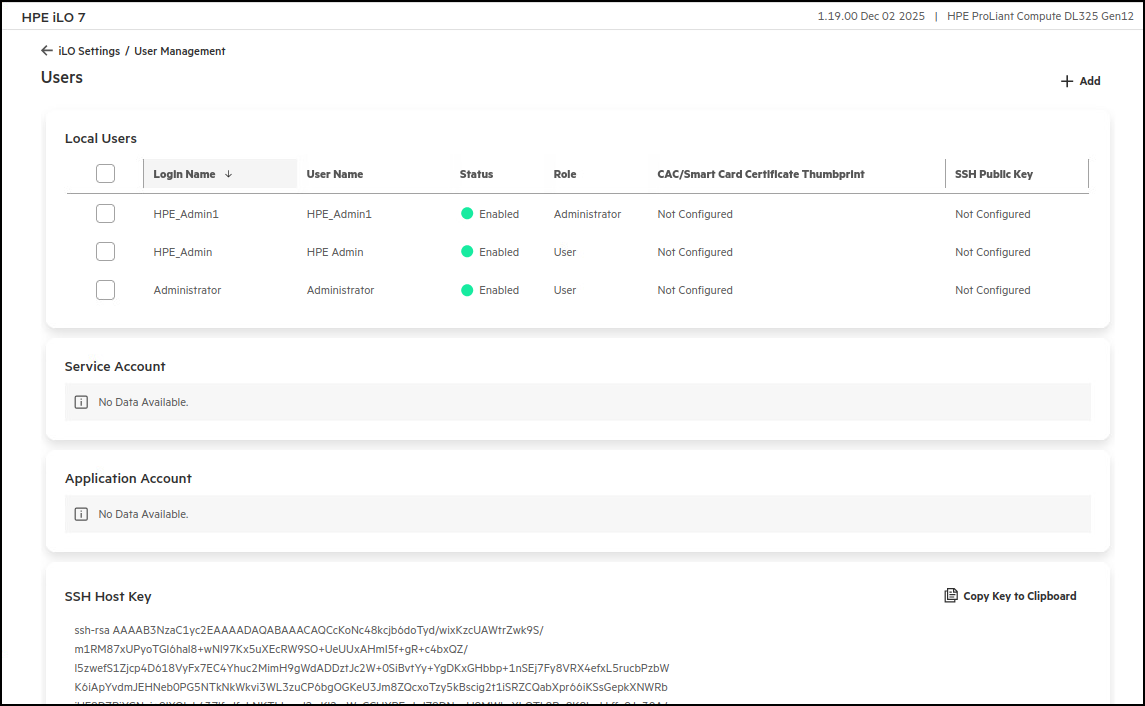
You should now see that the new user has been added to the Local Users list.
-
Logout and then log back in with your newly created user.
-
Take Note – You have just created a fully privileged Administrator account with a very simple password. We will circle back on this in a later part of the Lab.
-
Return to the User Management section in iLO Settings and Click on Directory Groups.
-
The Directory Groups section is where administrators can enter up to six directory groups using Kerberos authentication and schema-free directory integration.
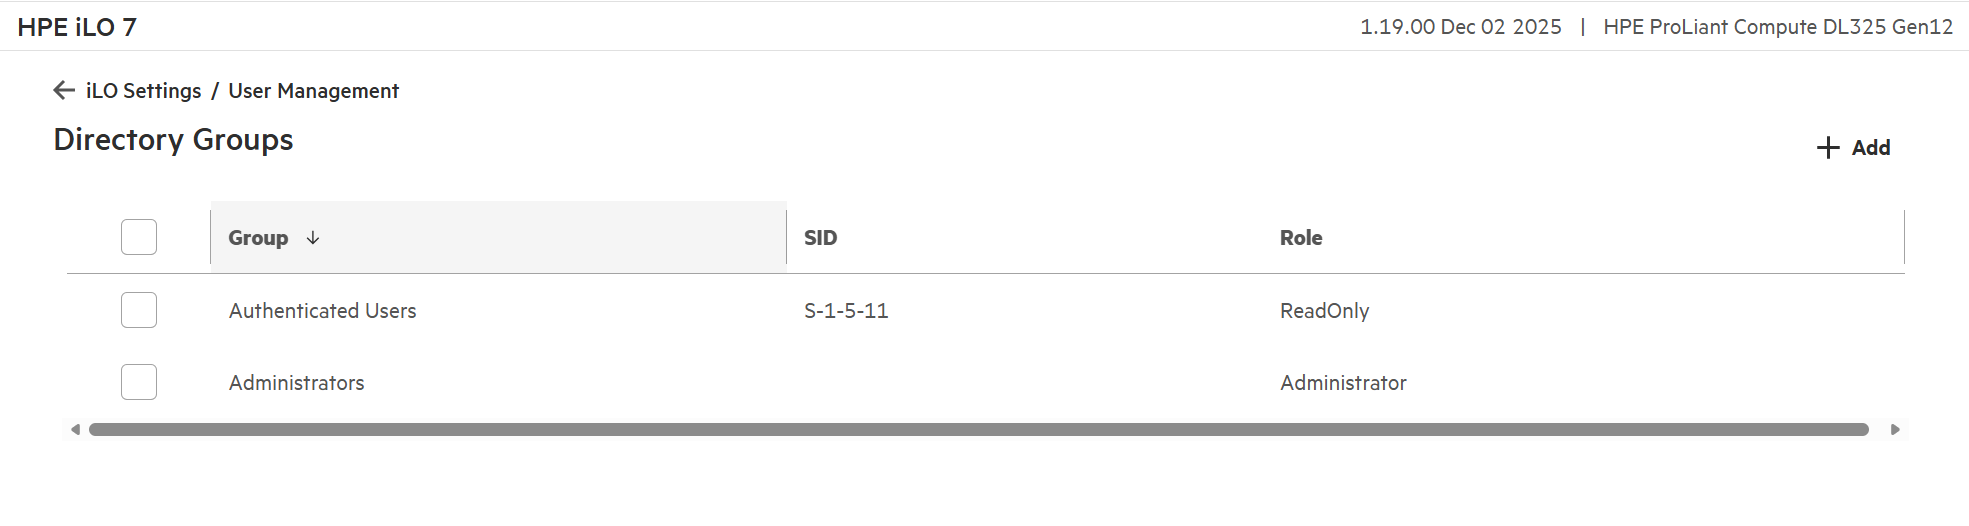
More information can be found in the HPE iLO7 User Guide at the HPE Support Center. https://support.hpe.com/hpesc/public/docDisplay?docId=sd00005342en_us&docLocale=en_US - Search “Kerberos authentication” as an example and you will see the process detailed in one of the search results.
This concludes this section of the lab.
Task 4 - Firmware Verification
The Firmware Verification feature allows you to run an on-demand scan or implement scheduled scans. To respond to detected issues, you can configure HPE iLO7 to:
-
Log the results.
-
Log the results and initiate a repair action that uses a recovery install set.
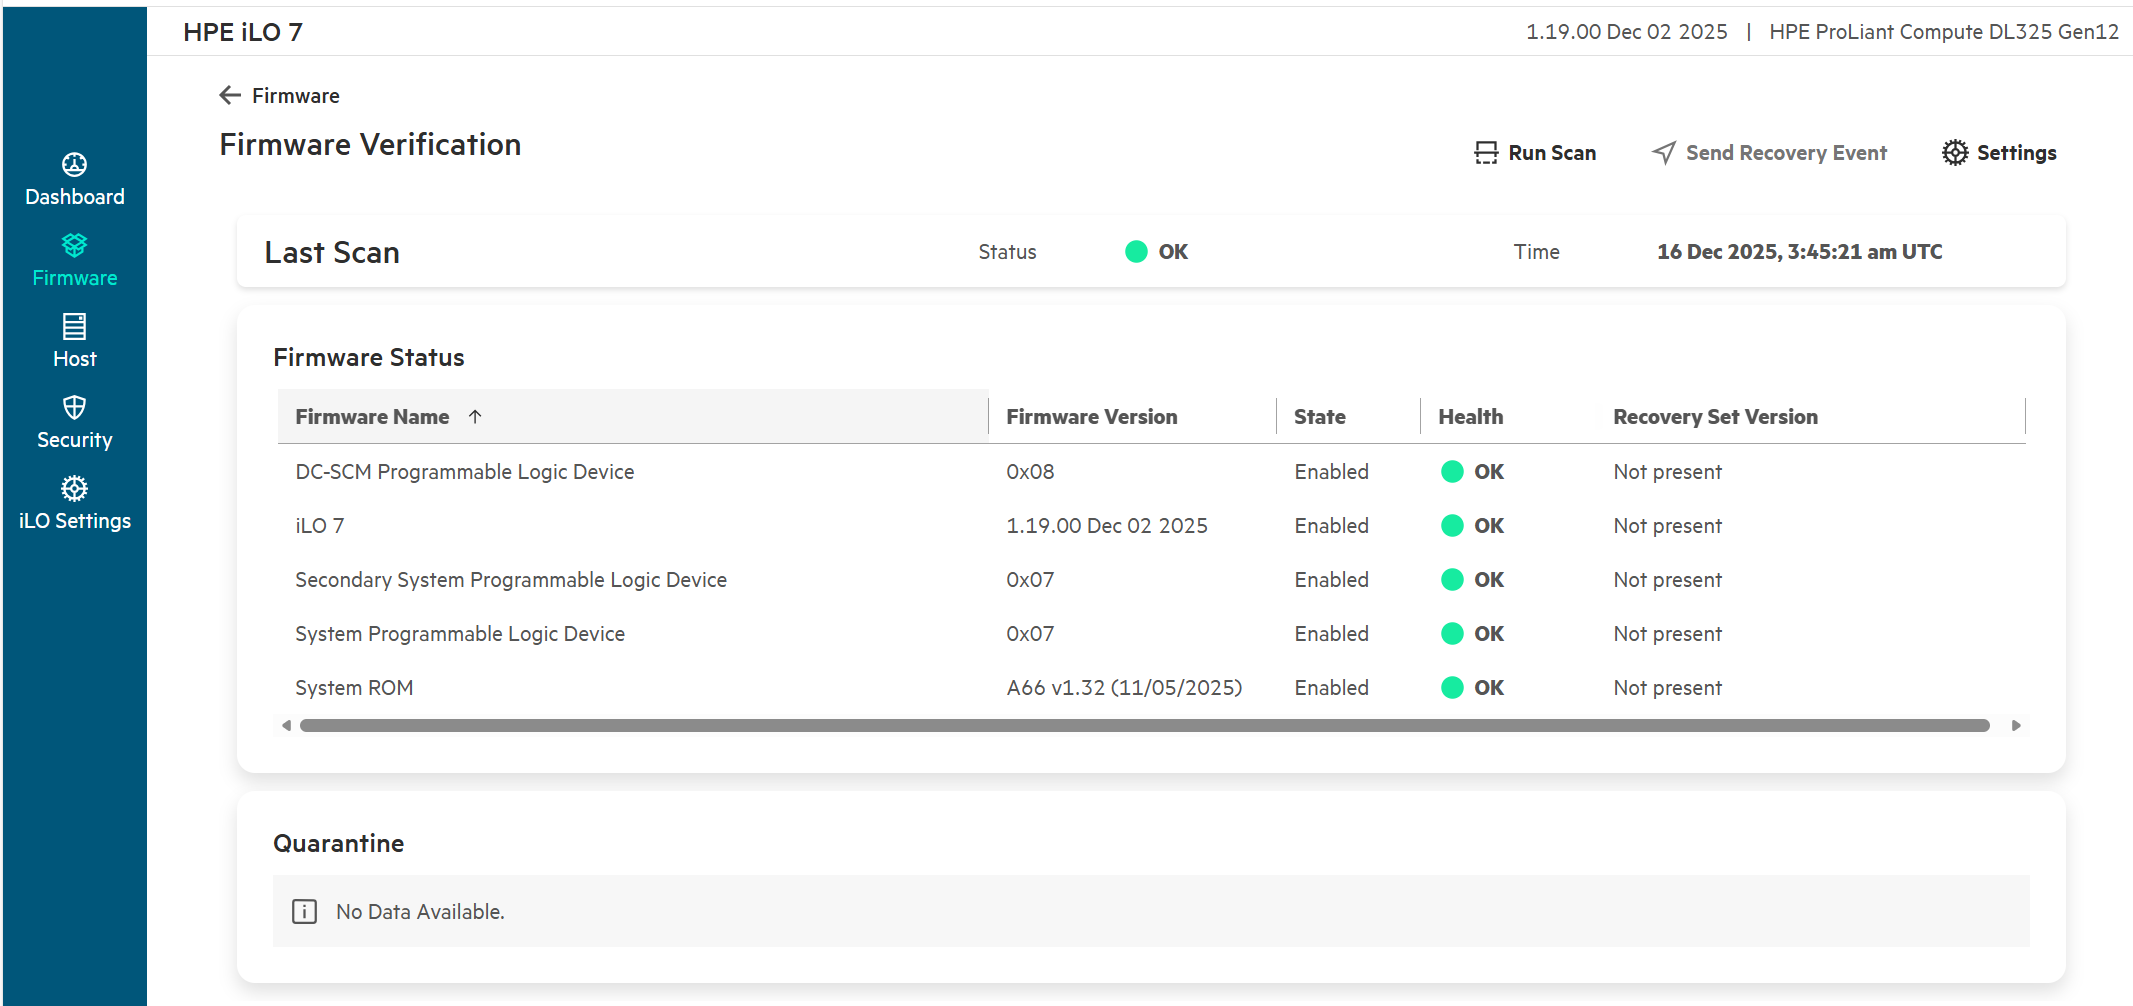
Depending on the scan results, information is logged in the Active Health System Log and the Integrated Management Log. The following firmware types are supported:
-
HPE iLO7 Firmware
-
System ROM (BIOS)
-
System Programmable Logic Device (CPLD)
When a firmware verification scan is in progress, HPE recommends not installing firmware updates or uploading firmware to the iLO Repository during this process. If an invalid iLO or System ROM (BIOS) firmware file is detected, the invalid file is saved to a quarantine card in the HPE iLO7’s Repository. You can download the invalid file to investigate its type and origin. Quarantined images are not displayed on the iLO Repository page, and you cannot select them when you use the Flash Firmware feature.
-
Click on the Firmware link to explore the HPE iLO7 capability to manually scan the system firmware and to check the validity and health of the firmware components.
-
Click on the Firmware Verification card.
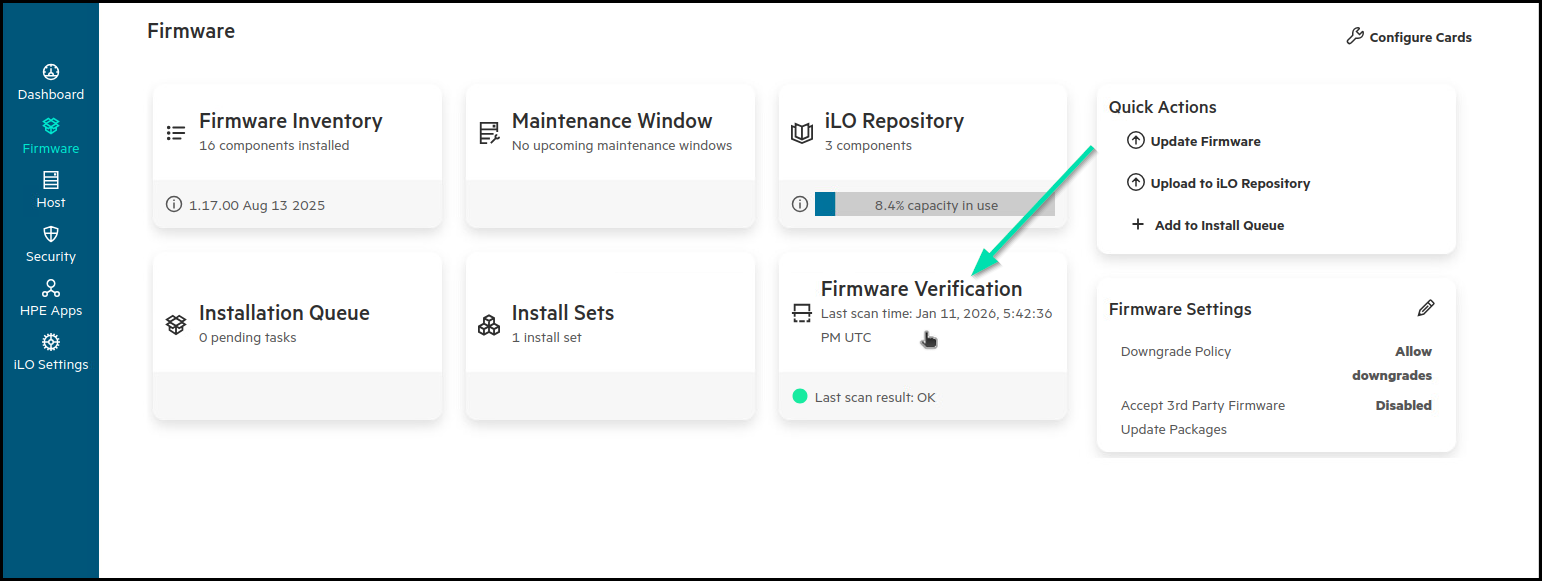
-
This screen may show results of previous scans.
-
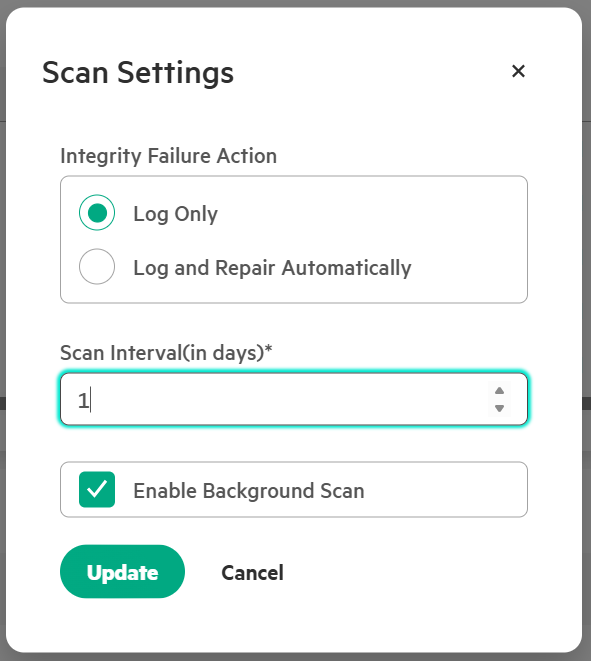
Click Settings and Enable Background Scan with an Integrity Failure Action of Log Only. The default setting is 7 days, but for this lab, change the Scan Interval to 1.
-
Click Update to save the scan settings. You should see that the scan settings have been saved successfully.
-
Click Run Scan to trigger a runtime firmware verification of the component firmware, to ensure validity. This scan is performed by the HPE iLO7 processor and does not consume clock cycles from the server’s CPUs. This action can be called from the API or a language binding like HPE iLO7 REST Utility or PowerShell.
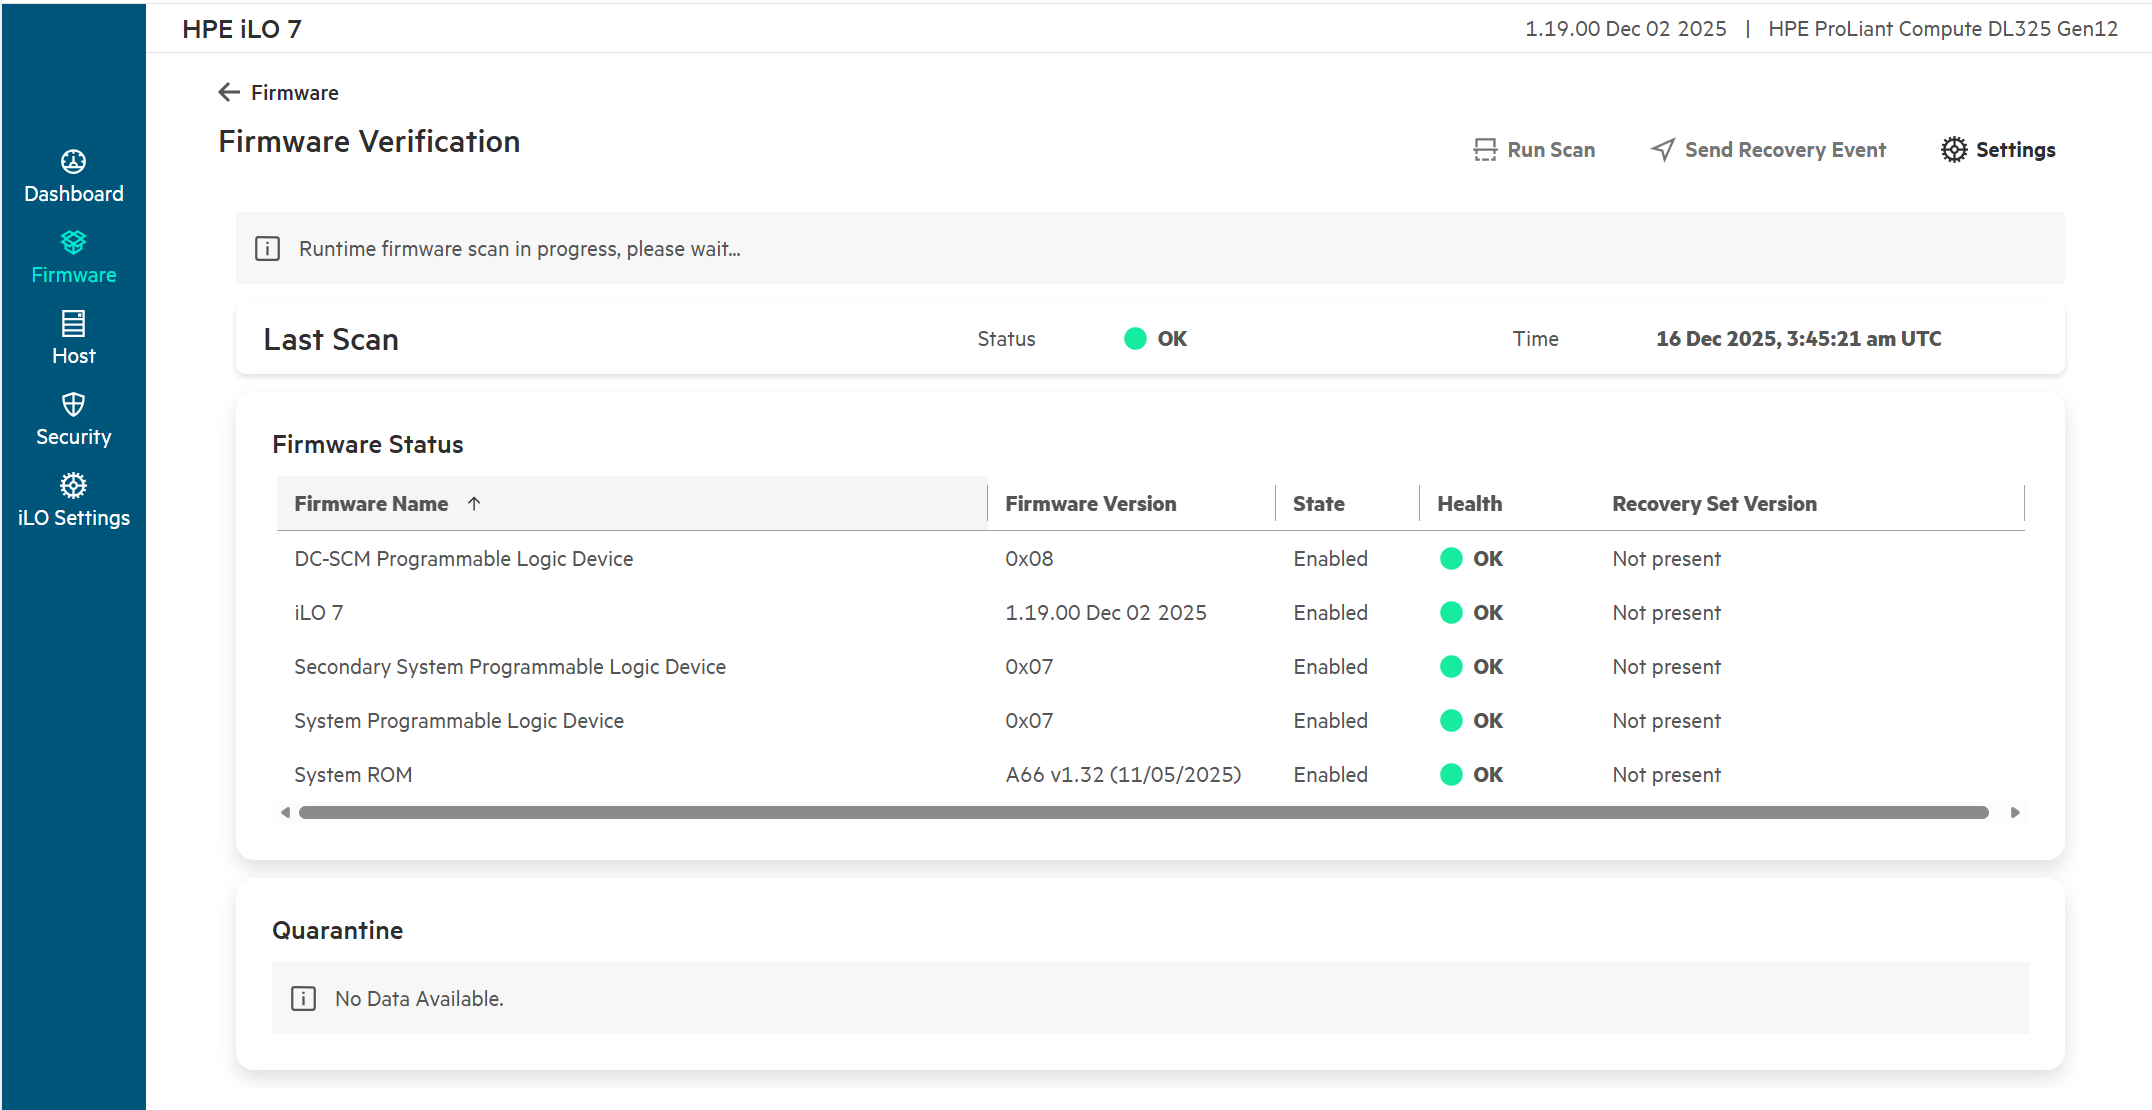
-
Return to the HPE iLO7 Dashboard screen.
This concludes this section of the lab.
Task 5 - Applying a Web Proxy configuration
HPE iLO7 enables organizations to customize security settings within the HPE iLO7, to meet their specific security and compliance requirements. This may include uploading a trusted SSL security certificate, integrating with directory services, enabling a login security banner, and modifying various other security-related parameters. For this exercise, we will configure a proxy server for HPE iLO7 to use within the environment.
-
In the left-hand navigation pane click Security.
-
Then click the Access wheel under Quick Links.
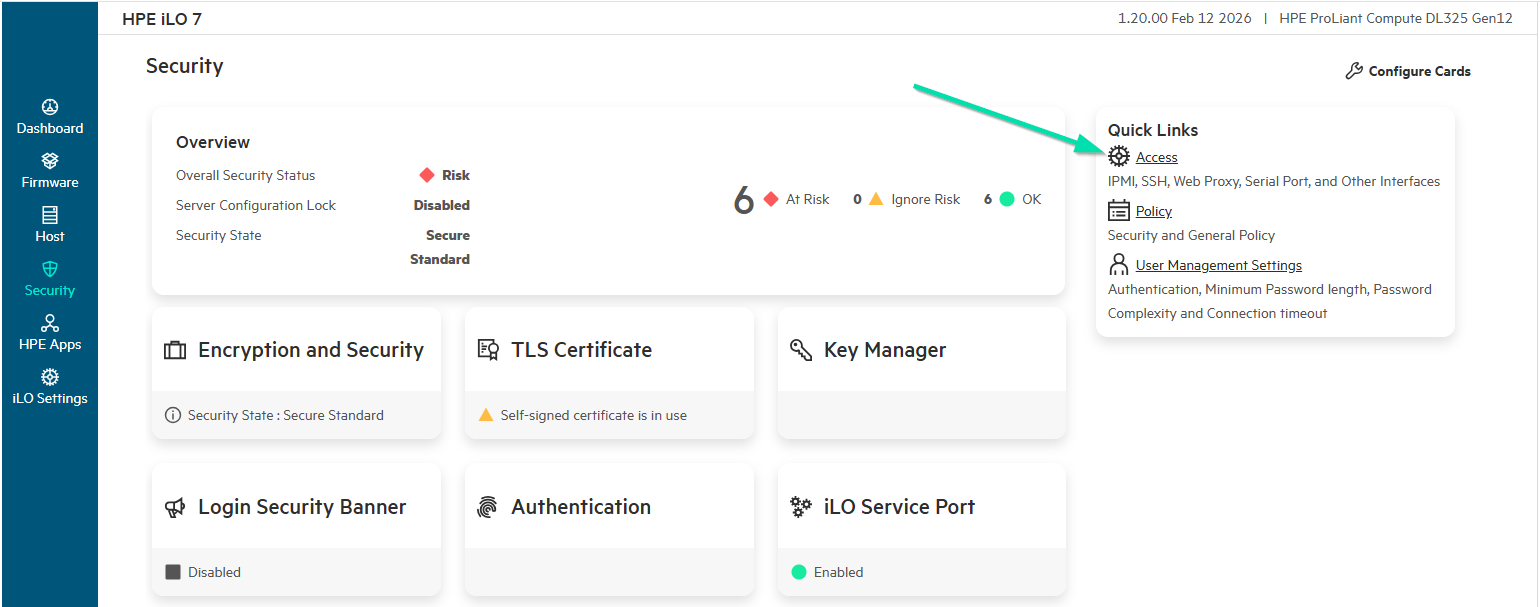
-
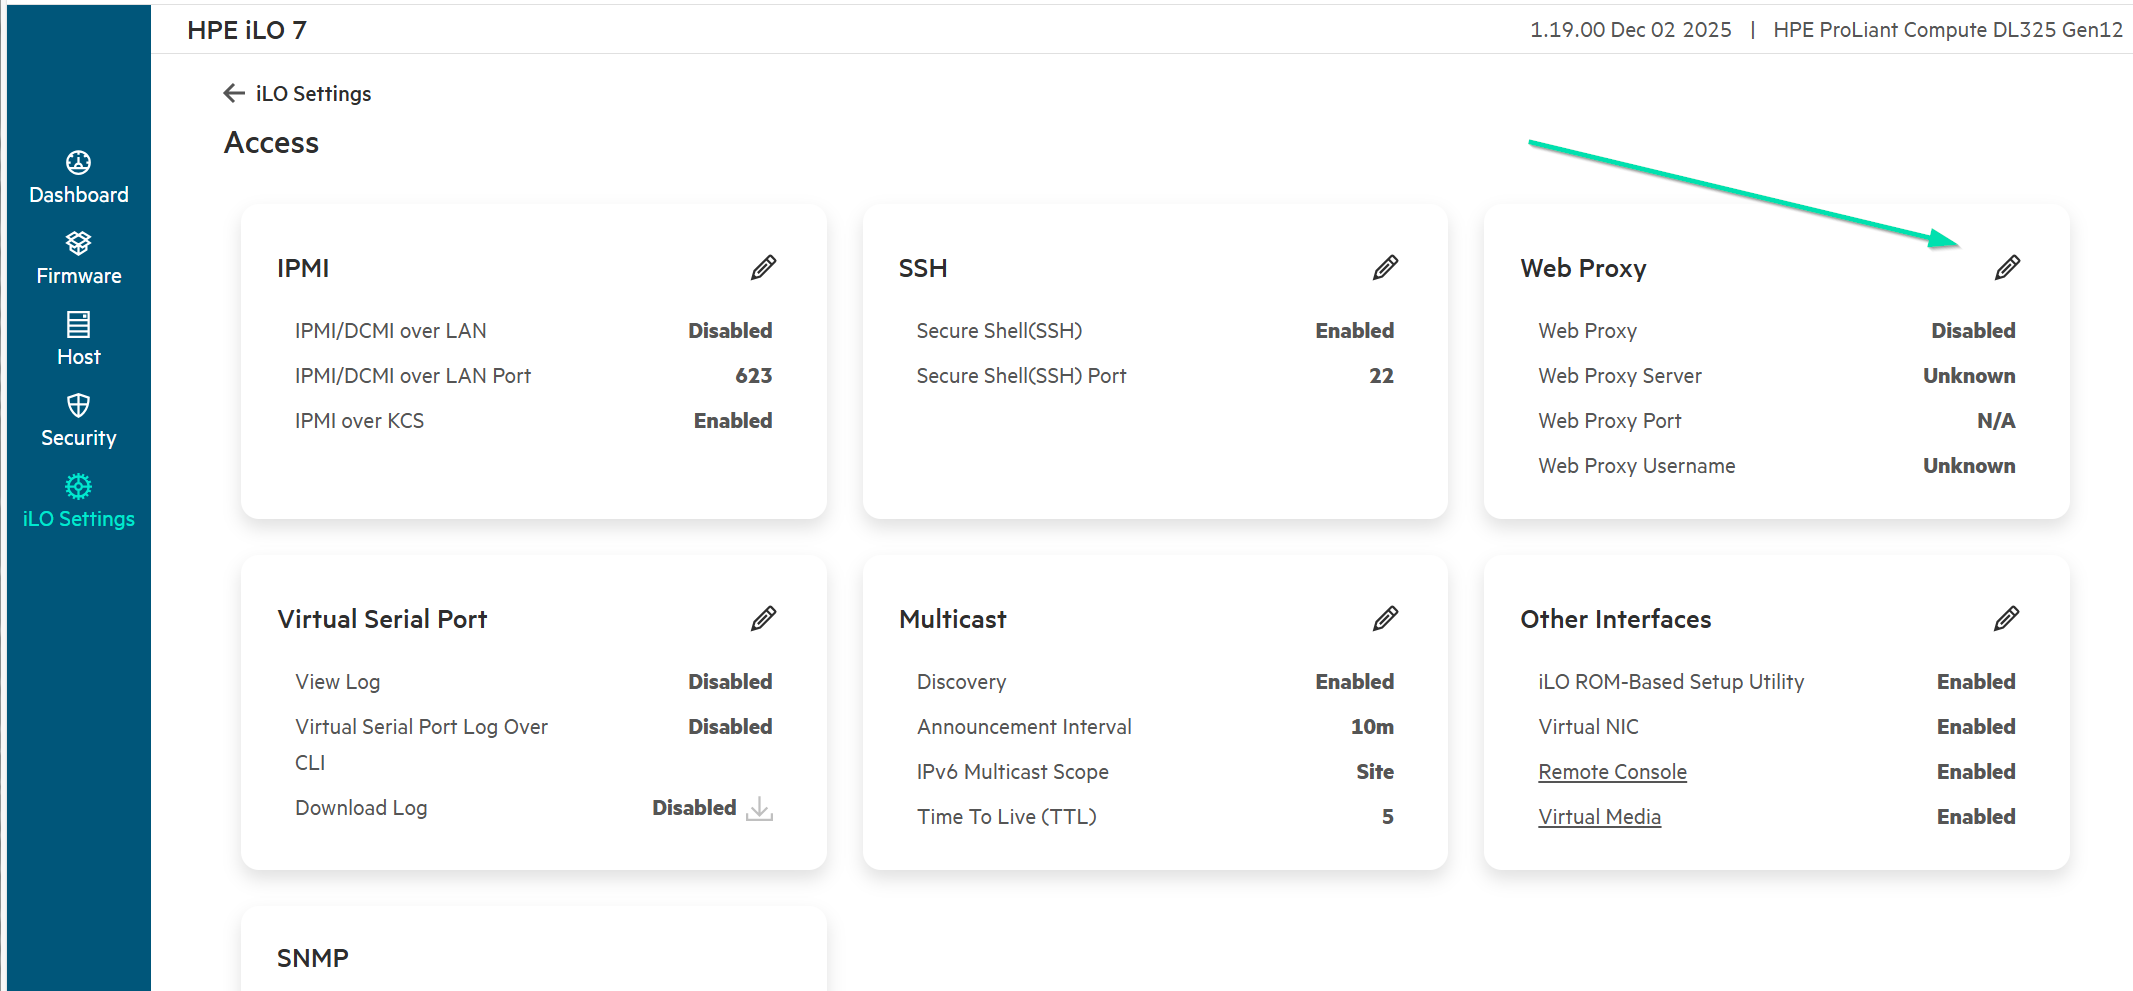
In the far-right card for the Web Proxy, click the edit (pencil) icon.
-
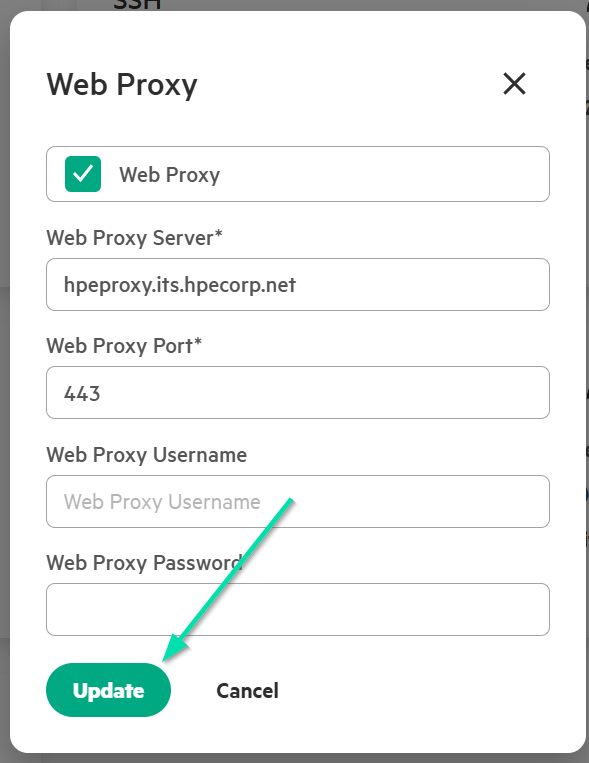
Click the checkbox for Web Proxy
-
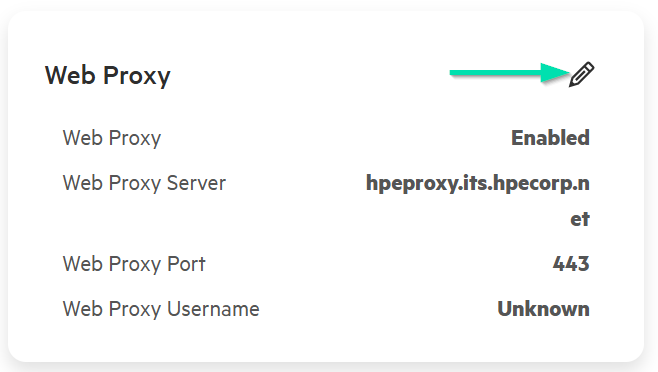
Now enter hpeproxy.its.hpecorp.net in the Web Proxy Server field
-
Enter 443 in the Web Proxy Port fields.
-
Leave the other settings blank.
-
Click Update to save the changes you entered.
This concludes this section of the lab.
Task 6 - Connecting to HPE Compute Ops Management
The HPE GreenLake Cloud Platform enables IT administrators to connect and manage devices and cloud services under a unified service presented by HPE. HPE compute, storage, and networking devices may be centrally managed whether on premises, at the edge, co-located, or on the other side of the world.
This single HPE GreenLake dashboard allows administrators to launch domain specific applications like Compute Ops Management, Aruba Central, Data Services, along with tools to manage governance like OpsRamp and gain insights in the HPE Sustainability Insight Center.
For this exercise, we are going to focus on the onboarding of our devices into the GreenLake platform so that they may be managed by HPE Compute Ops Management.
You will need to login to the GreenLake environment. For this portion of the lab, you will use a different username and password from what you used to start the labs. Your assignment is based on your team number and is in the table below.
Once you have located your username and password, proceed to Step 1 of this lab.
-
Open a new tab and connect to HPE GreenLake at https://common.cloud.hpe.com/ and then enter your assigned user information from the following table as the Username. Your instructor will provide a password if it is different from the table below.
Team Number GreenLake Username User Password Team-01 comholuser+1@gmail.com Refer to login sheet Team-02 comholuser+2@gmail.com Refer to login sheet Team-03 comholuser+3@gmail.com Refer to login sheet Team-04 comholuser+4@gmail.com Refer to login sheet Team-05 comholuser+5@gmail.com Refer to login sheet Team-06 comholuser+6@gmail.com Refer to login sheet Team-07 comholuser+7@gmail.com Refer to login sheet Team-08 comholuser+8@gmail.com Refer to login sheet Team-09 comholuser+9@gmail.com Refer to login sheet Team-10 comholuser+10@gmail.com Refer to login sheet Team-11 comholuser+11@gmail.com Refer to login sheet Team-12 comholuser+12@gmail.com Refer to login sheet Team-13 comholuser+13@gmail.com Refer to login sheet Team-14 comholuser+14@gmail.com Refer to login sheet Team-15 comholuser+15@gmail.com Refer to login sheet Team-16 comholuser+16@gmail.com Refer to login sheet Team-17 comholuser+17@gmail.com Refer to login sheet Team-18 comholuser+18@gmail.com Refer to login sheet Team-19 comholuser+19@gmail.com Refer to login sheet Team-20 comholuser+20@gmail.com Refer to login sheet Team-21 comholuser+21@gmail.com Refer to login sheet Team-22 comholuser+22@gmail.com Refer to login sheet Team-23 comholuser+23@gmail.com Refer to login sheet Team-24 comholuser+24@gmail.com Refer to login sheet Team-25 comholuser+25@gmail.com Refer to login sheet -
Click Next to be prompted for a password.
-
Type in the password of Refer to login sheet (or the password supplied by your instructor) and press the Enter key or click Sign In.
-
If there’s a short advertising message, enjoy it and then close the pop-up window.
-
When presented with a choice of workspaces, choose COM Security Lab XX (where XX is your Team Number) and Go to Workspace.

-
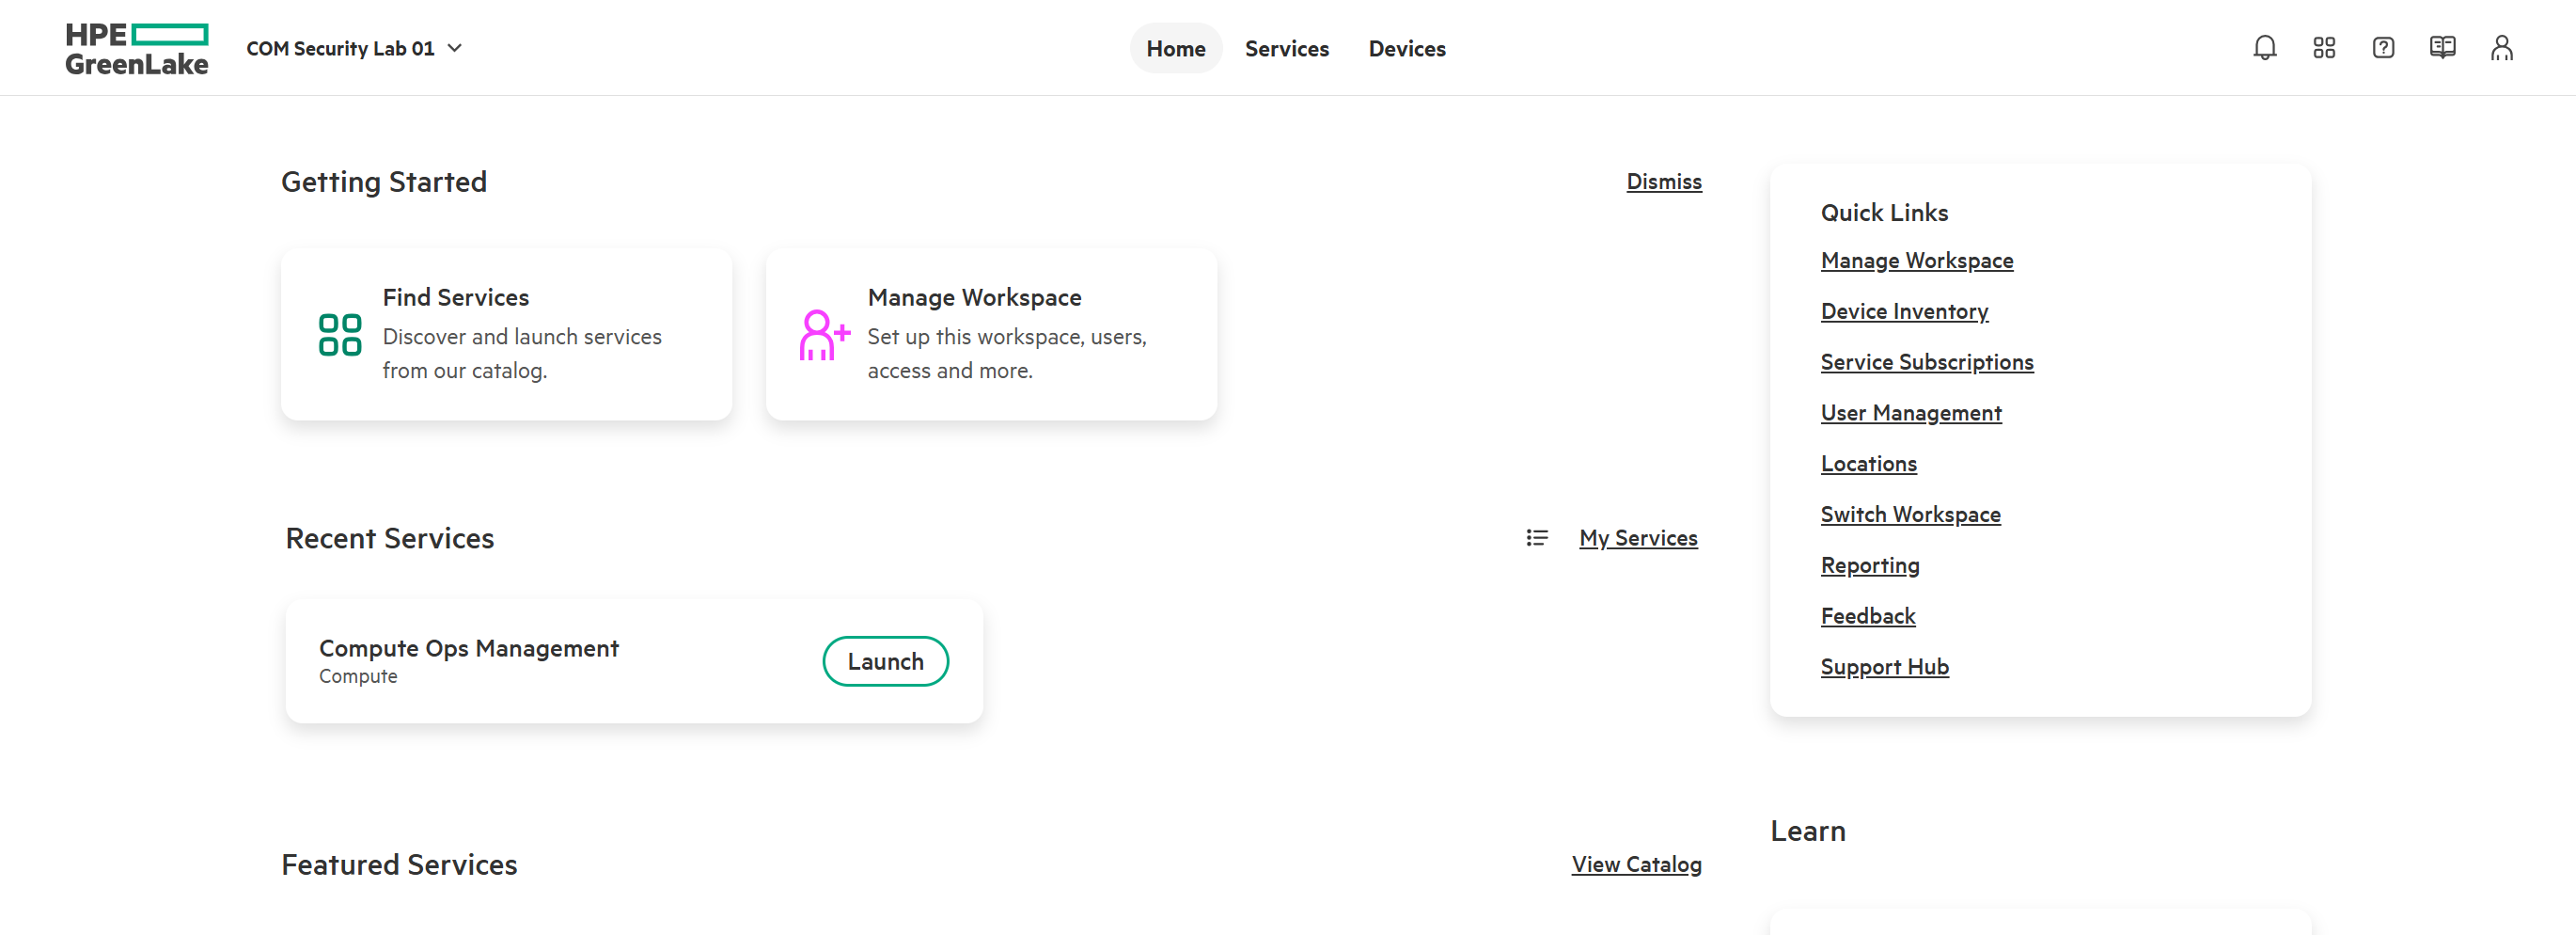
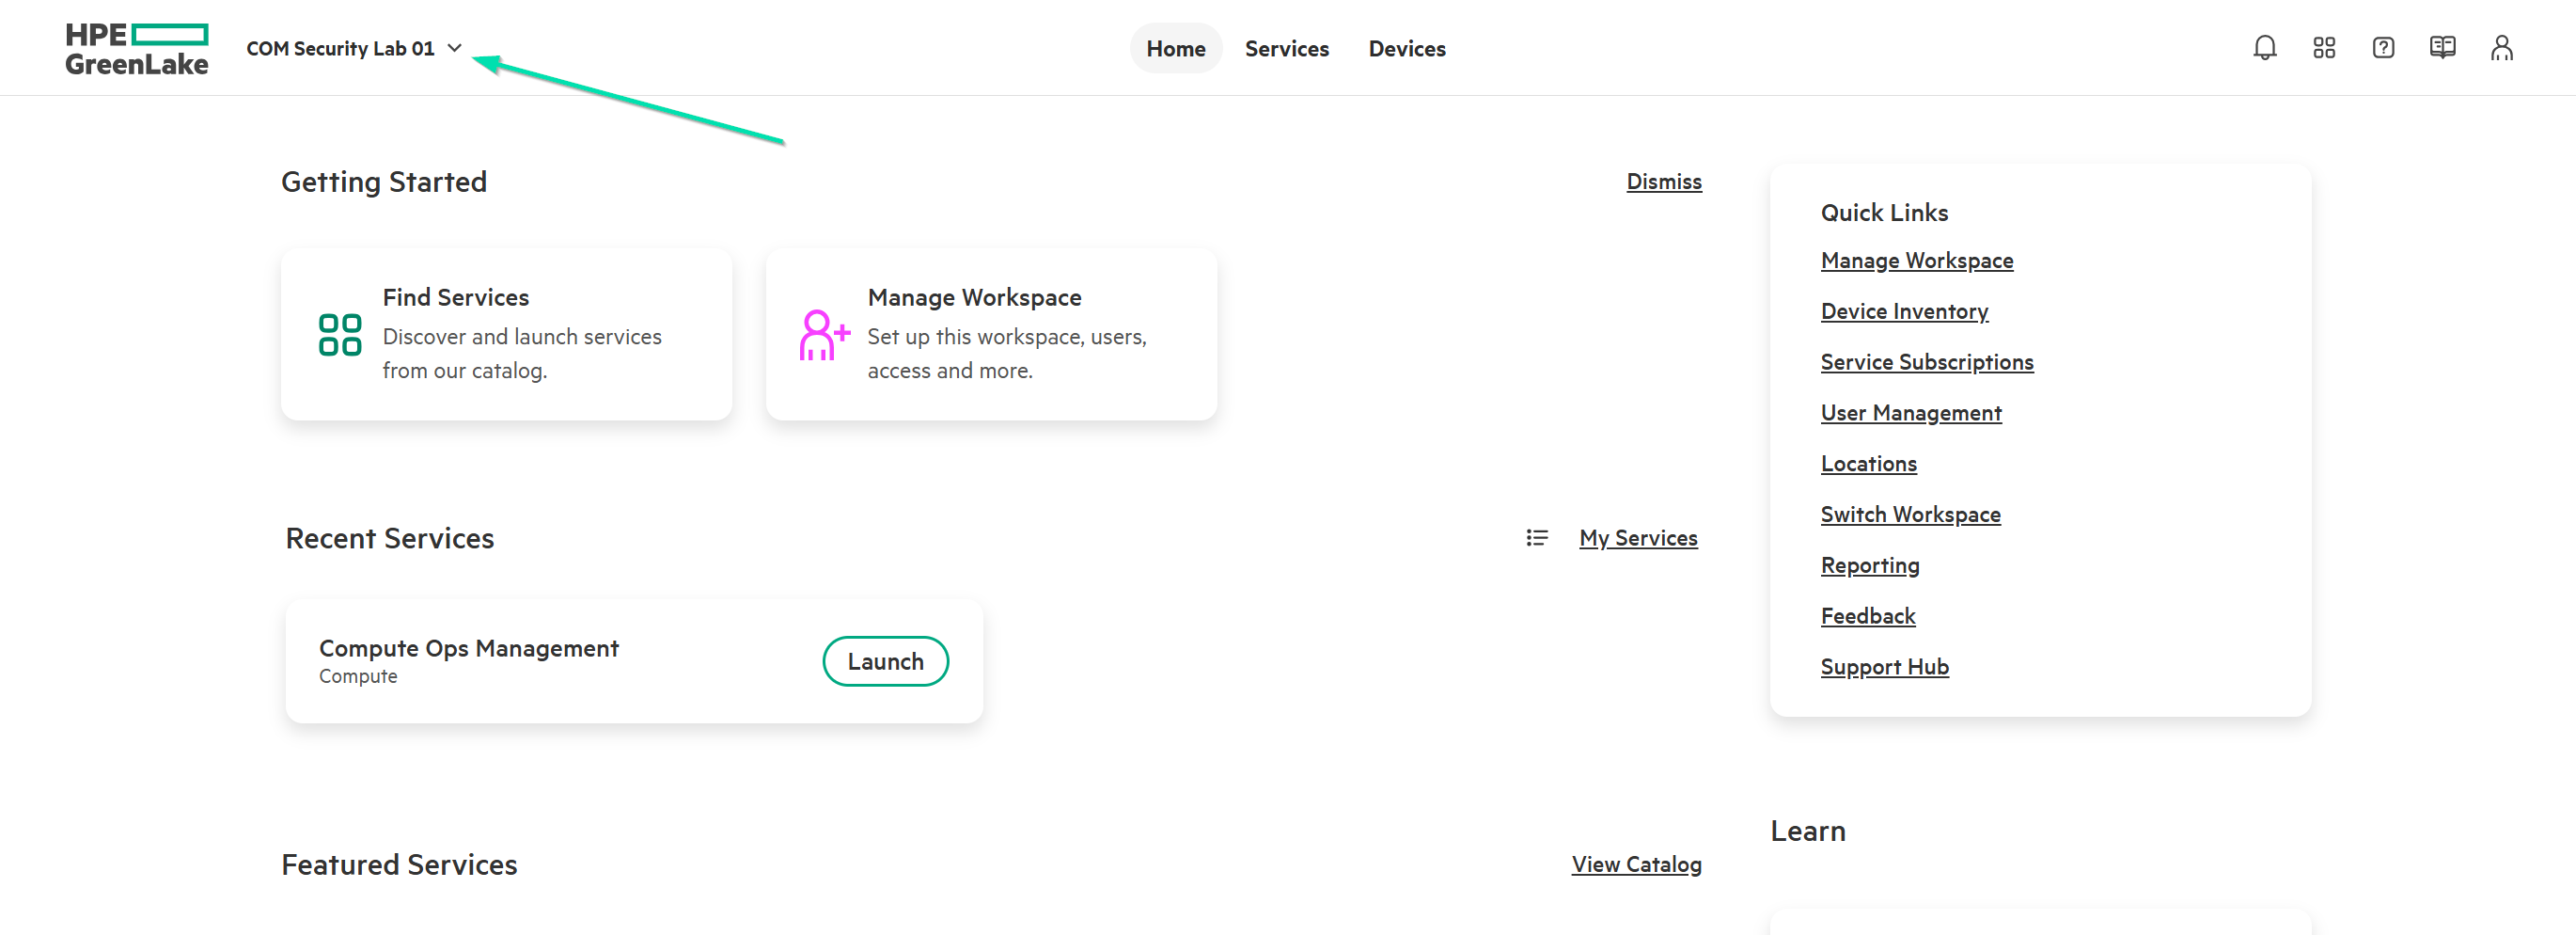
You are now on the HPE GreenLake Cloud Platform homepage. You can see your workspace choice, to the right of the HPE GreenLake logo. Don’t click on the Launch button for Compute Ops Management just yet.
This concludes this section of the lab.
Task 7 - Secure Login Options for Enterprise IT Administrators
In the previous section of this lab, we were able to login to our HPE Compute Ops Management Workspace with an email address and somewhat complex password. In today’s world, this is no longer secure enough to meet Industry Security Standards and additional safeguards should be configured.
Our HPE GreenLake Cloud Platform supports Multi-Factor Authentication as well as SAML SSO which, when combined, can go a long way to ensuring any bad actors do not access your IT Estate, especially through HPE Compute Ops Management.
For this Lab, we will just walk you through the various locations in HPE GreenLake Cloud Platform where this can be configured, but we will not actually set it up at this time.
-
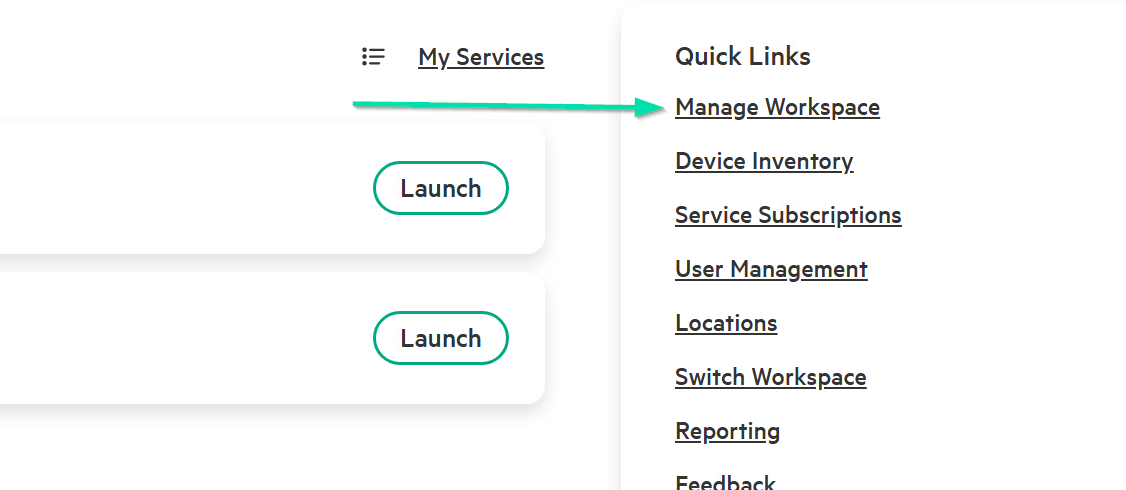
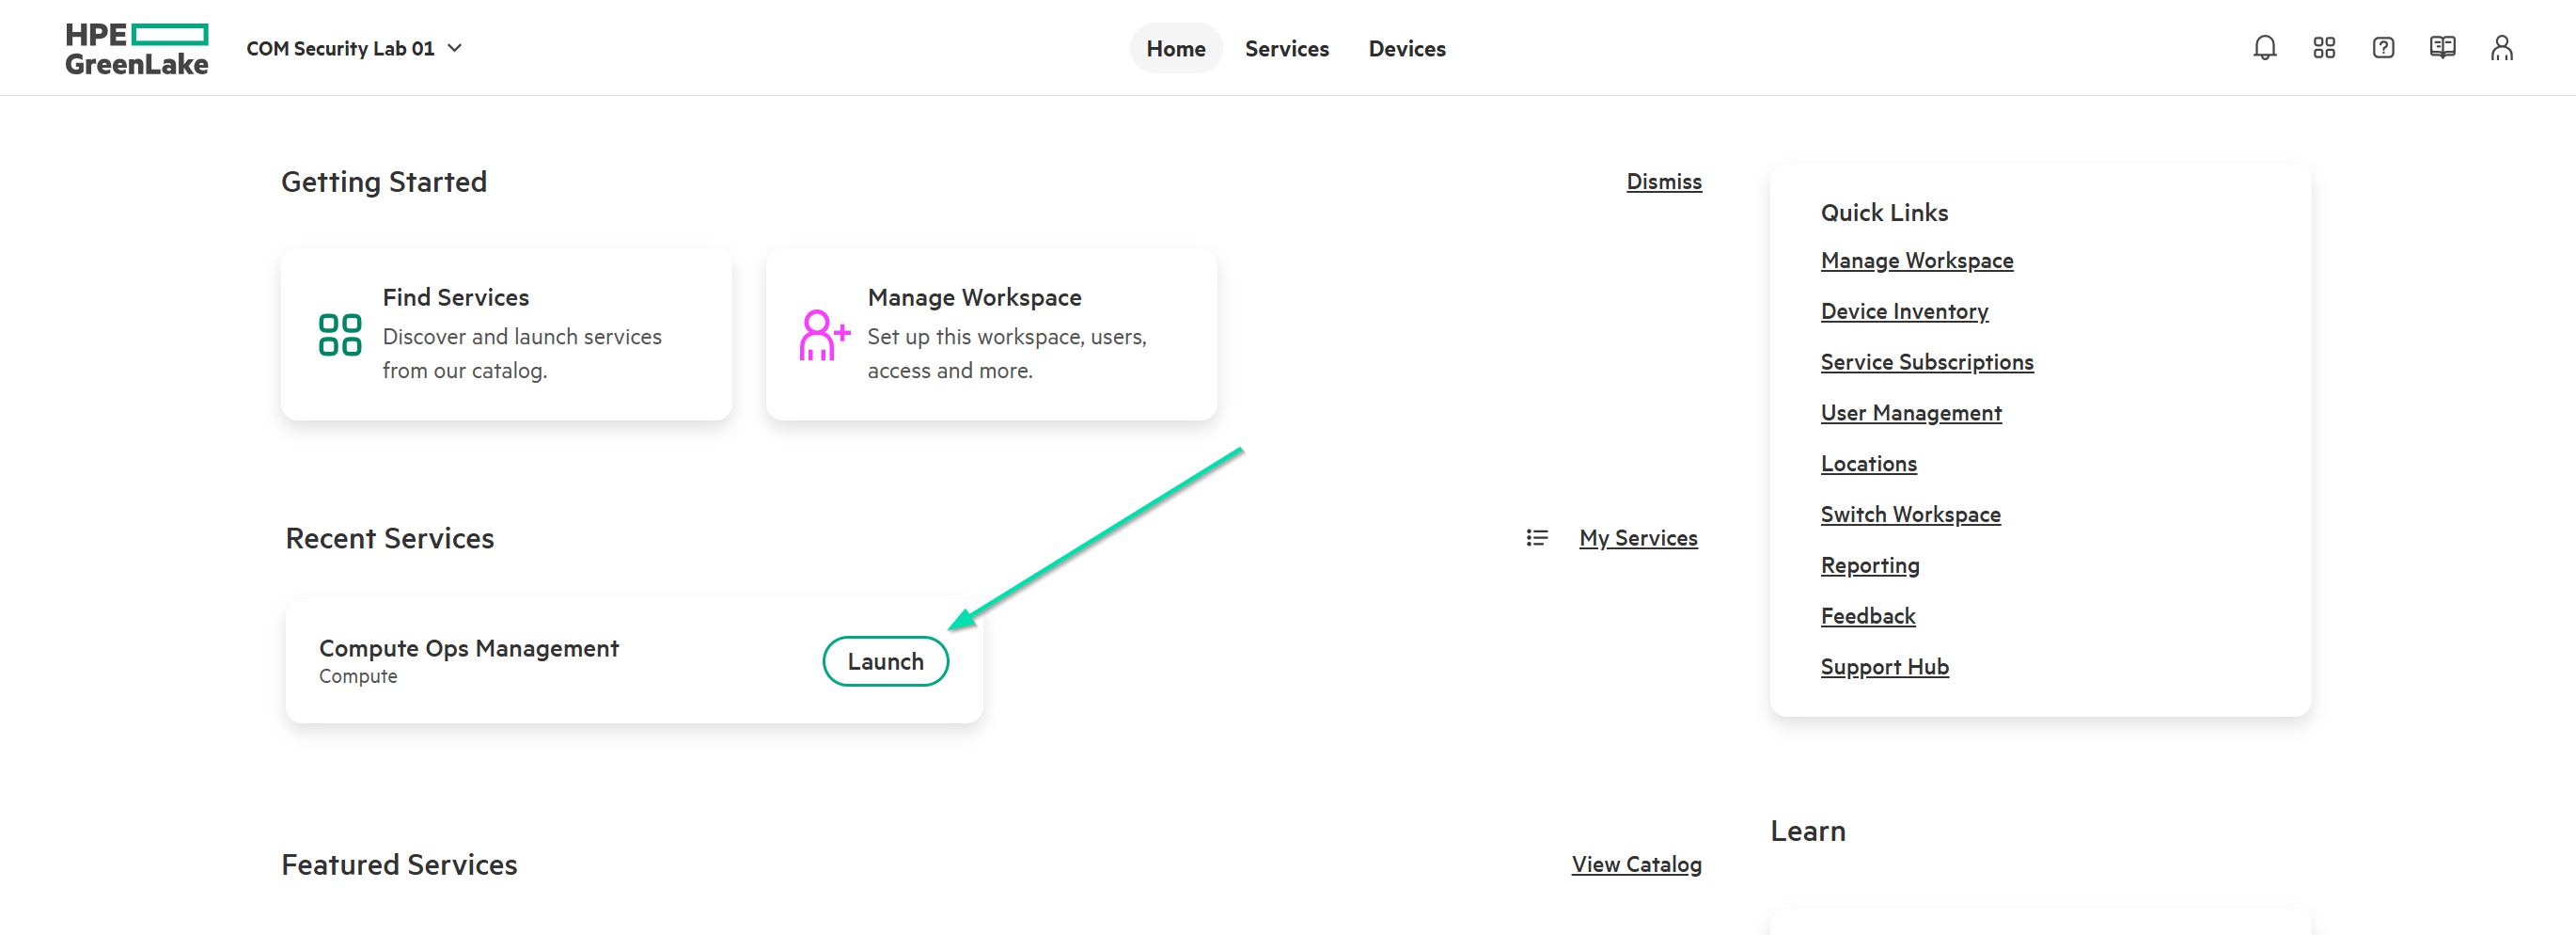
From the Quick Links on the right-hand side of the GreenLake Home Page, click Manage Workspace.
-
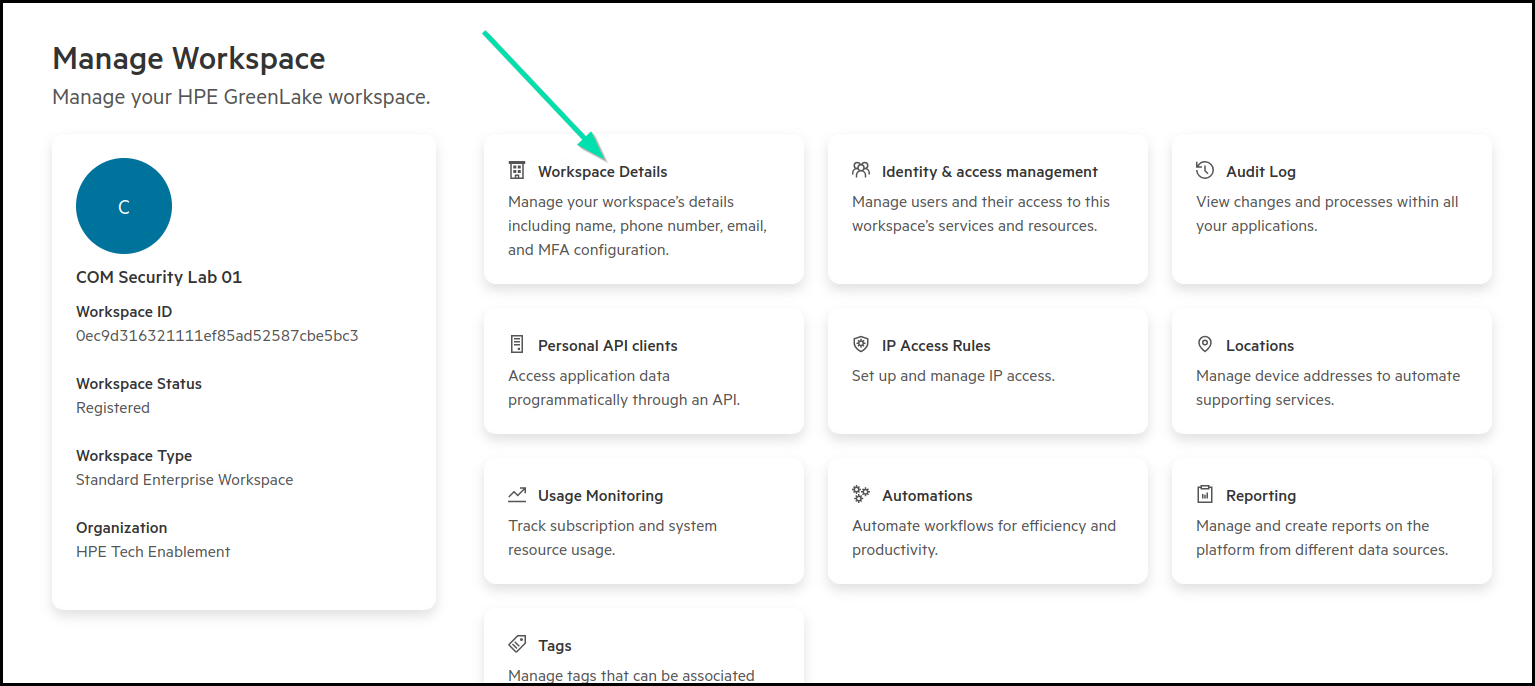
Select the Workspace Details card.
-
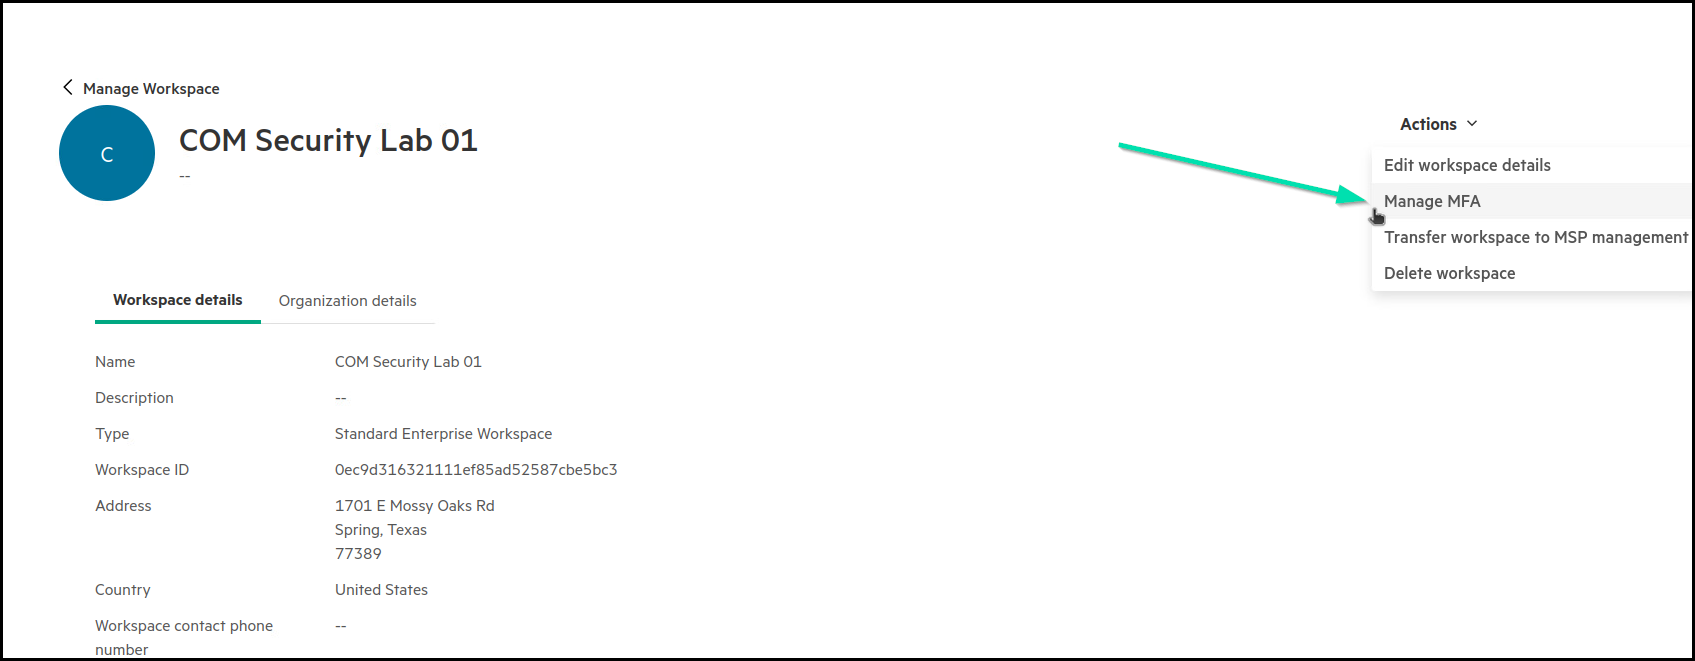
In the Actions pull down, navigate to the Manage MFA list.
-
This is where Multifactor Authentication can be configured for all Users within the Workspace. Currently supported methods are Okta Verify, Security Key or Biometric Authenticator and Google Authenticator.
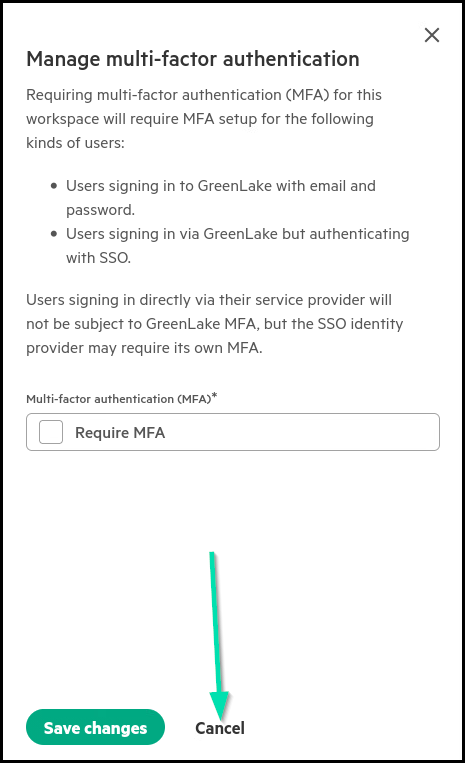
Note: For the purpose of this lab, we will NOT be configuring MFA on these Workspaces.
When enabling Multifactor Authentication (MFA), you significantly enhance the security of your account when signing in to HPE GreenLake. By requiring multiple forms of verification, such as a password and a one-time code sent to your mobile device, MFA adds an extra layer of protection against unauthorized access. This reduces the risk of account compromise, even if your password is stolen or guessed. Implementing MFA is a crucial step in safeguarding your sensitive data and ensuring secure access to HPE GreenLake services.
Note: MFA can also be configured at the user level from the HPE user account details. However, please do NOT enable it for this lab.
This concludes this section of the lab.
Task 8 - Establishing a connection from HPE iLO7 to HPE GreenLake
For our lab purposes, the HPE GreenLake Workspace company in this environment is called COM Security Lab XX.
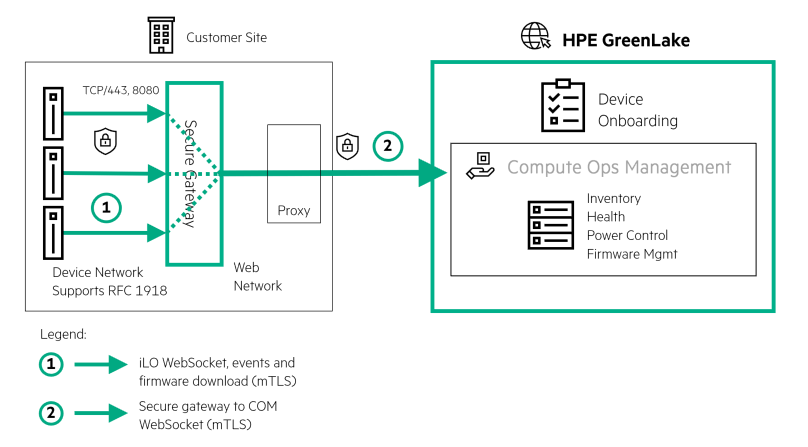
The connection between HPE iLO7 and HPE GreenLake is initiated by the HPE iLO7 for security purposes. During the onboarding process, an HPE-issued client certificate is used by the HPE iLO7 to connect to HPE Compute Ops Management. The HPE CA Certificate uses SHA256 with a key size of EC 384 bits and is transmitted over a Mutual Transport Layer Security (mTLS) connection from the HPE iLO7 to HPE GreenLake and Compute Ops Management over HTTPS (port 443). In a typical TLS setup, only the server is authenticated by the client. In mTLS, both the client and the server authenticate each other, providing enhanced security by ensuring that both parties are authenticated before establishing a secure communication channel.
For more information regarding the security protocols and firewall requirements, consult the HPE Compute Ops Management security guide.
To initiate the connection from HPE iLO7 to the HPE Compute Ops Management, we first need to obtain an Activation Key.
-
Click on the HPE GreenLake logo in the browser to return to the main menu.
-
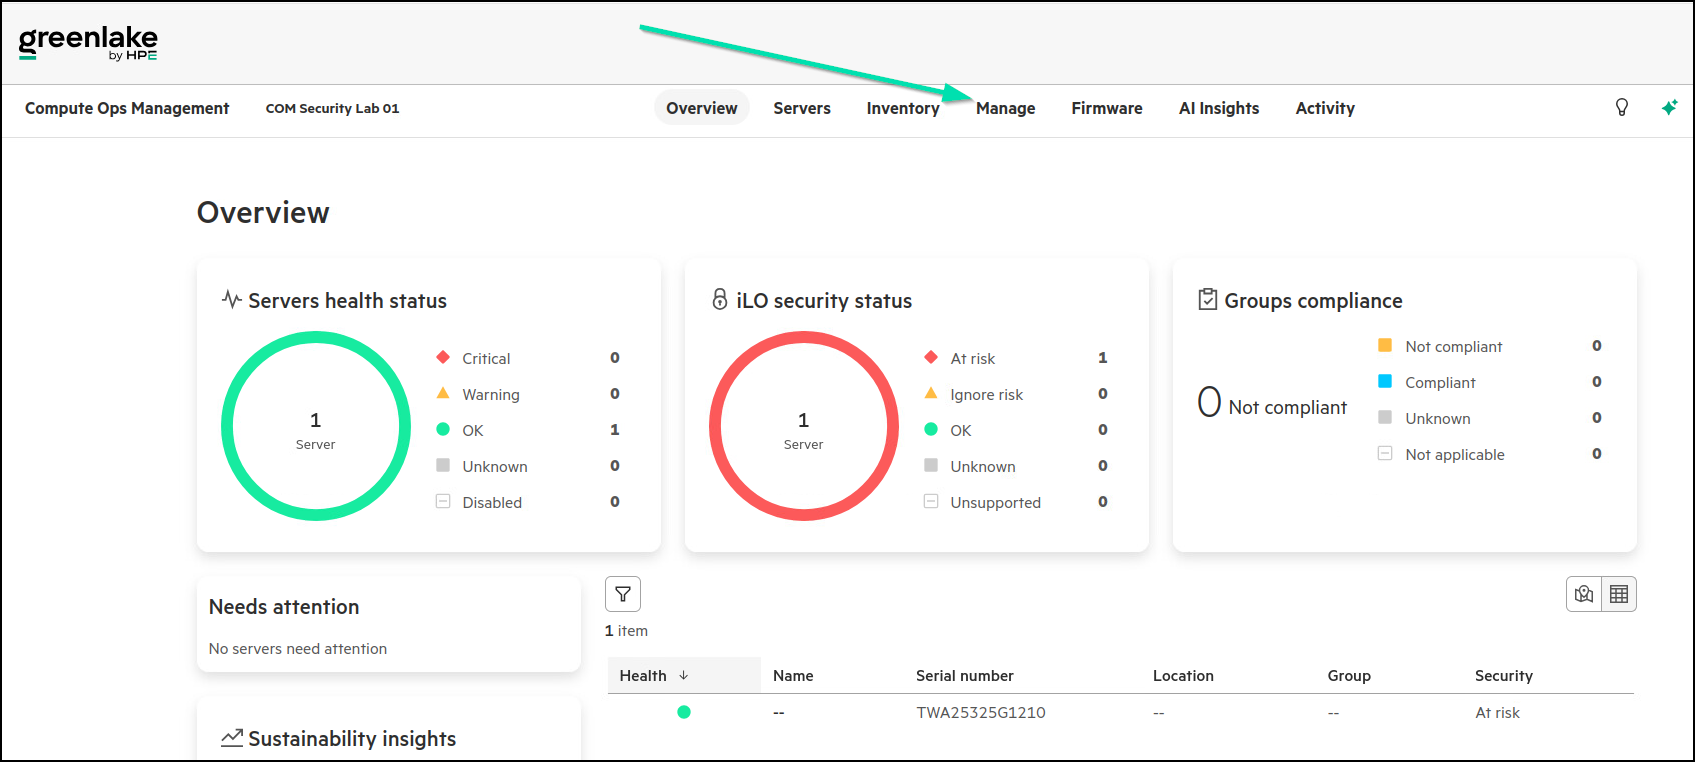
From the HPE GreenLake Recent Services section, choose the Launch button in the Compute Ops Management card to connect to HPE Compute Ops Management main menu.
-
You are at the Compute Ops Management Overview page.
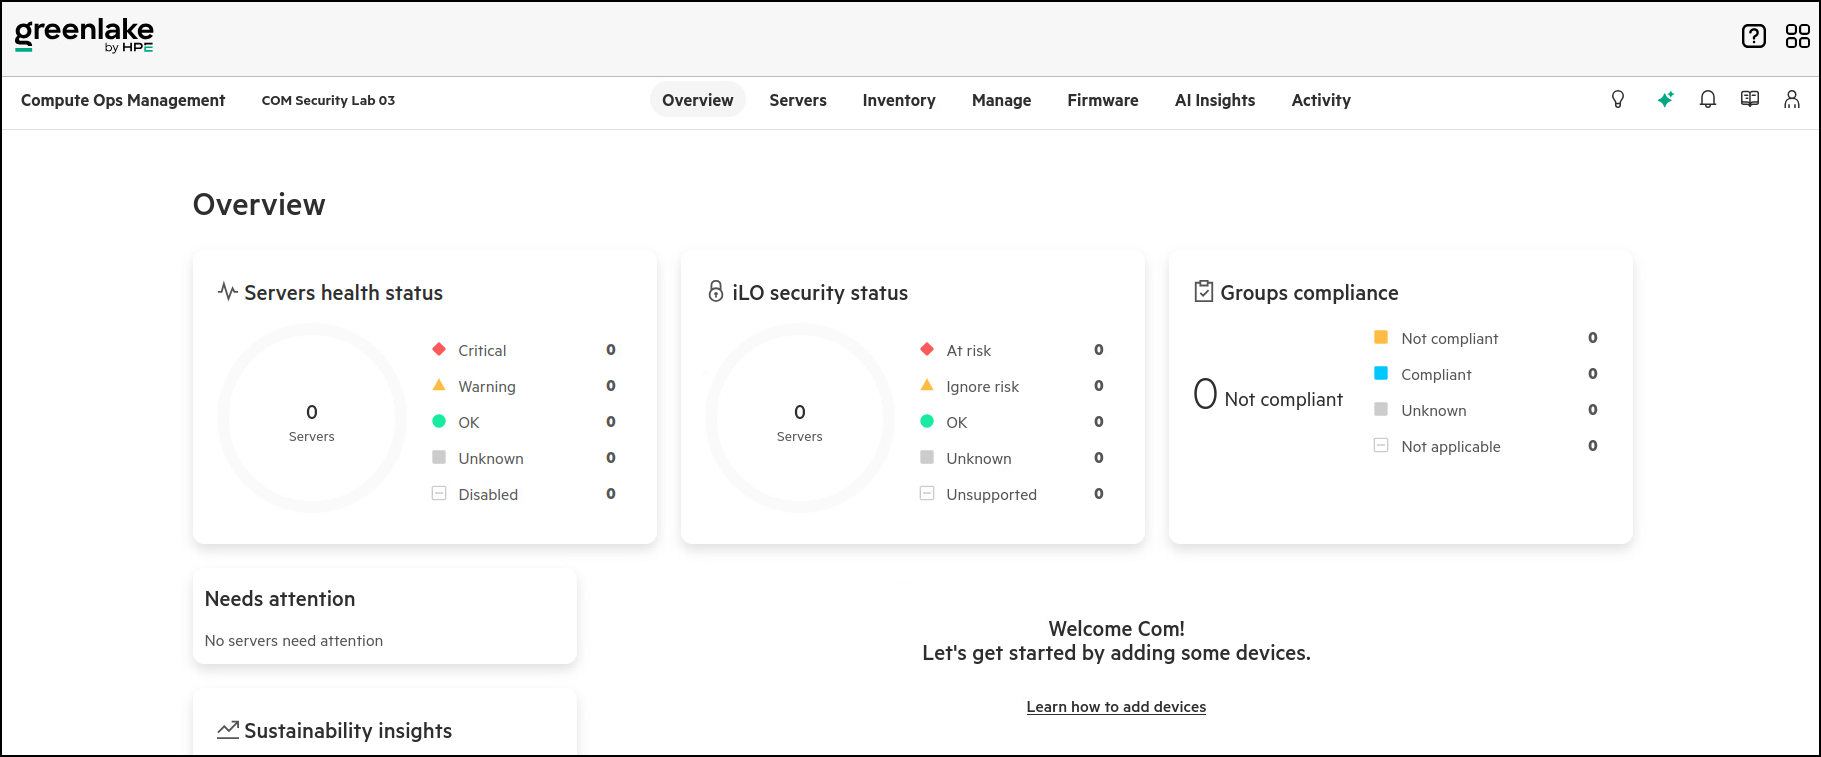
-
Click on the Servers tab across the top of the page.

-
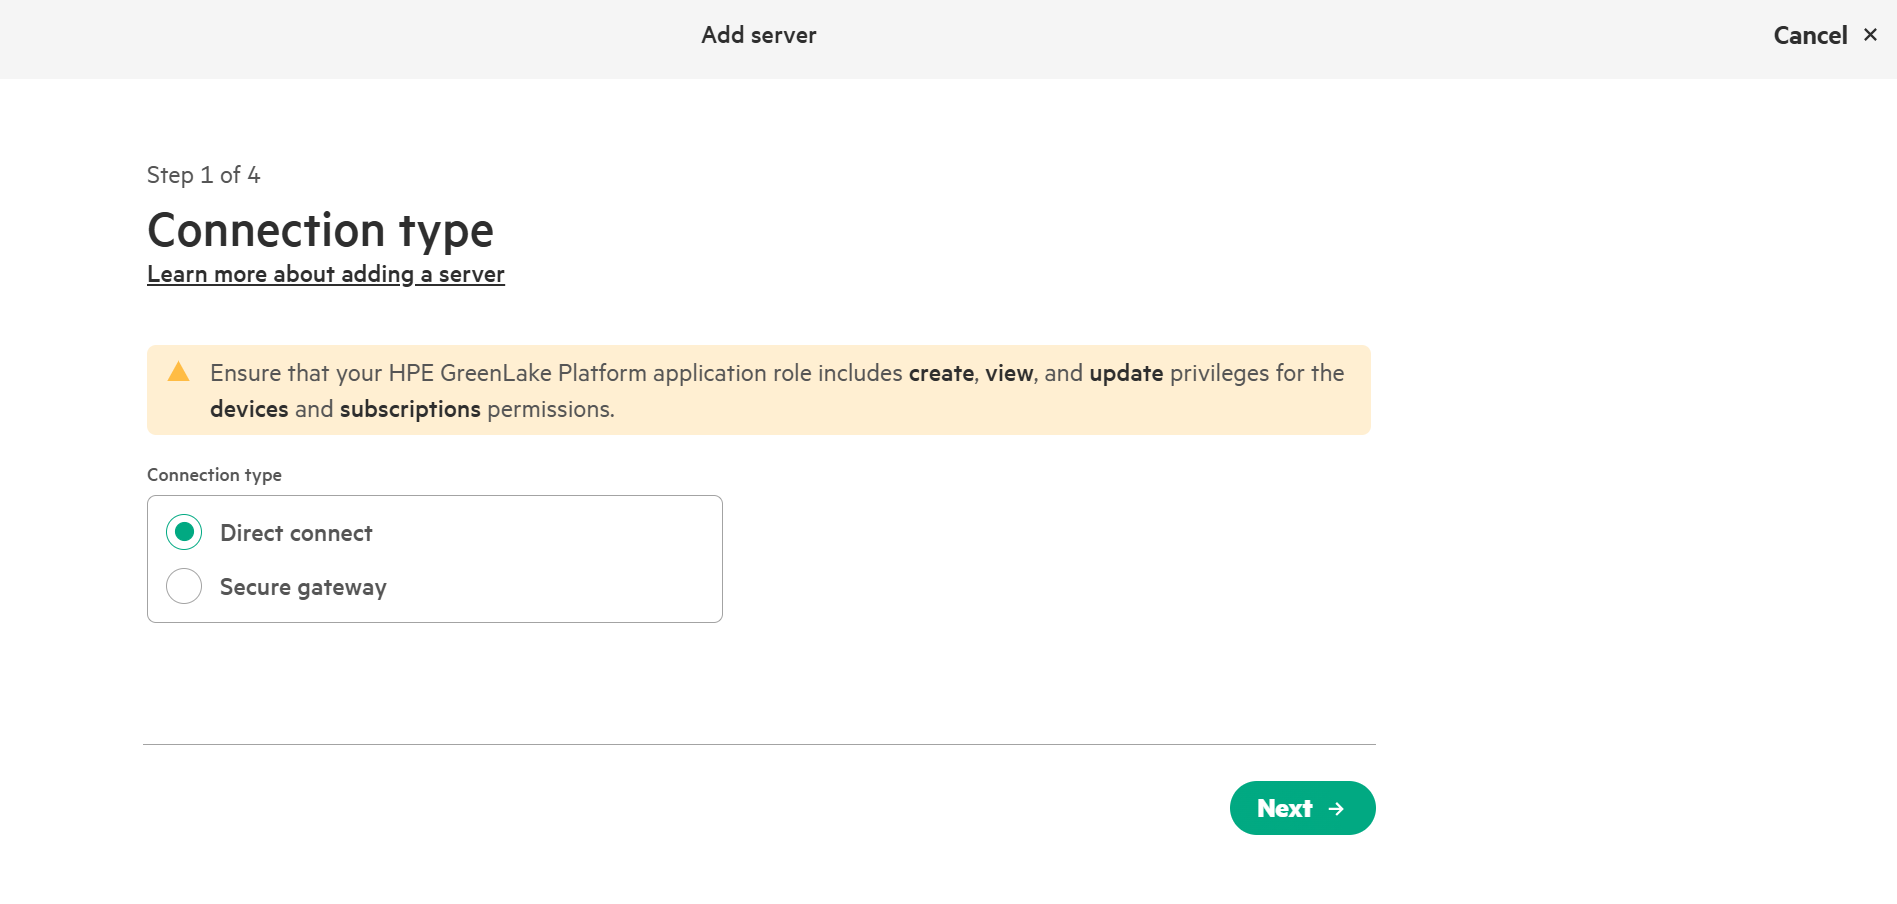
Click the Add server button.

-
At this time, we will select Direct connect as our Server Connection type. Click Next.
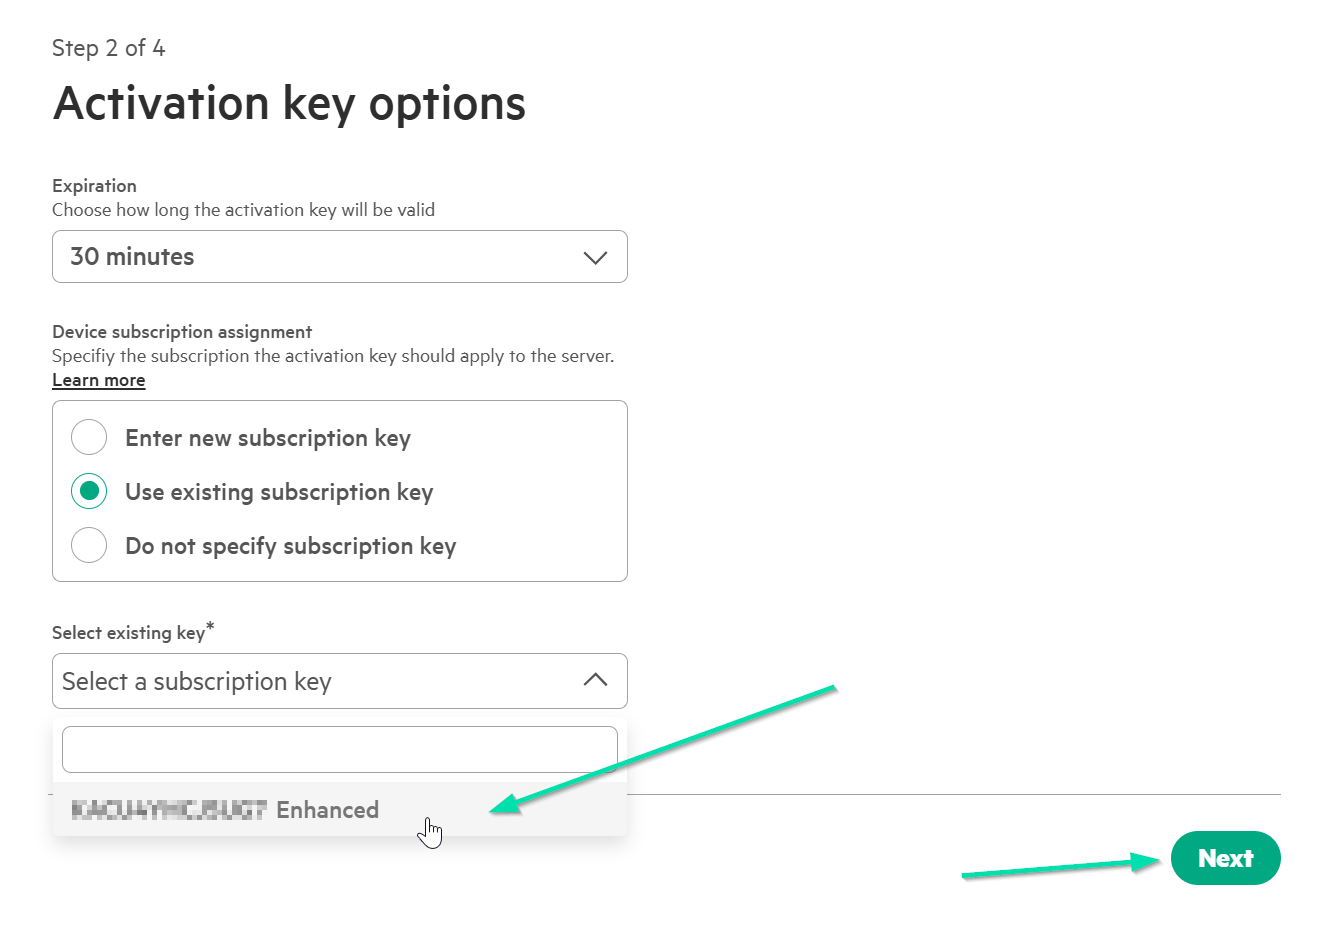
-
Here we can select how long our Activation Key will be valid for and which Subscription Key we will apply. For this lab, let’s choose 30 minutes and Use existing subscription key. In the Select existing key (Select a subscription key) box, choose the available key and click Next.
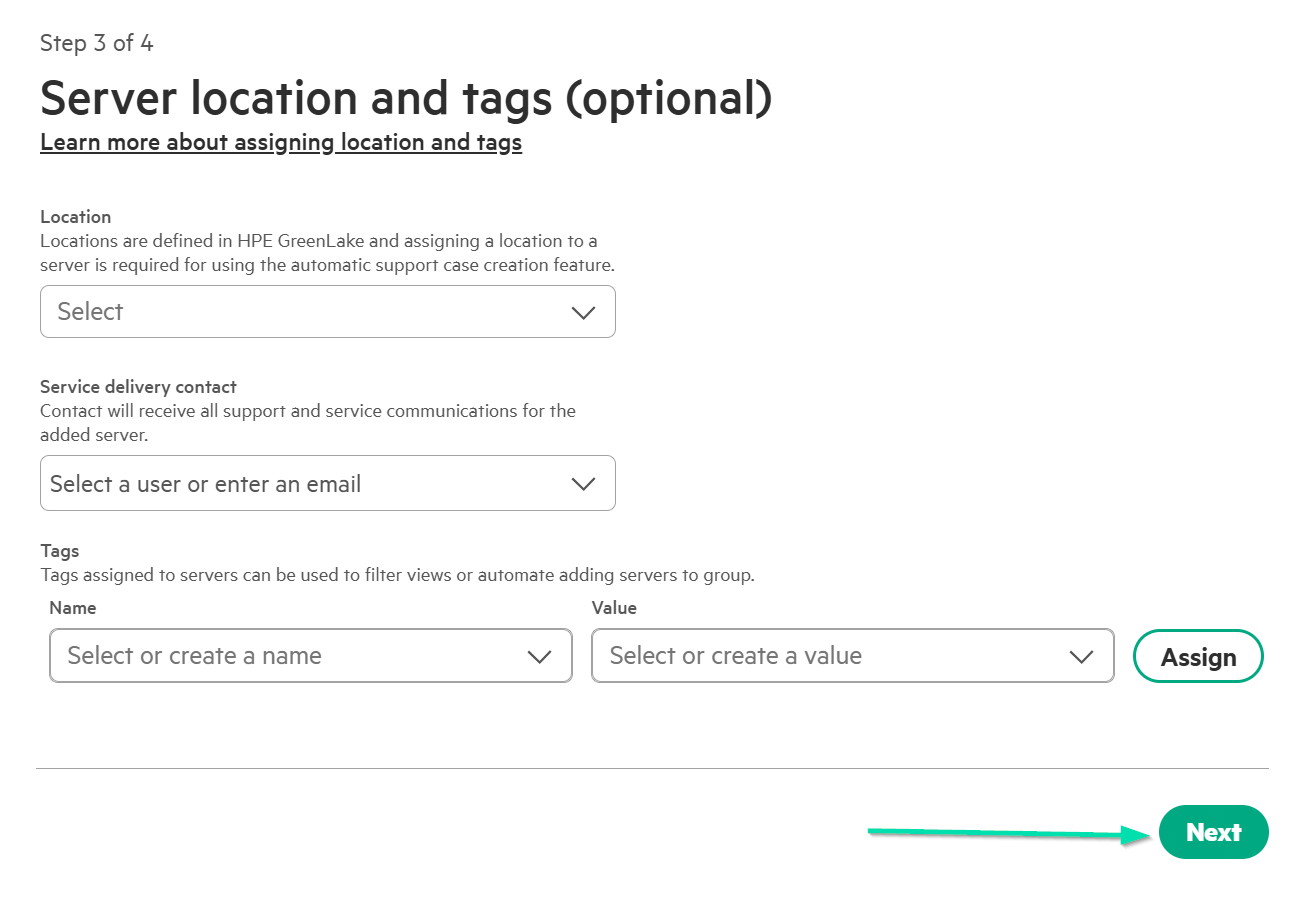
-
Adding Server location and tags is optional, so we will click Next but generally this would be best practice to perform this task now.
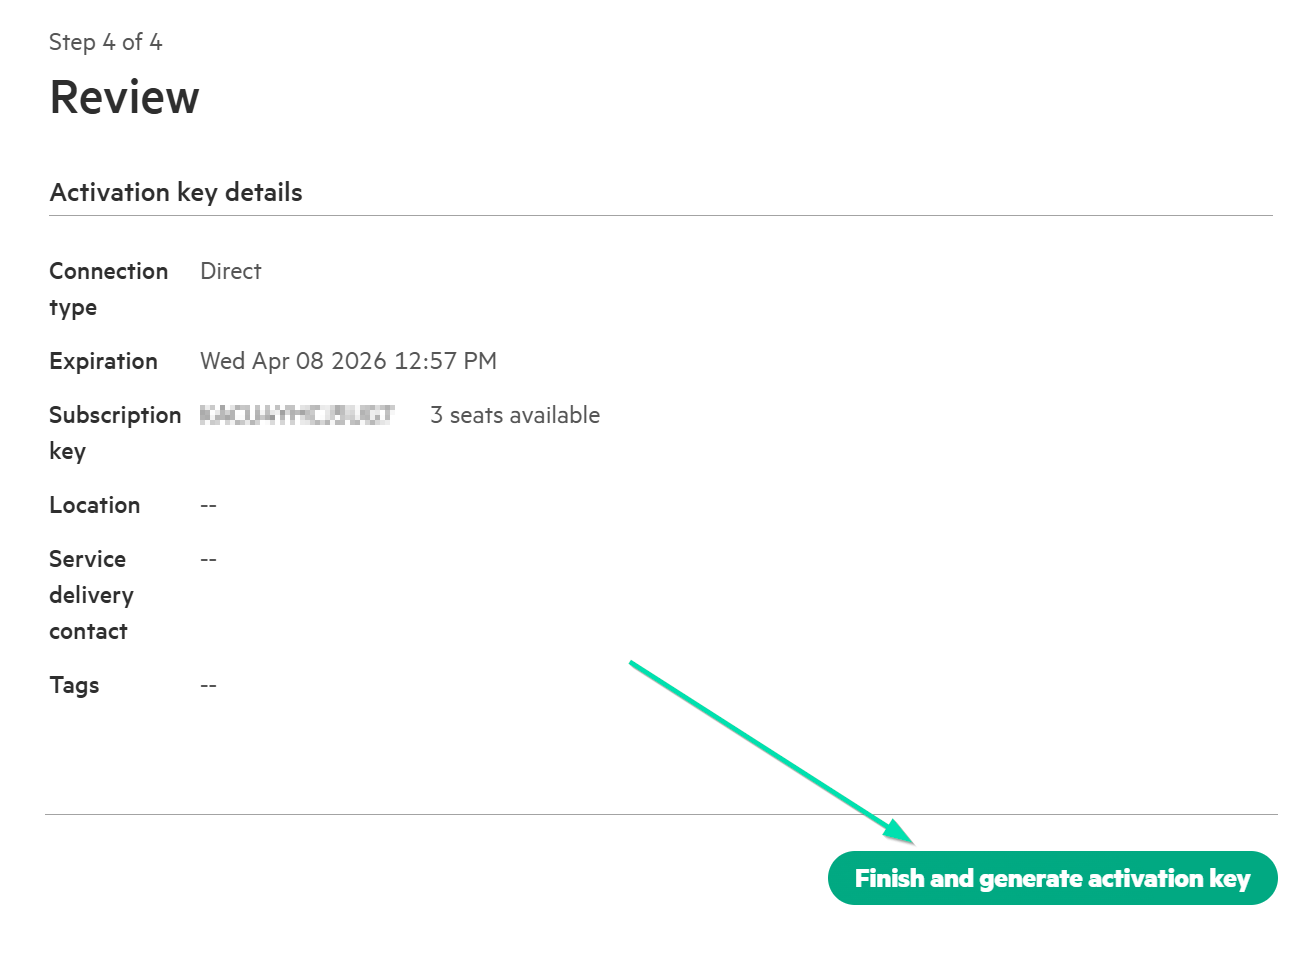
-
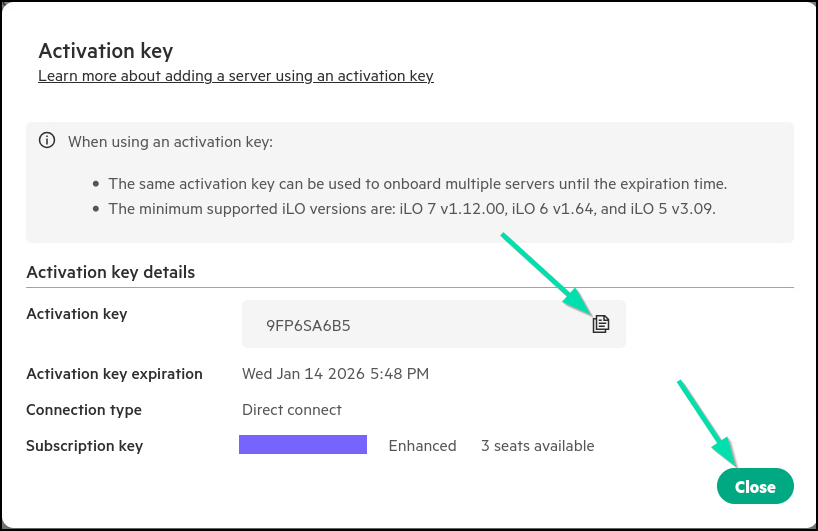
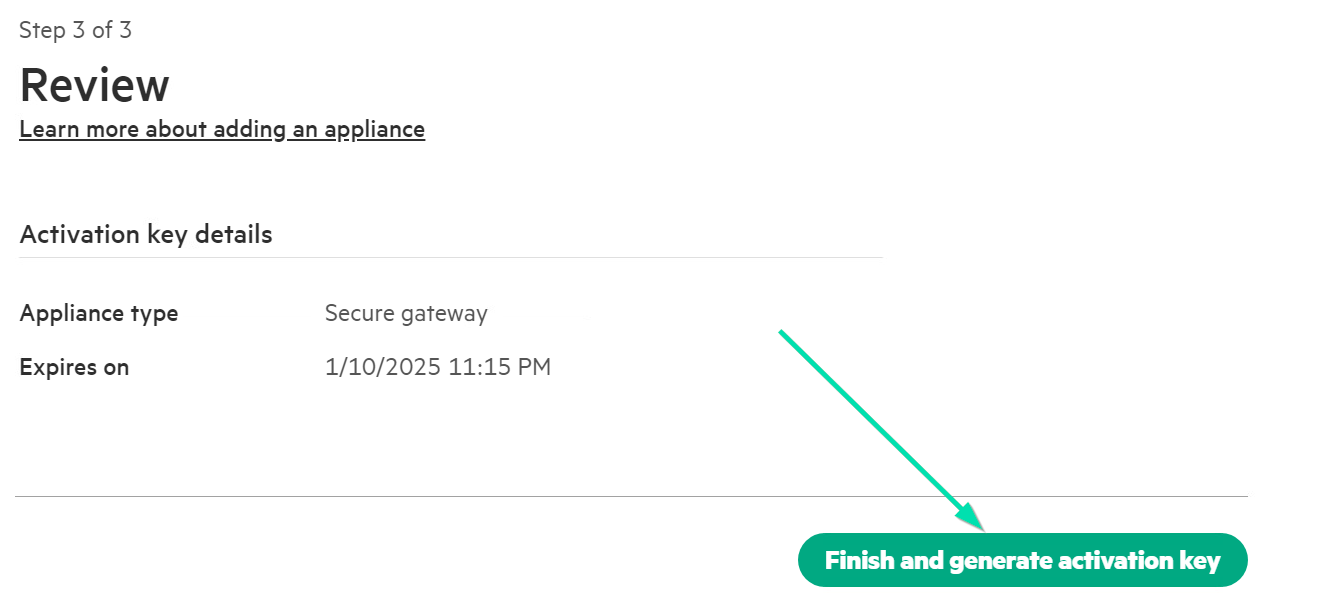
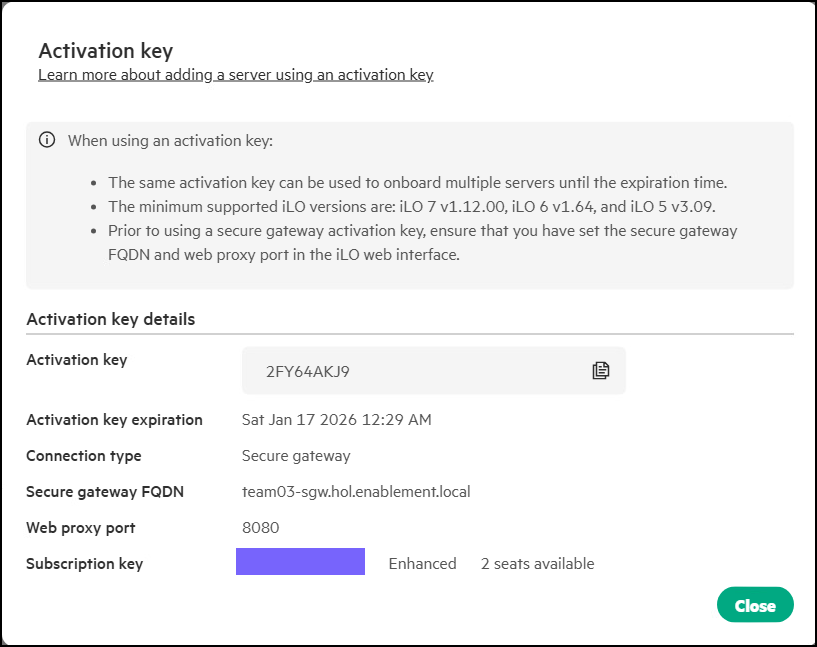
Once you have reviewed the details, click Finish and generate activation key.
-
We will now take note of our Activation Key, so we can use it in our HPE iLO7 to connect to Compute Ops Management. Click the copy icon and then close this pop up.
-
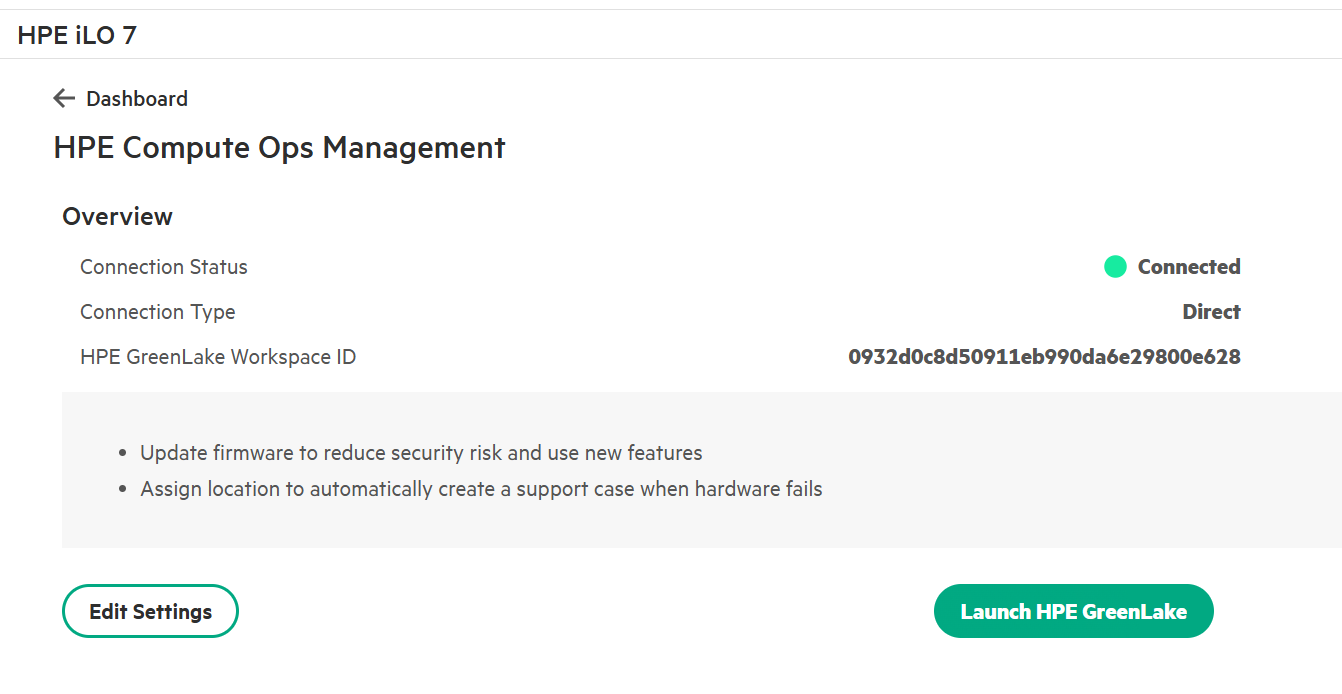
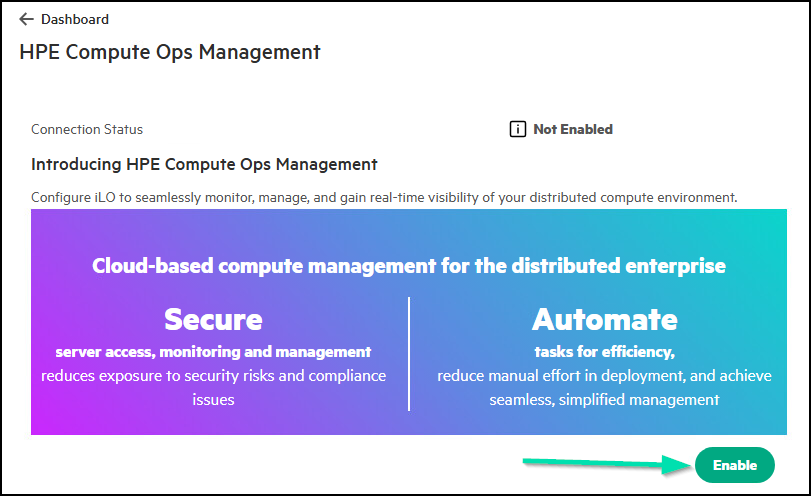
Return to the Web Browser Tab, which is connected to your assigned Server’s HPE iLO7, then navigate to Dashboard on the left-hand side of your screen, then click on HPE Compute Ops Management card.
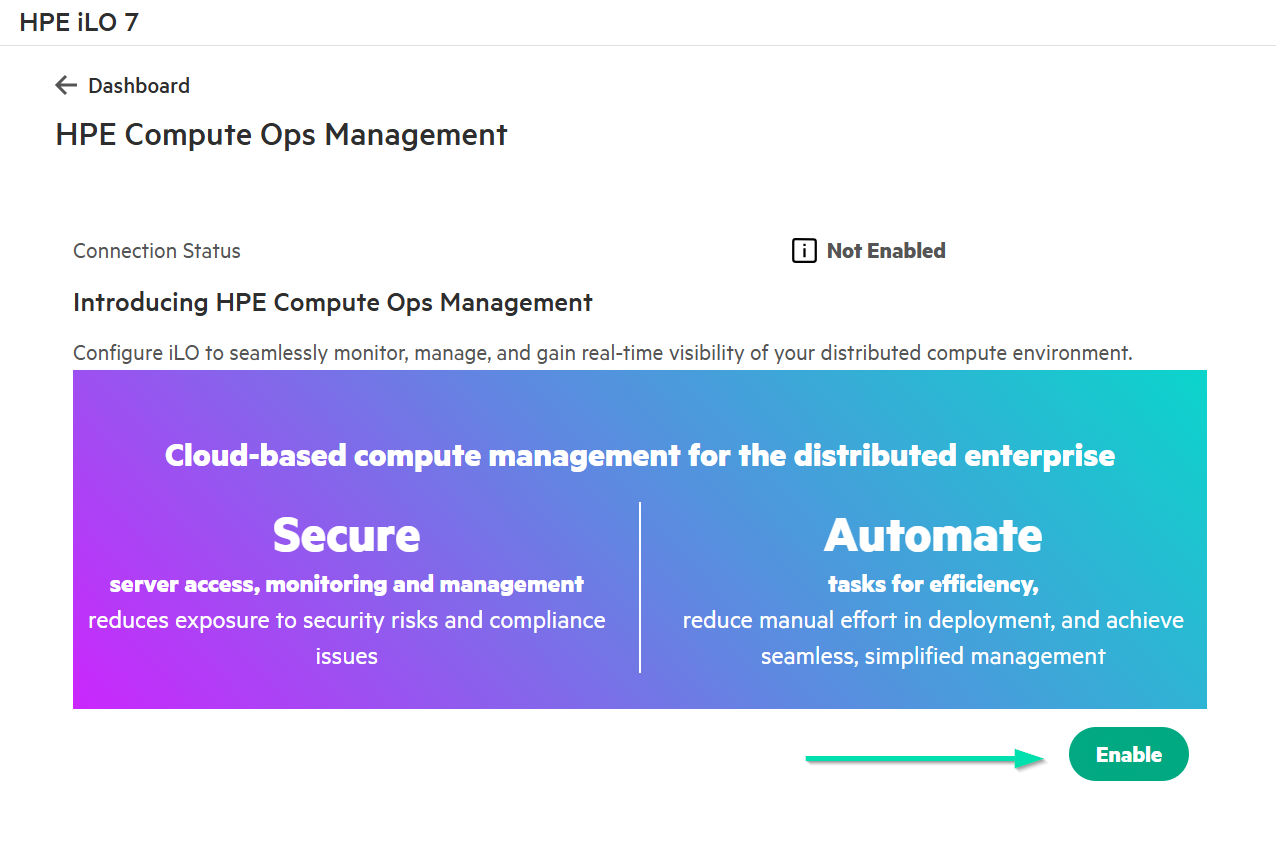
-
Click Enable to enable the Compute Ops Management connection.
-
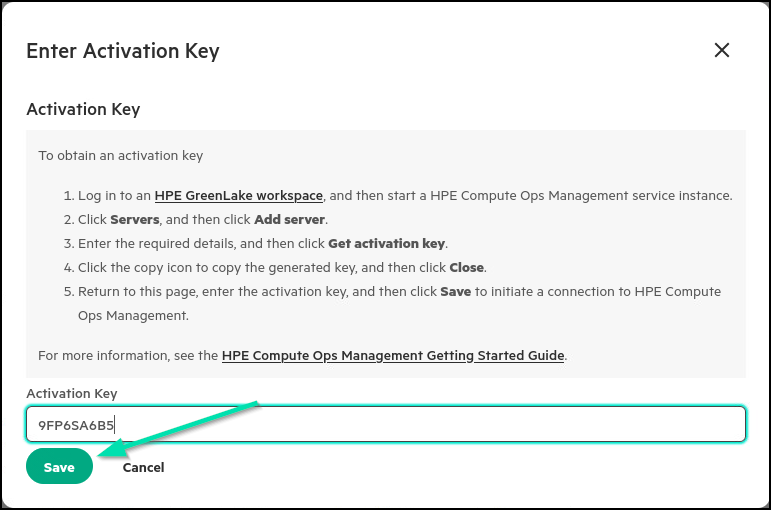
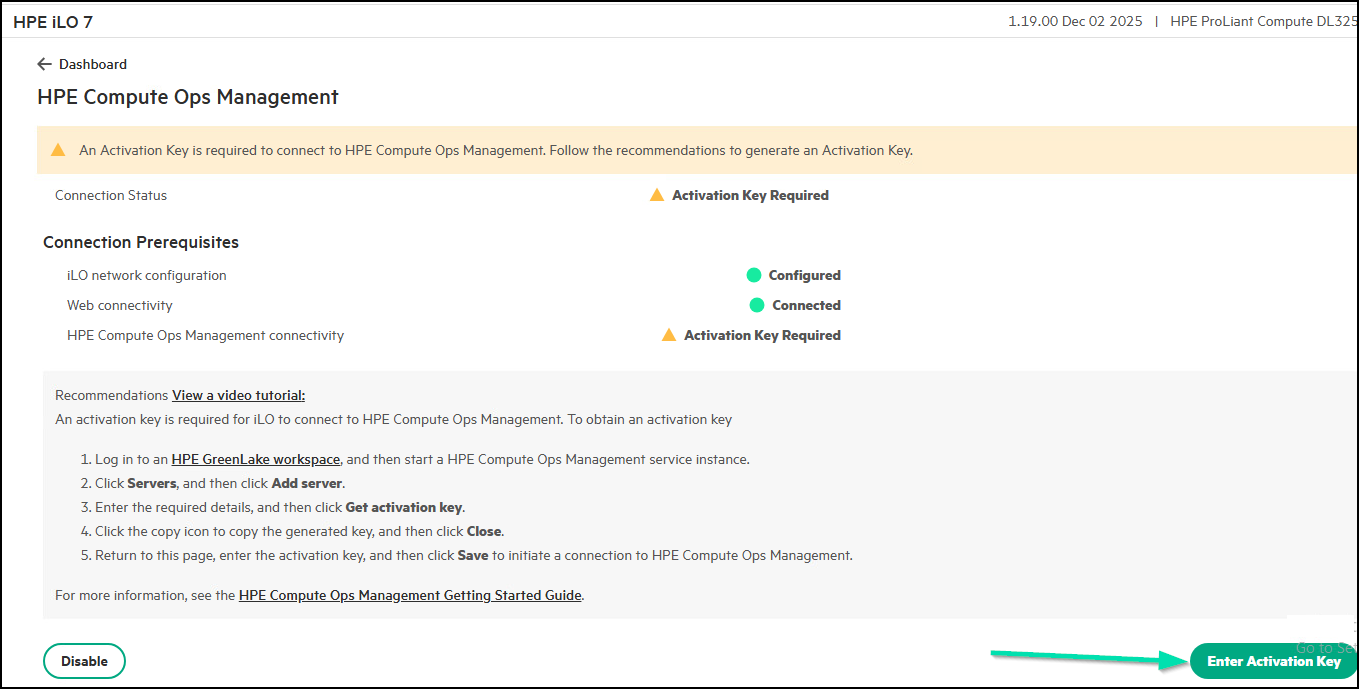
Then click on Enter Activation Key.

-
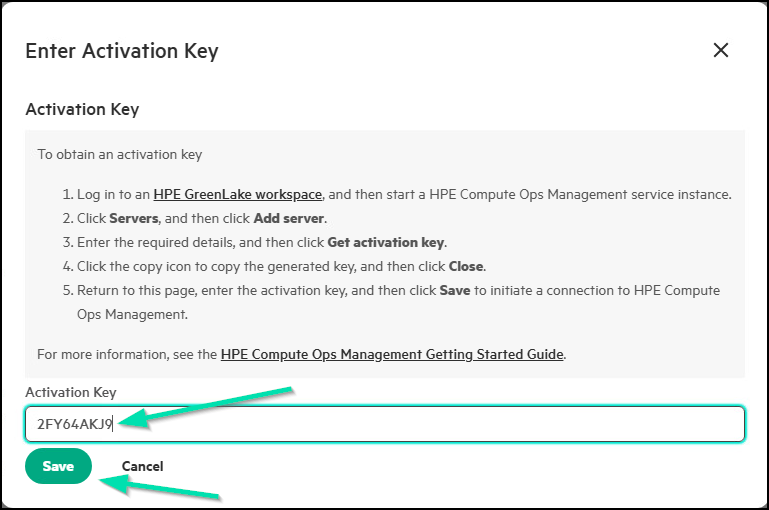
Then paste the Activation Key you copied previously and hit Save.
-
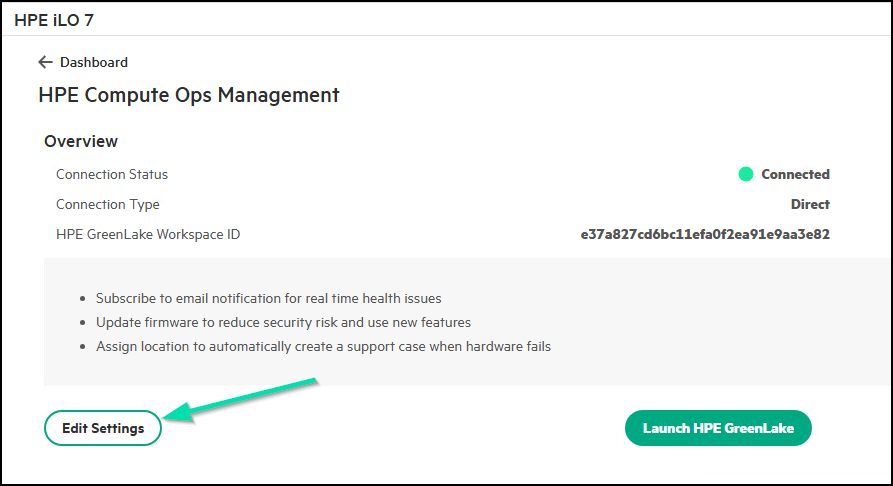
After a few seconds, it should now show you as Connected with your Workspace ID and Connection Type.
This concludes this section of the lab.
Task 9 - Securing your Server Fleet with HPE Compute Ops Management
HPE Compute Ops Management provides the core platform for delivering HPE compute services, enabling a standardized, self‑service, and real‑time operational model for IT administrators across the datacenter and edge‑to‑cloud infrastructures. It delivers a unified control plane that consolidates compute management into a single cloud‑hosted interface, reducing operational overhead and ensuring continuous access to newly released features, service enhancements, and security updates.
In this portion of the lab, we will focus on configuring Server Groups and applying Server Settings. This is the security configuration and lifecycle management aspect of your assigned server. We will create settings for the systems and place those settings into Groups. This ensures consistency across all servers assigned to those groups.
Return to your HOL Horizon Browser session.
-
From the HPE Compute Ops Management main menu. Select the Manage option.
-
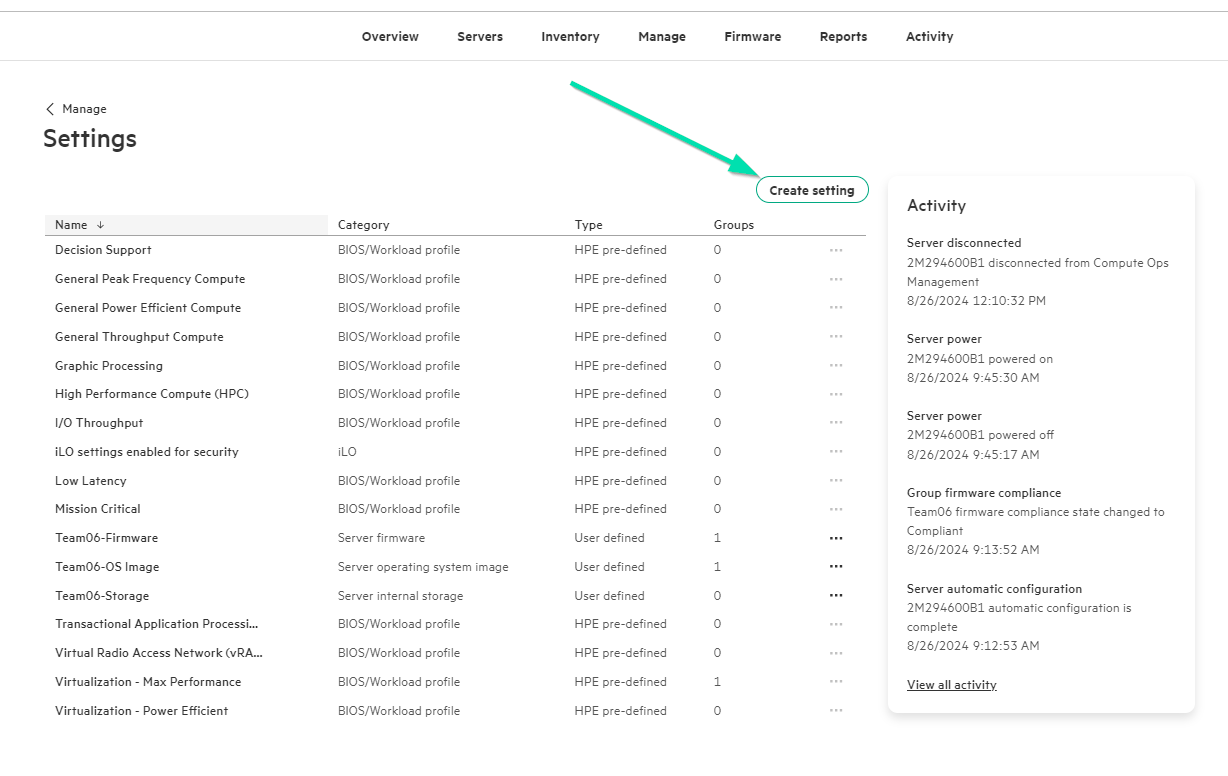
Now pick the card for Settings.
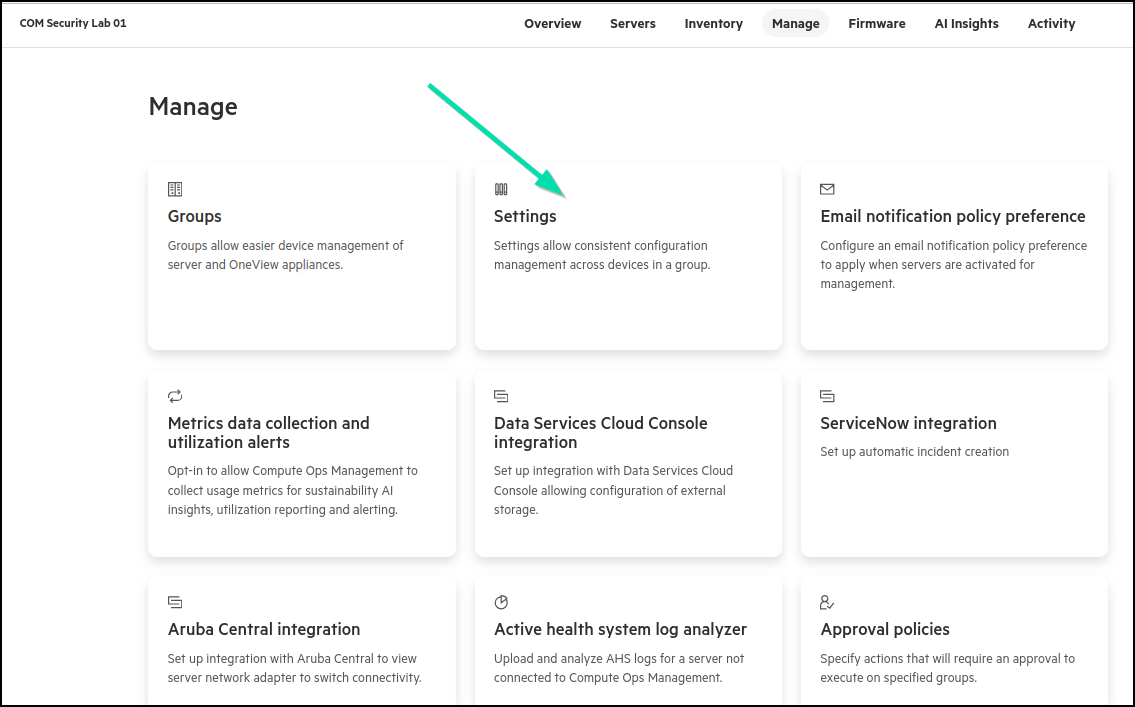
-
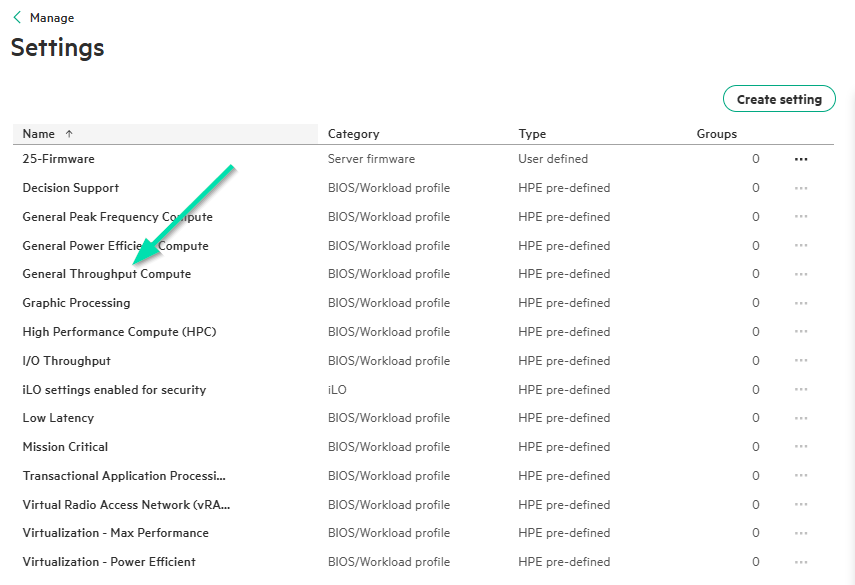
Take notice of some of the settings in the Name column and the Type column associated with each setting. HPE provides some pre-defined settings based on HPE ProLiant UEFI Workload Profiles. These settings are popular with administrators using HPE best practices for workloads like virtualization.
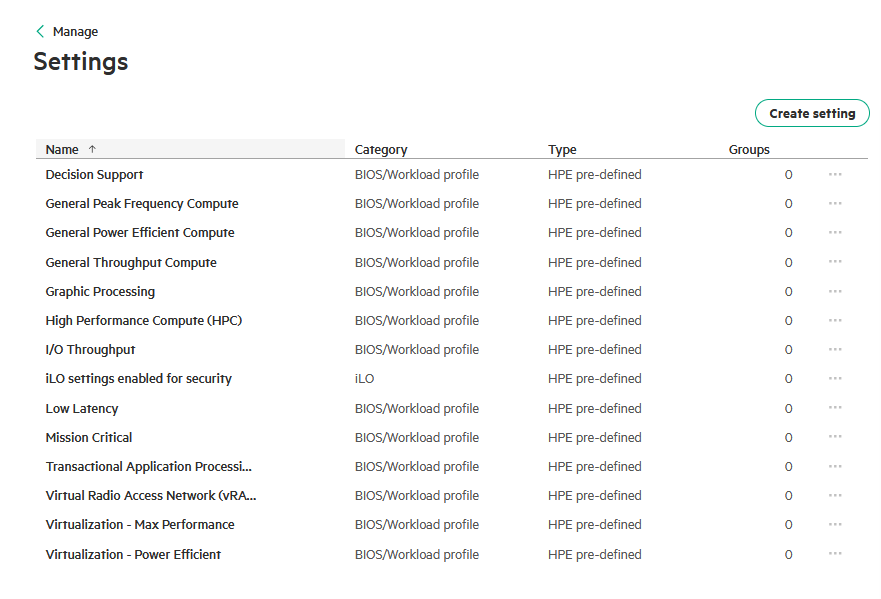
-
Now click on Create setting.
-
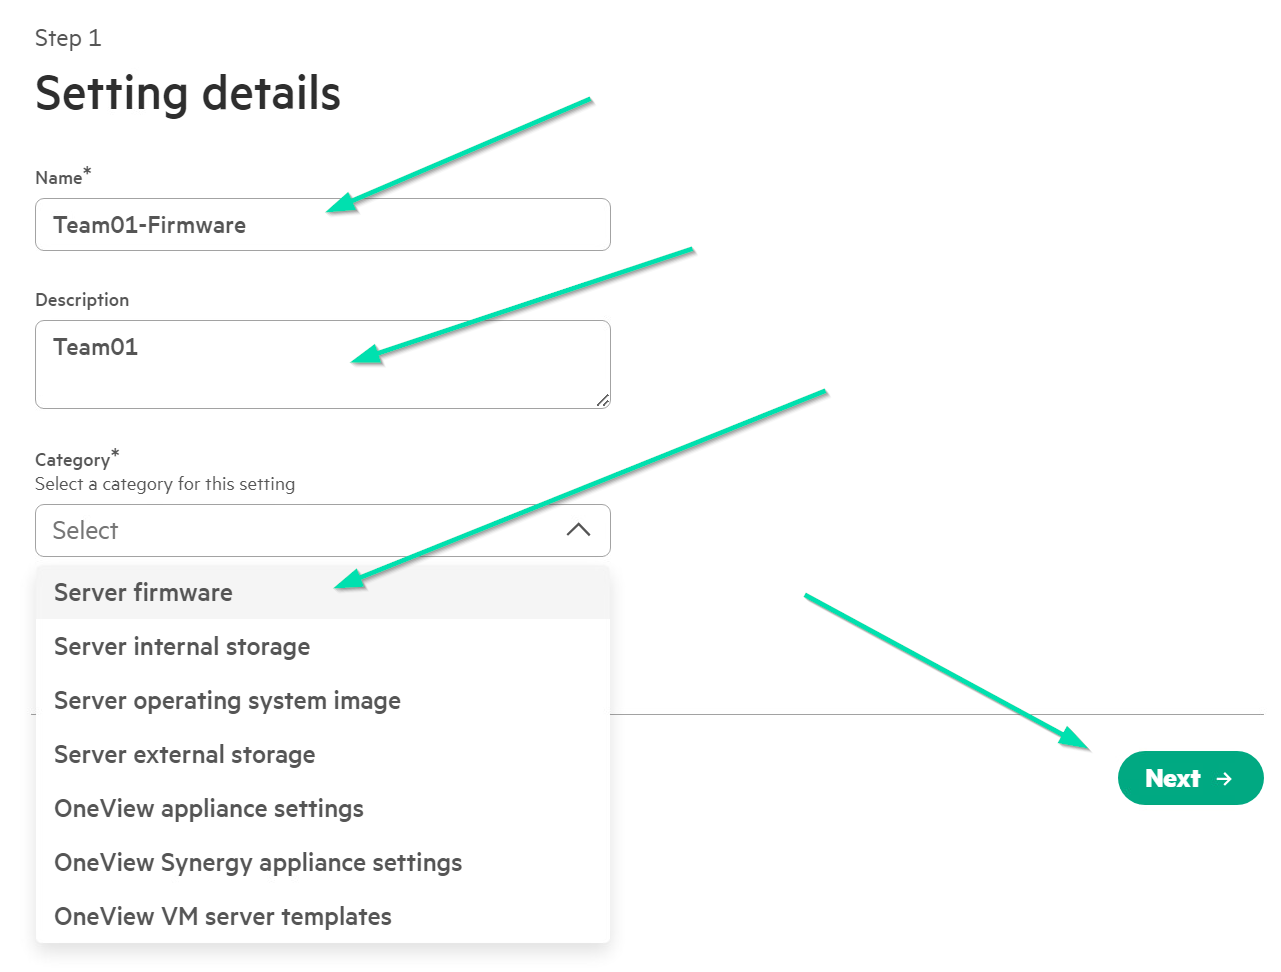
On the Setting details page, enter your Team name with -Firmware appended to it. Also enter your team’s name as a Description. Finally pick the Category of Firmware from the pull-down box and click Next to continue.
-
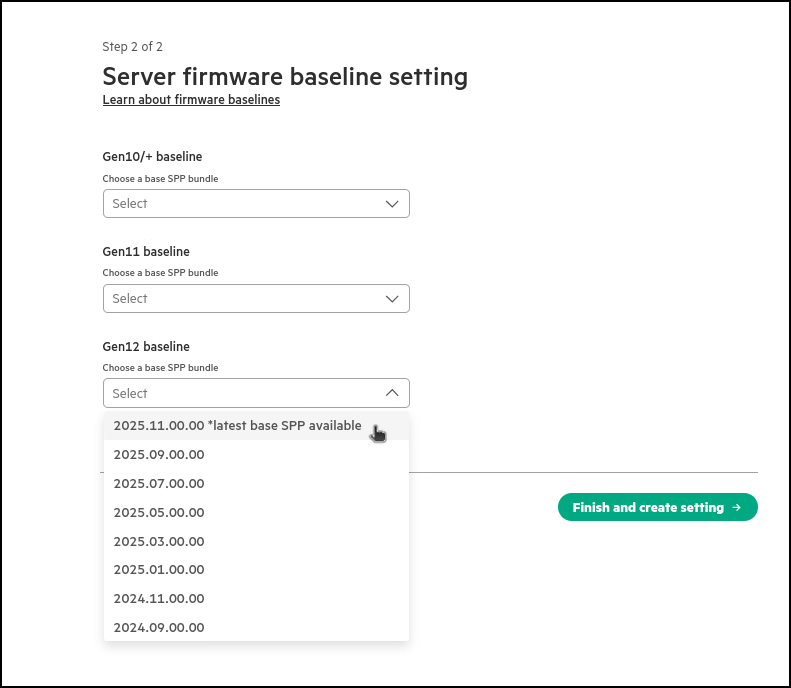
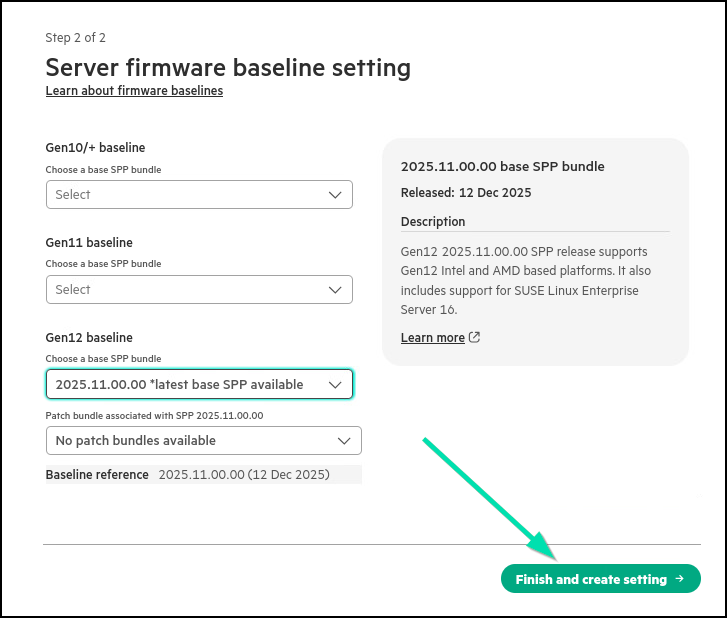
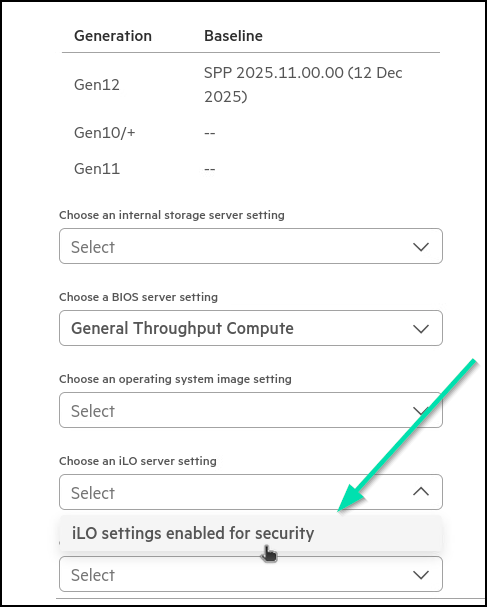
Now in step two of the process, use the pull-down menu in the Gen12 baseline to select the latest base SPP available.
-
Now select Finish and create server setting.
-
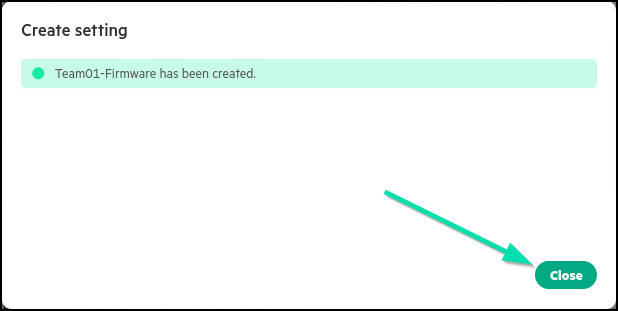
You should see the setting for firmware successfully created. Click on Close to finish the process.
-
The next two settings we will look to add to our Server Group in the next section of the Lab. The first is a HPE Pre-Defined BIOS/Workload profile. Click on General Throughput Compute as an example to find out more.
-
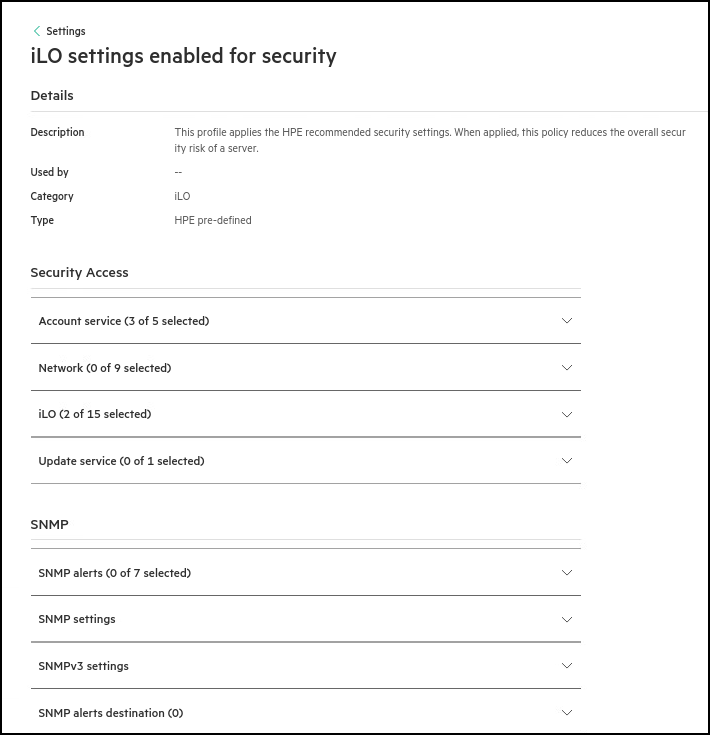
The second setting is the very important iLO settings enabled for security setting can be used to apply HPE recommended HPE iLO7 security settings, to reduce the overall security risk of a server:
This concludes this section of the lab.
Task 10 - Creating server groups and associating server settings
Server groups allow you to organize servers based on specific criteria (e.g., location, function, or role). When you create or edit a server group, you can apply server settings and server group policies. Servers directly managed by HPE Compute Ops Management can be added to server groups where these settings will be applied to all the systems in the group.
-
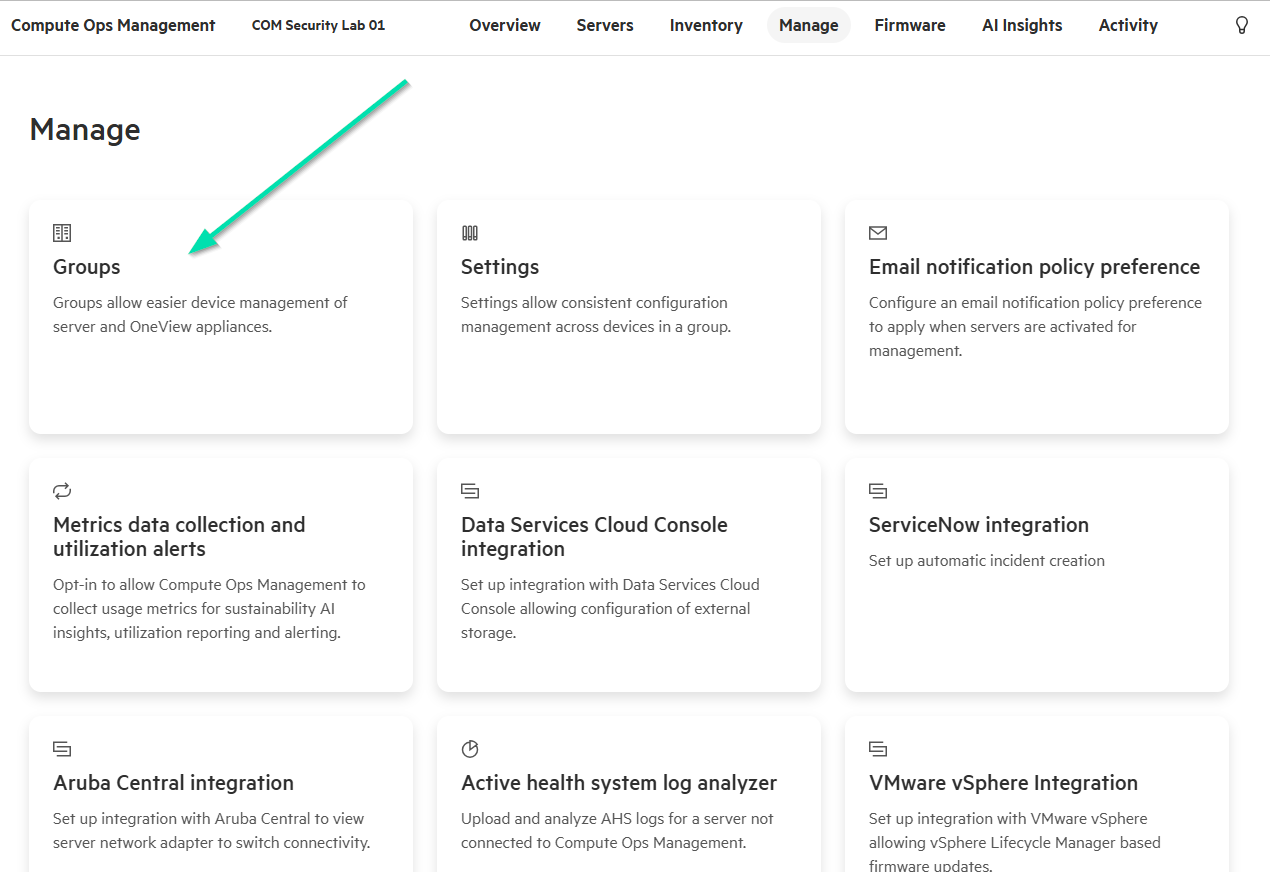
Now return to Manage in HPE Compute Ops Management and this time select the Groups card.
-
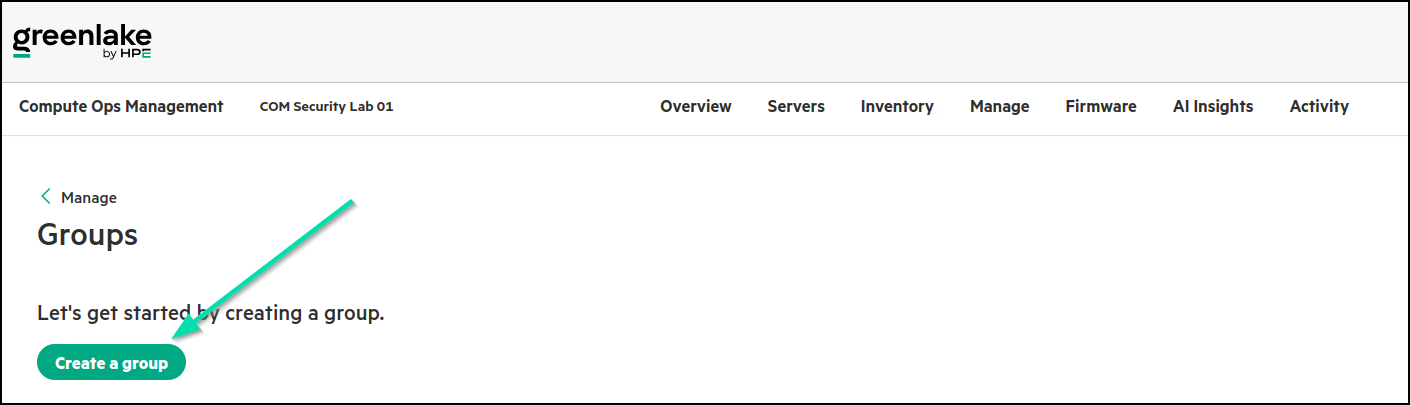
At the Groups page, click on Create a group.
-
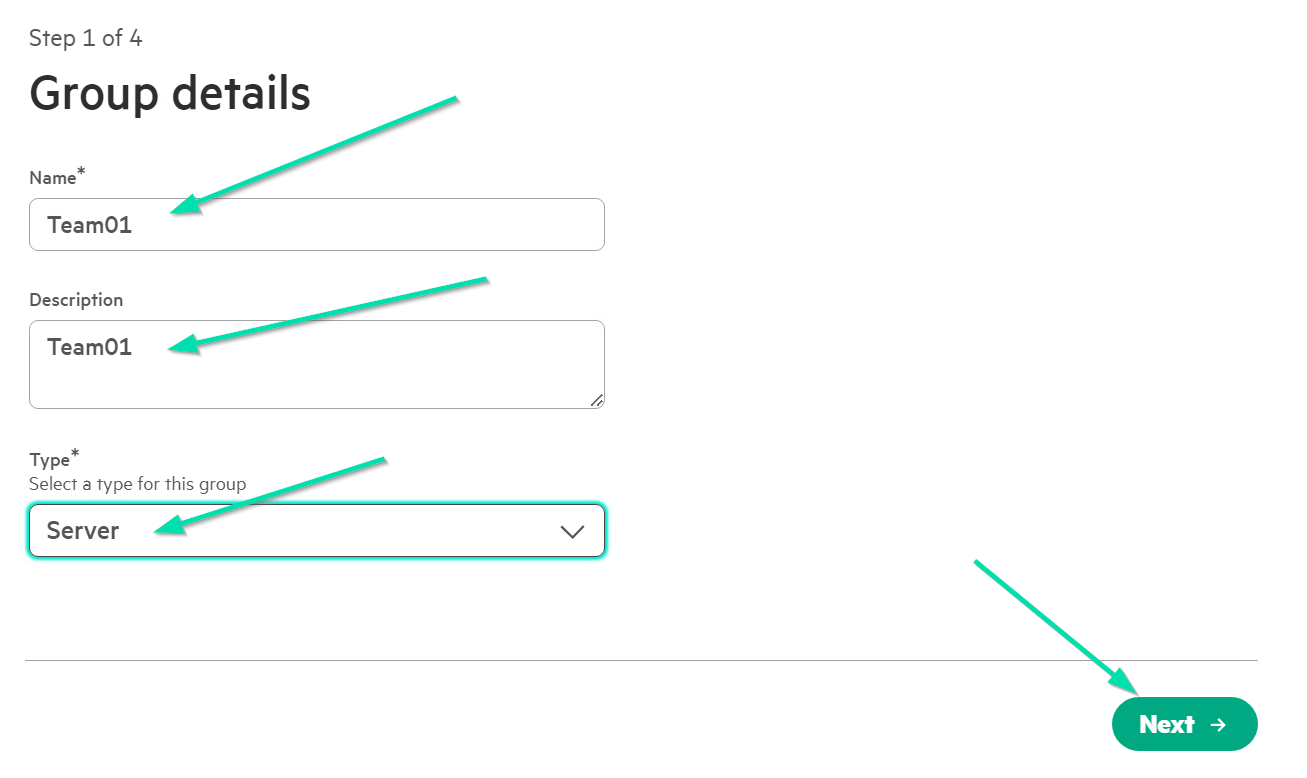
In the Group details section, enter your Team name in the Name field and then again for the Description field. Select Server as the type, then click Next to continue in the wizard.
-
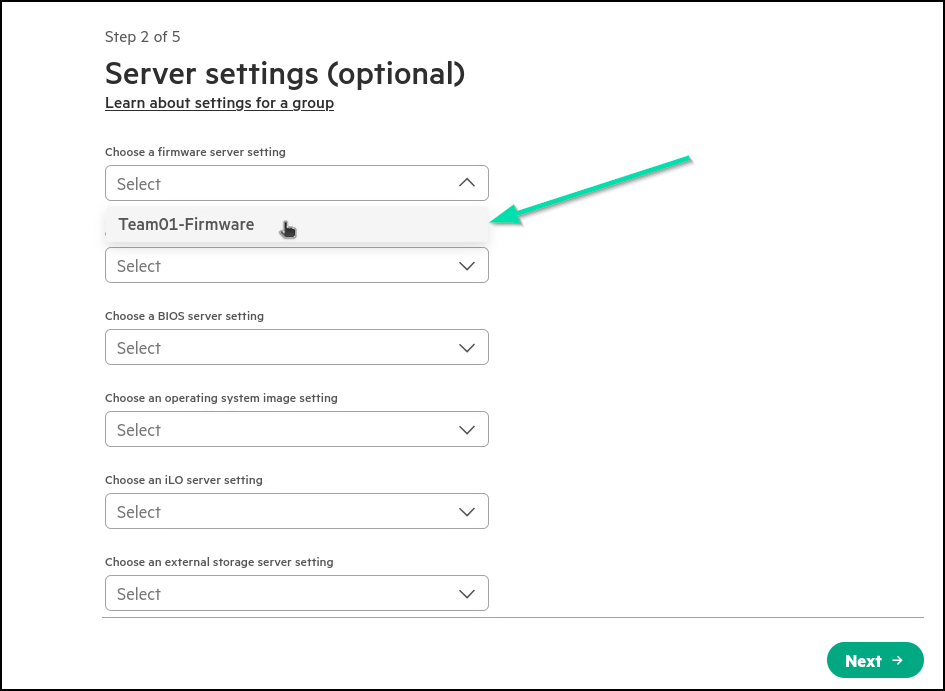
In the next screen of the wizard, use the pulldown menu to choose your previously created Firmware setting.
-
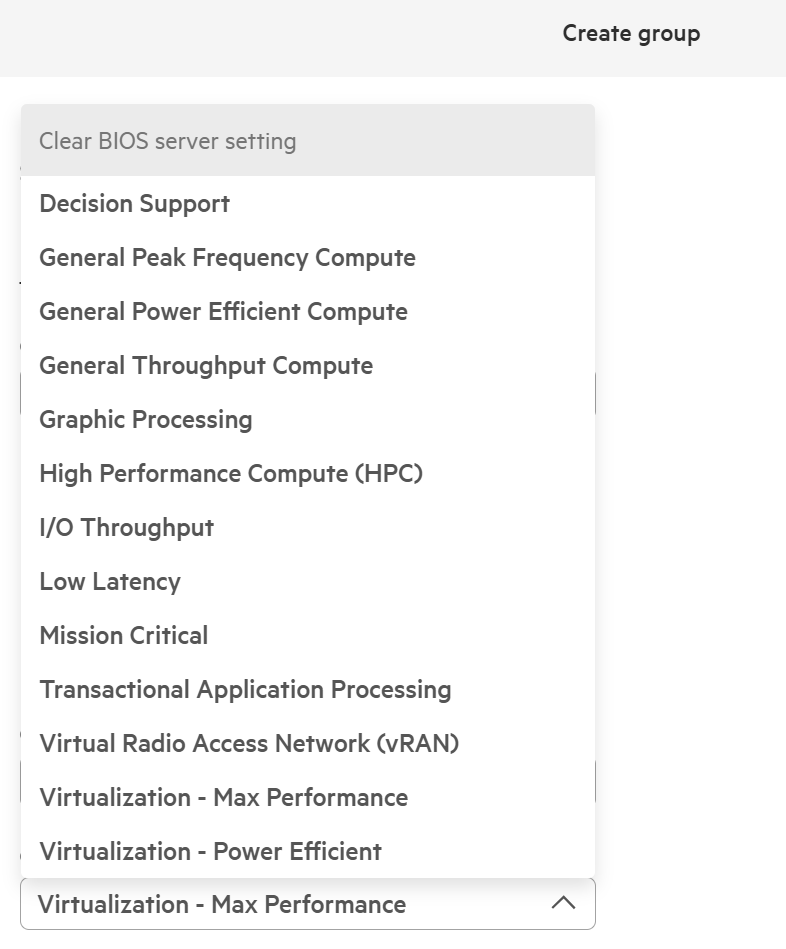
In the section, to choose a BIOS server setting, choose a setting that meets the needs of the customer.
-
In the section Choose an iLO server setting box, select iLO settings enabled for security.
-
Leave the rest of the options in this initial section at their default values, and then select Next to advance in the wizard.
-
Normally we would enable the Auto apply firmware baseline, but for the purpose of this Lab, we will leave it disabled. Click Next to continue.

-
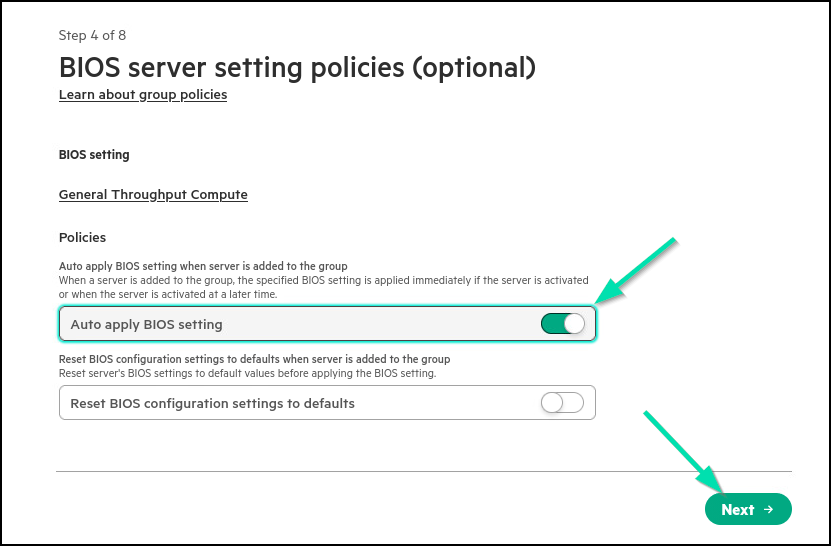
Enable the Auto apply BIOS settings policy and then select Next.
-
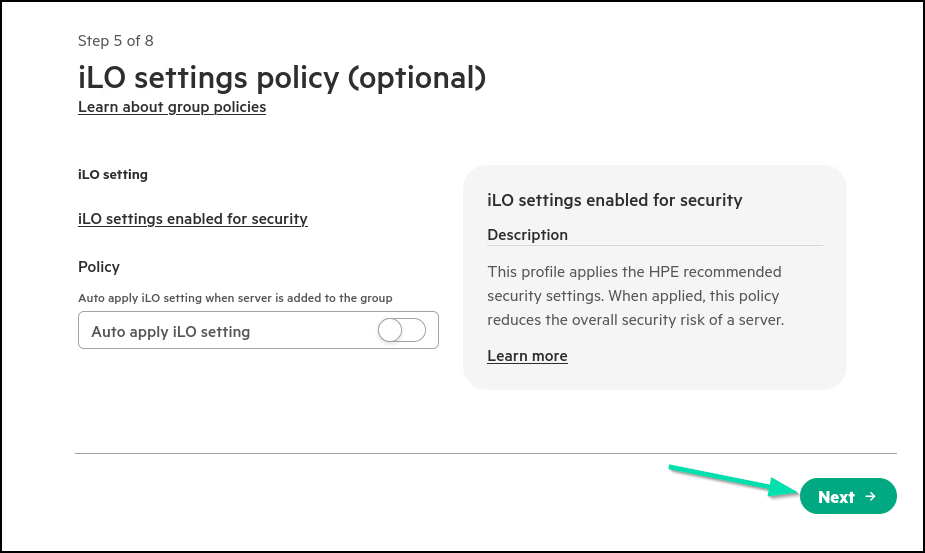
For auto applying iLO Setting, leave this disabled for now so we can manually apply this later in the Lab, click Next to continue.
-
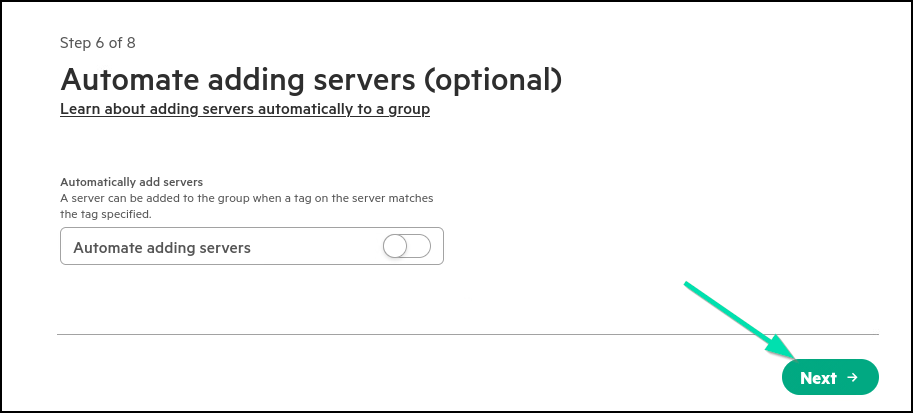
For the question of how we are adding our servers to the group, we are going to setup the group for manual addition of servers to the group. Select Next to move on.
-
We are not going to establish an approval process in this HOL but it is a best practice in real life. Select Next to move to the finish.
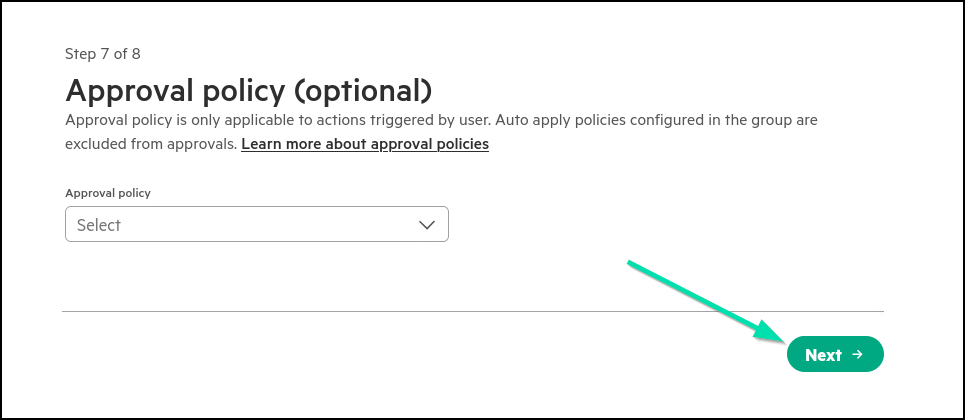
-
At the last step, review the card you have settings defined and then select Finish and create group.
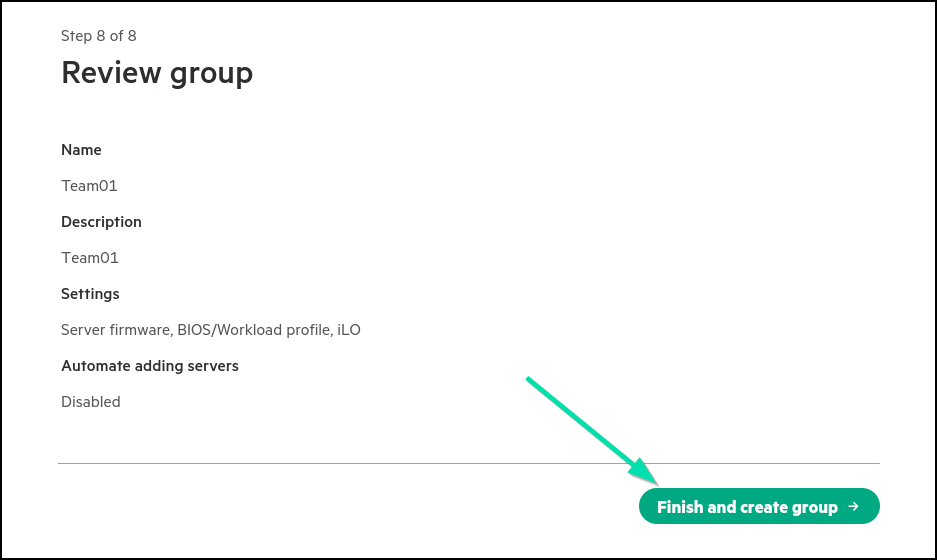
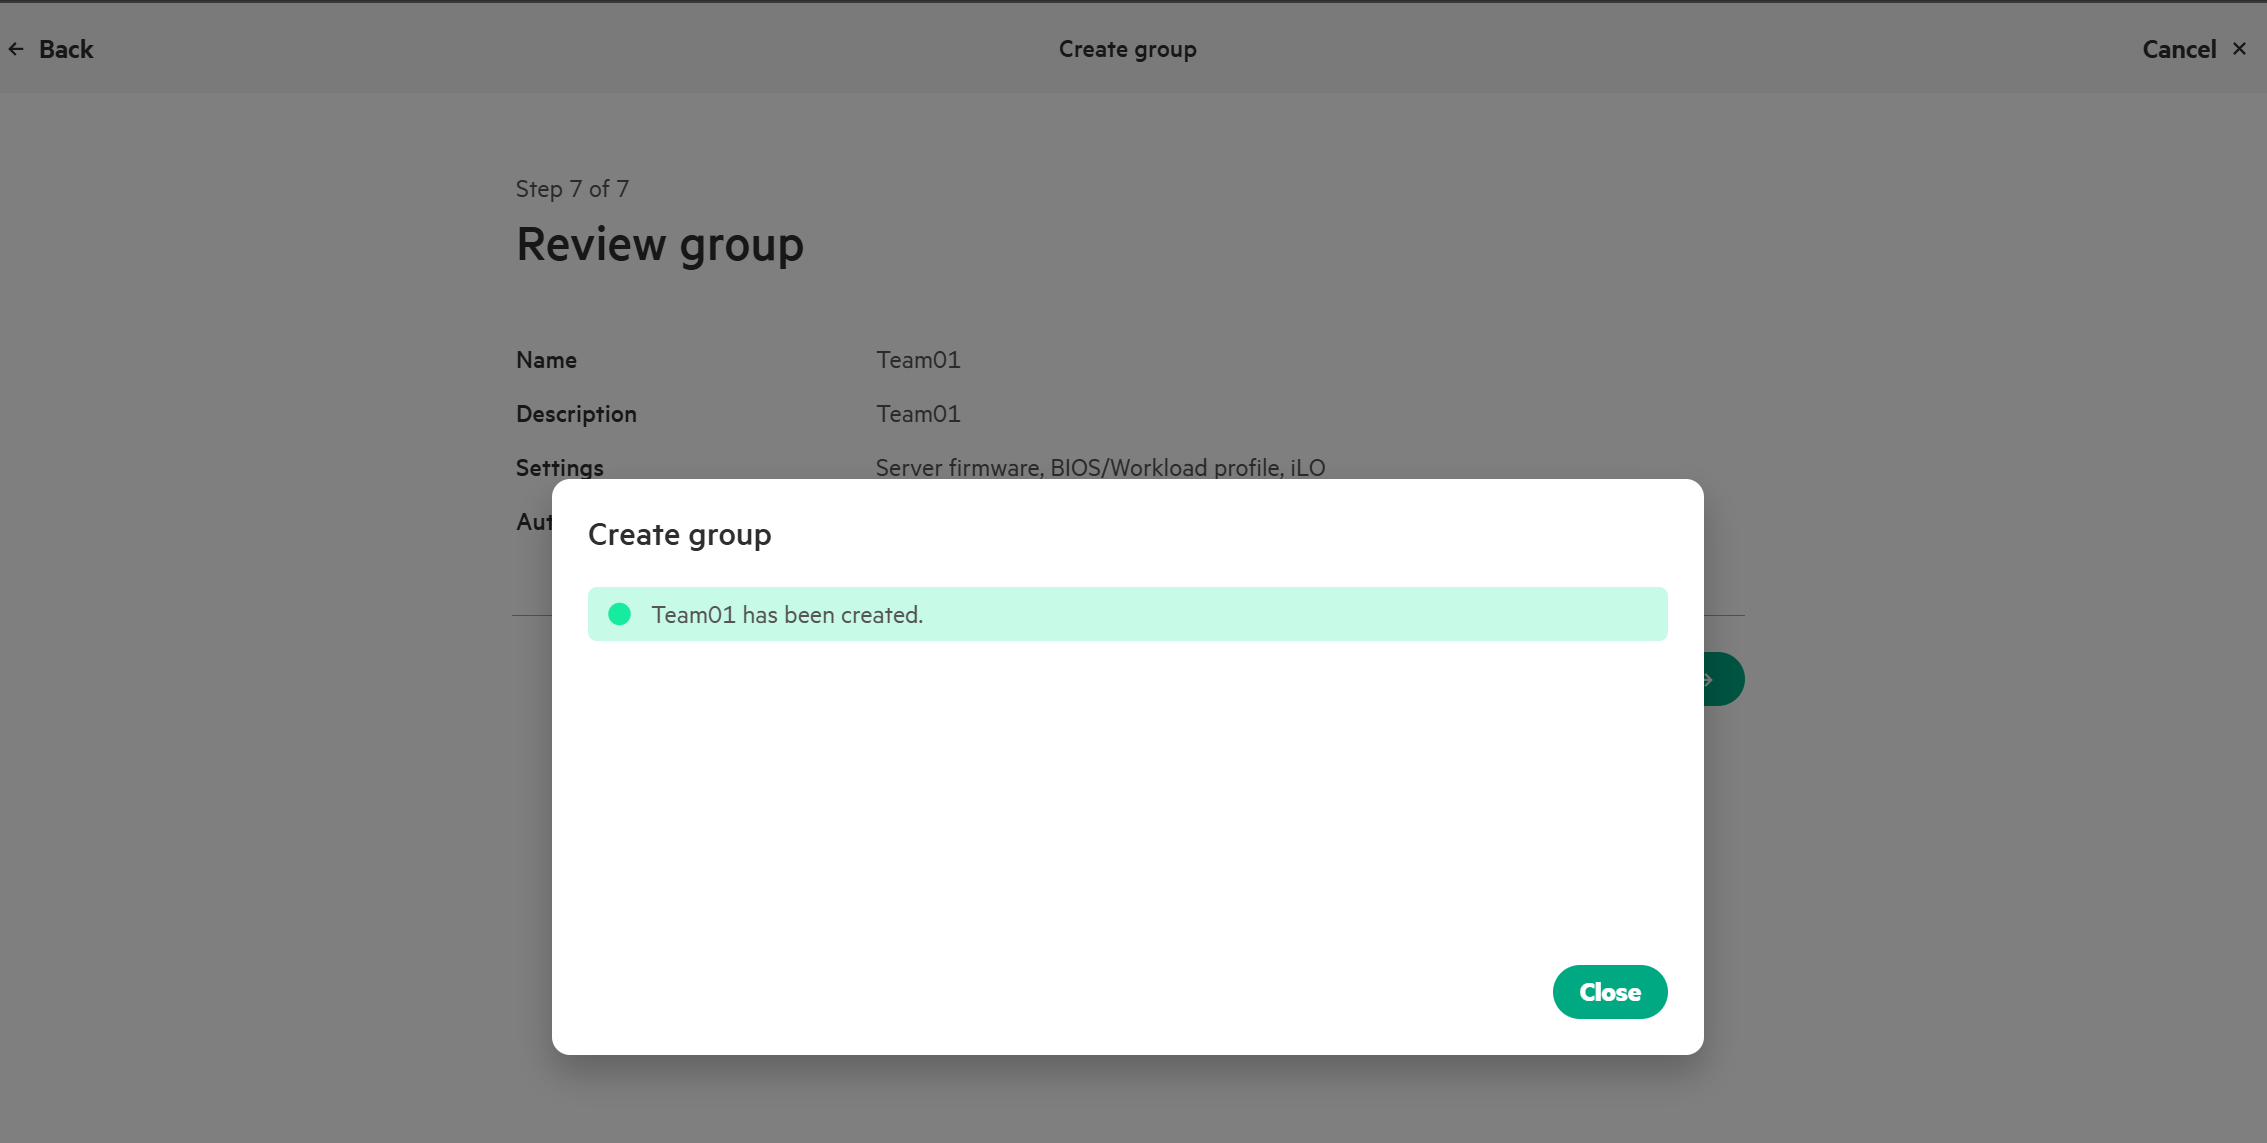
-
The group should be created, and you can click on Close to finish the process.
-
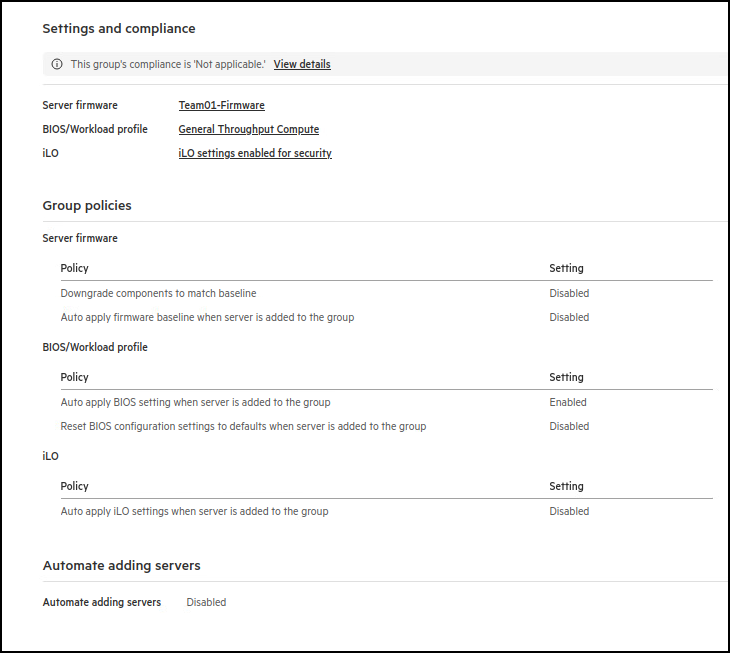
Now within the Groups section, you can select your Server group. Click the Hyperlink for your Team Name.
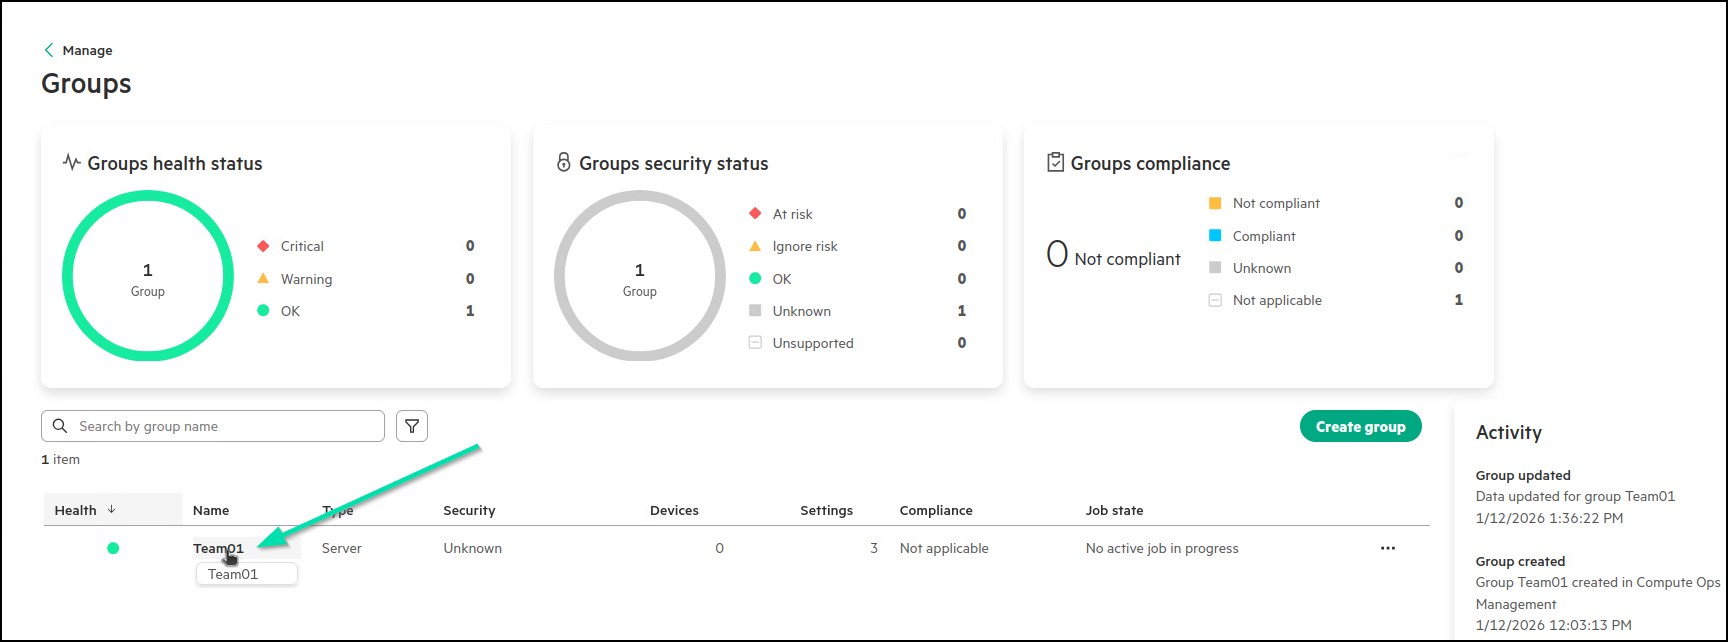
-
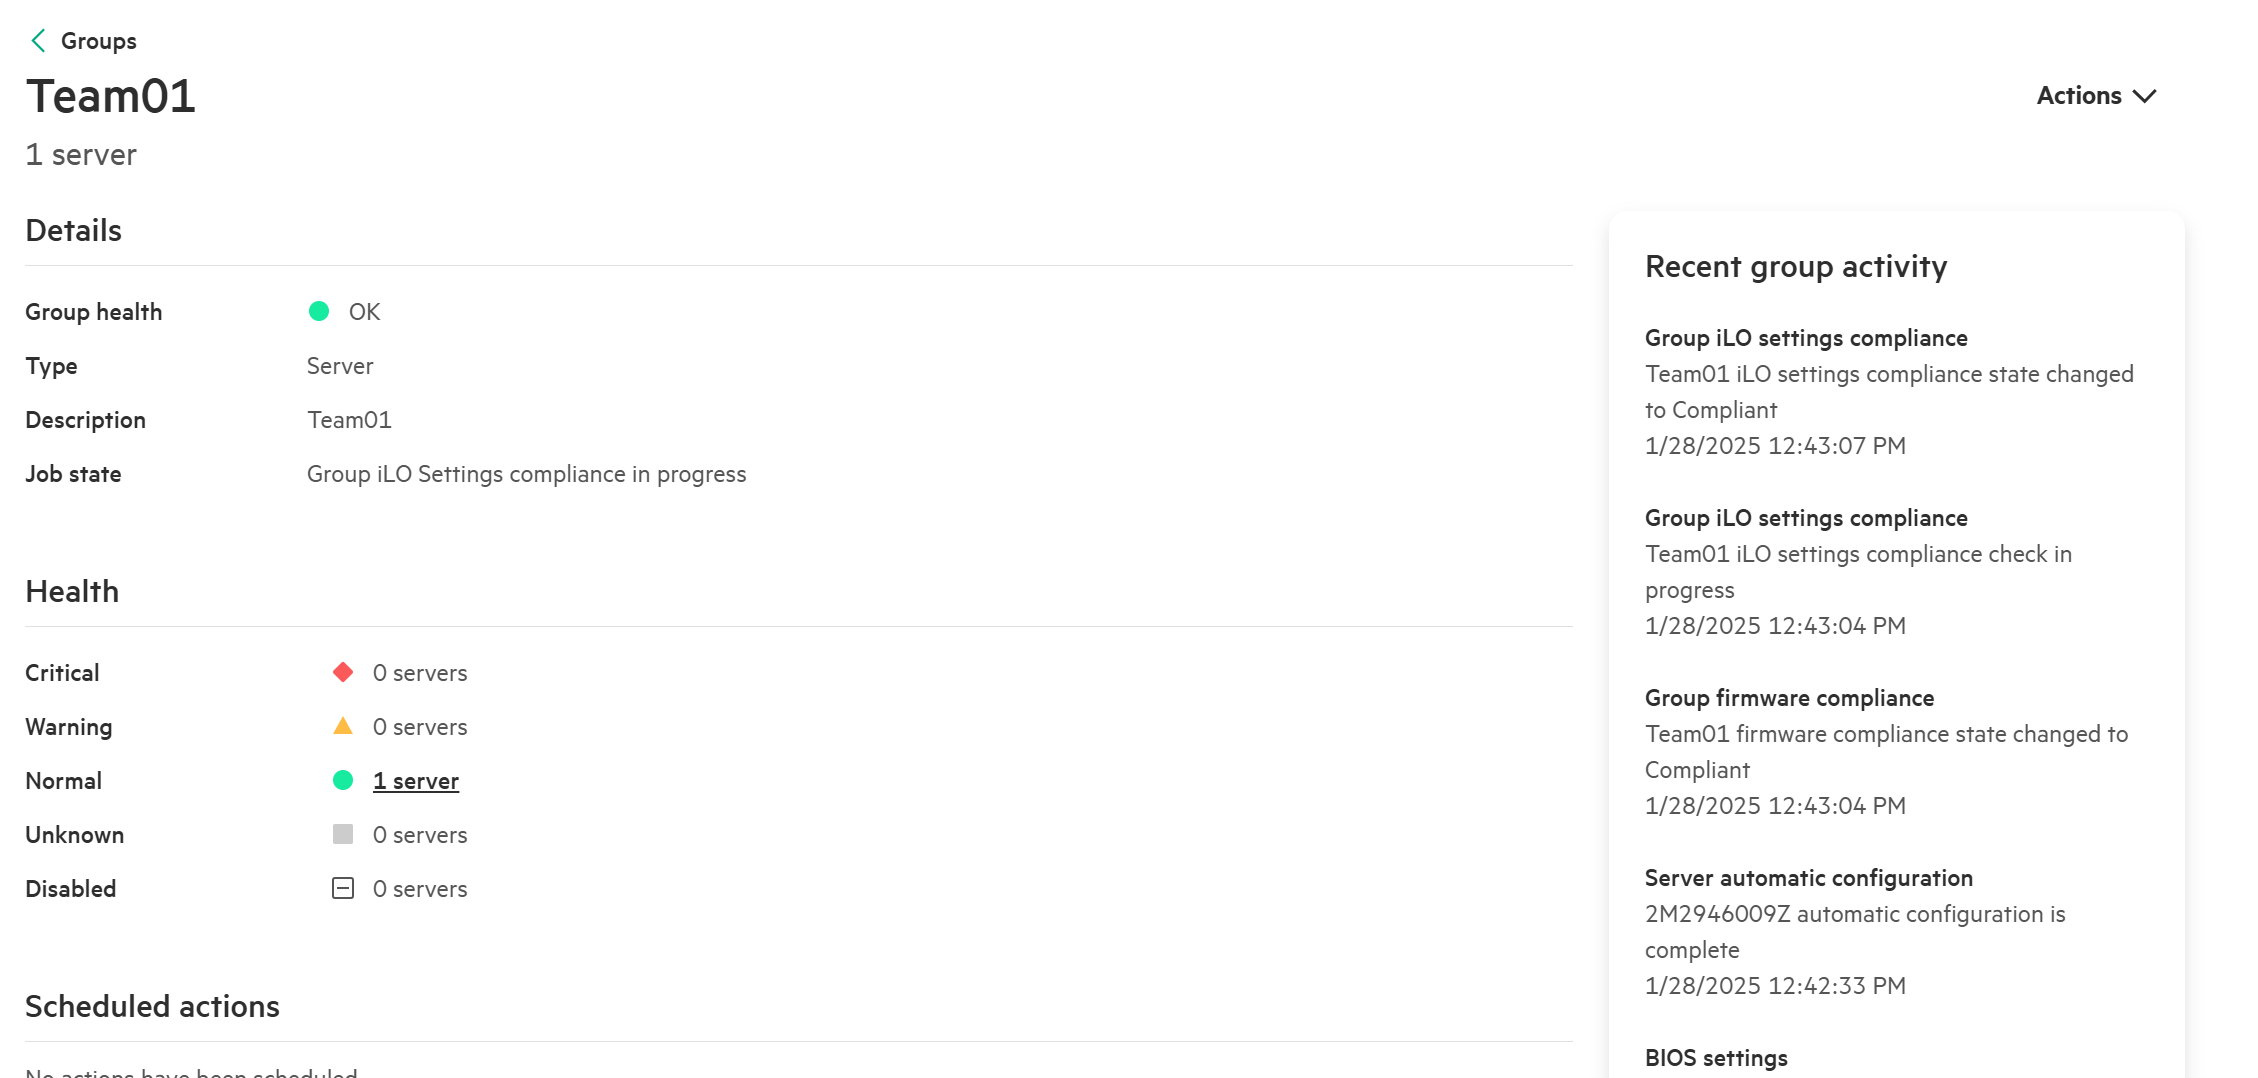
Scroll through the details of your server group and take notes of the Compliance section. These are the details of what you just defined at the group level. This will help administrators understand if any configuration drift occurs in the future.
-
Scroll back up to the top of the page and click on the Actions button (to the right of the frame) to reveal how functions are performed on the entire group.
-
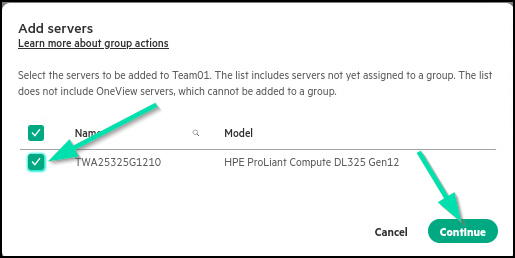
Click Add servers.
-
Select your server by clicking the checkbox next to its name then click Continue to proceed to the summary.
-
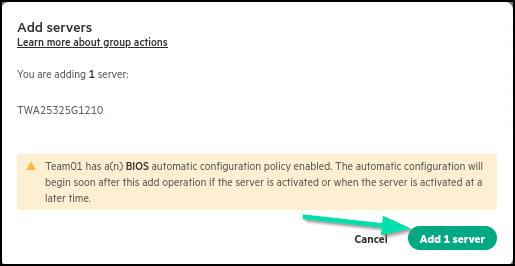
Review the actions that will take place on your server before clicking Add 1 server.
-
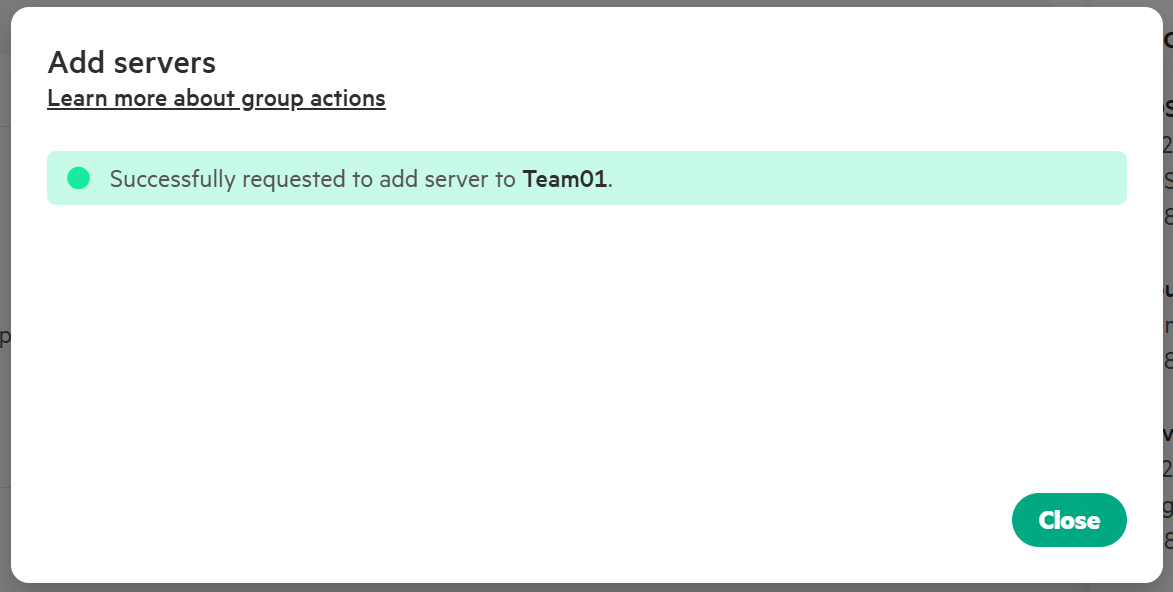
Click Close to return to your team’s server group.
-
The settings designated to automatically apply to servers as they are added to the group will be applied. Note the Recent group activity pane and observe the actions as the settings are applied to your server.
This concludes this section of the lab.
Task 11 - Advanced Security settings for HPE iLO7
HPE iLO (Integrated Lights-Out) provides robust security features to mitigate risks in networked environments. Features like Trusted Platform Module (TPM) or TM Status, Local User Account Controls and Directory Group Account Controls that support Kerberos authentication or schema-free directory integration. You can set server name and FQDN/IP addresses yourself but consider leaving those values blank to let the host OS assign them. There are Secure Shell (SSH) Key Settings that can be managed for secure communication with the HPE iLO7 management processor itself.
In this lab we will look at security parameters like in Network Settings where we can enable/disable various services (e.g., SSH, SNMP, Virtual Media.) We will configure anonymous data and IPMI/DCMI over LAN. Idle Connection Timeout values can be set.
While security is crucial, striking a balance between protection and usability is essential. Implement settings based on your organization’s needs.
Finally, the HPE iLO7 Security Dashboard provides real-time insights to monitor and manage security settings proactively.
-
Navigate back to your assigned Servers HPE iLO7.
-
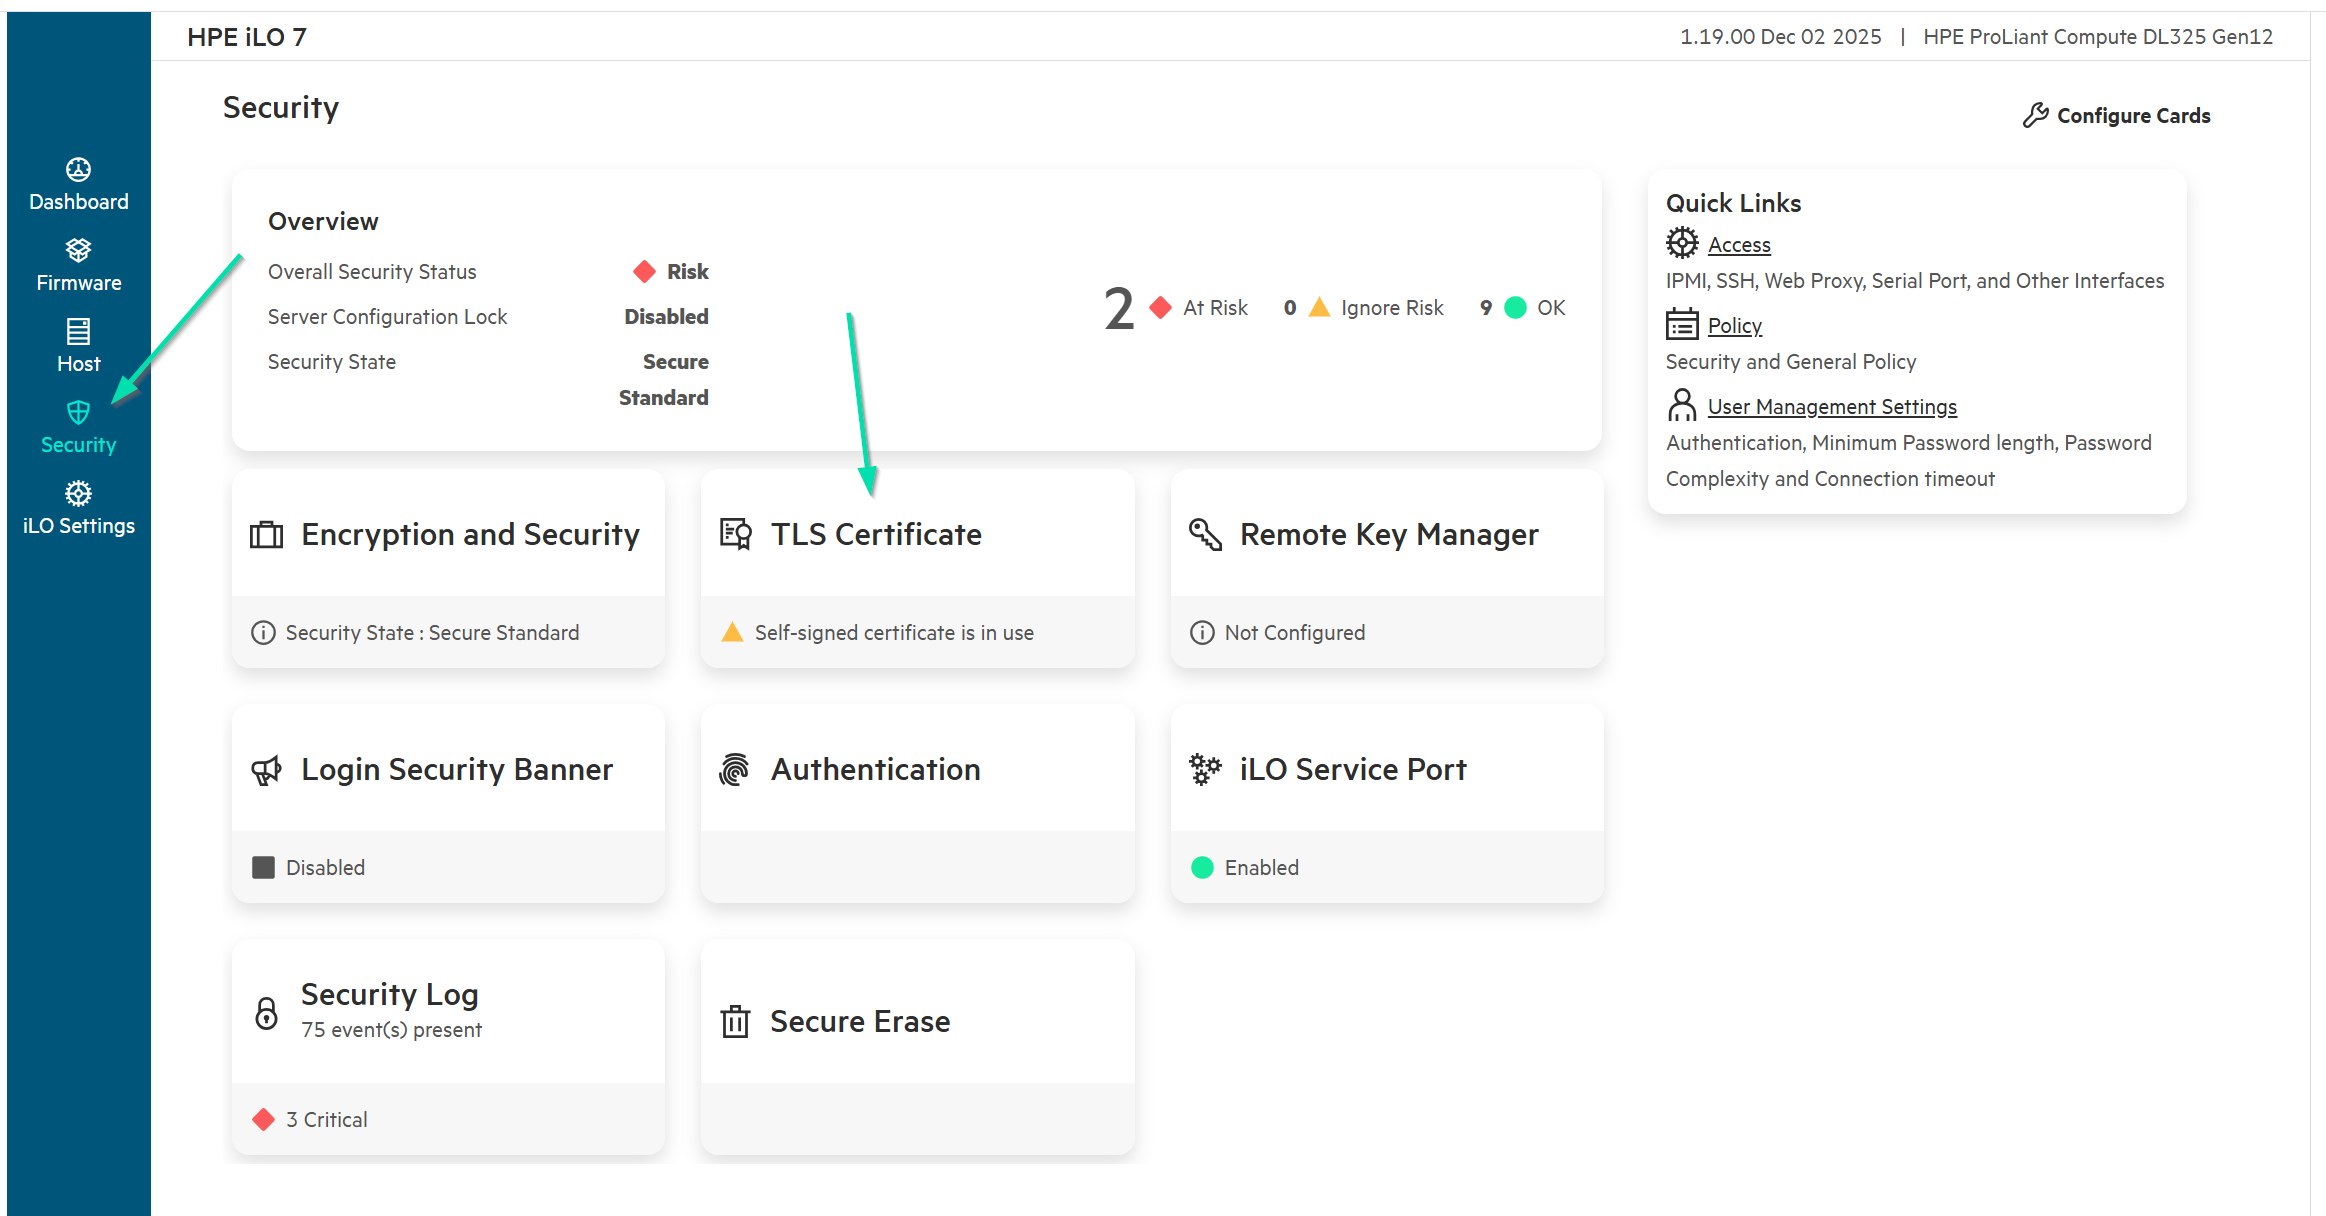
From the HPE iLO7 Dashboard page, click on Security link.
-
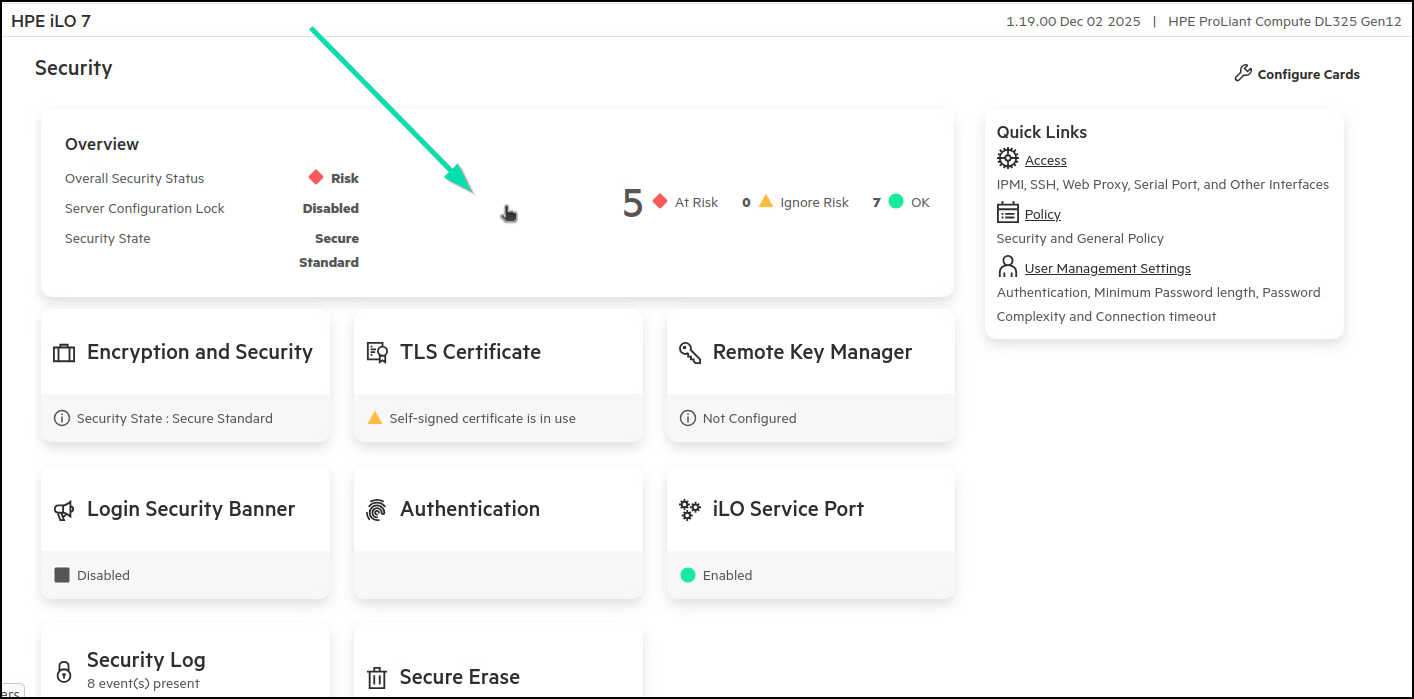
From the Security page, click on the Overview card.
-
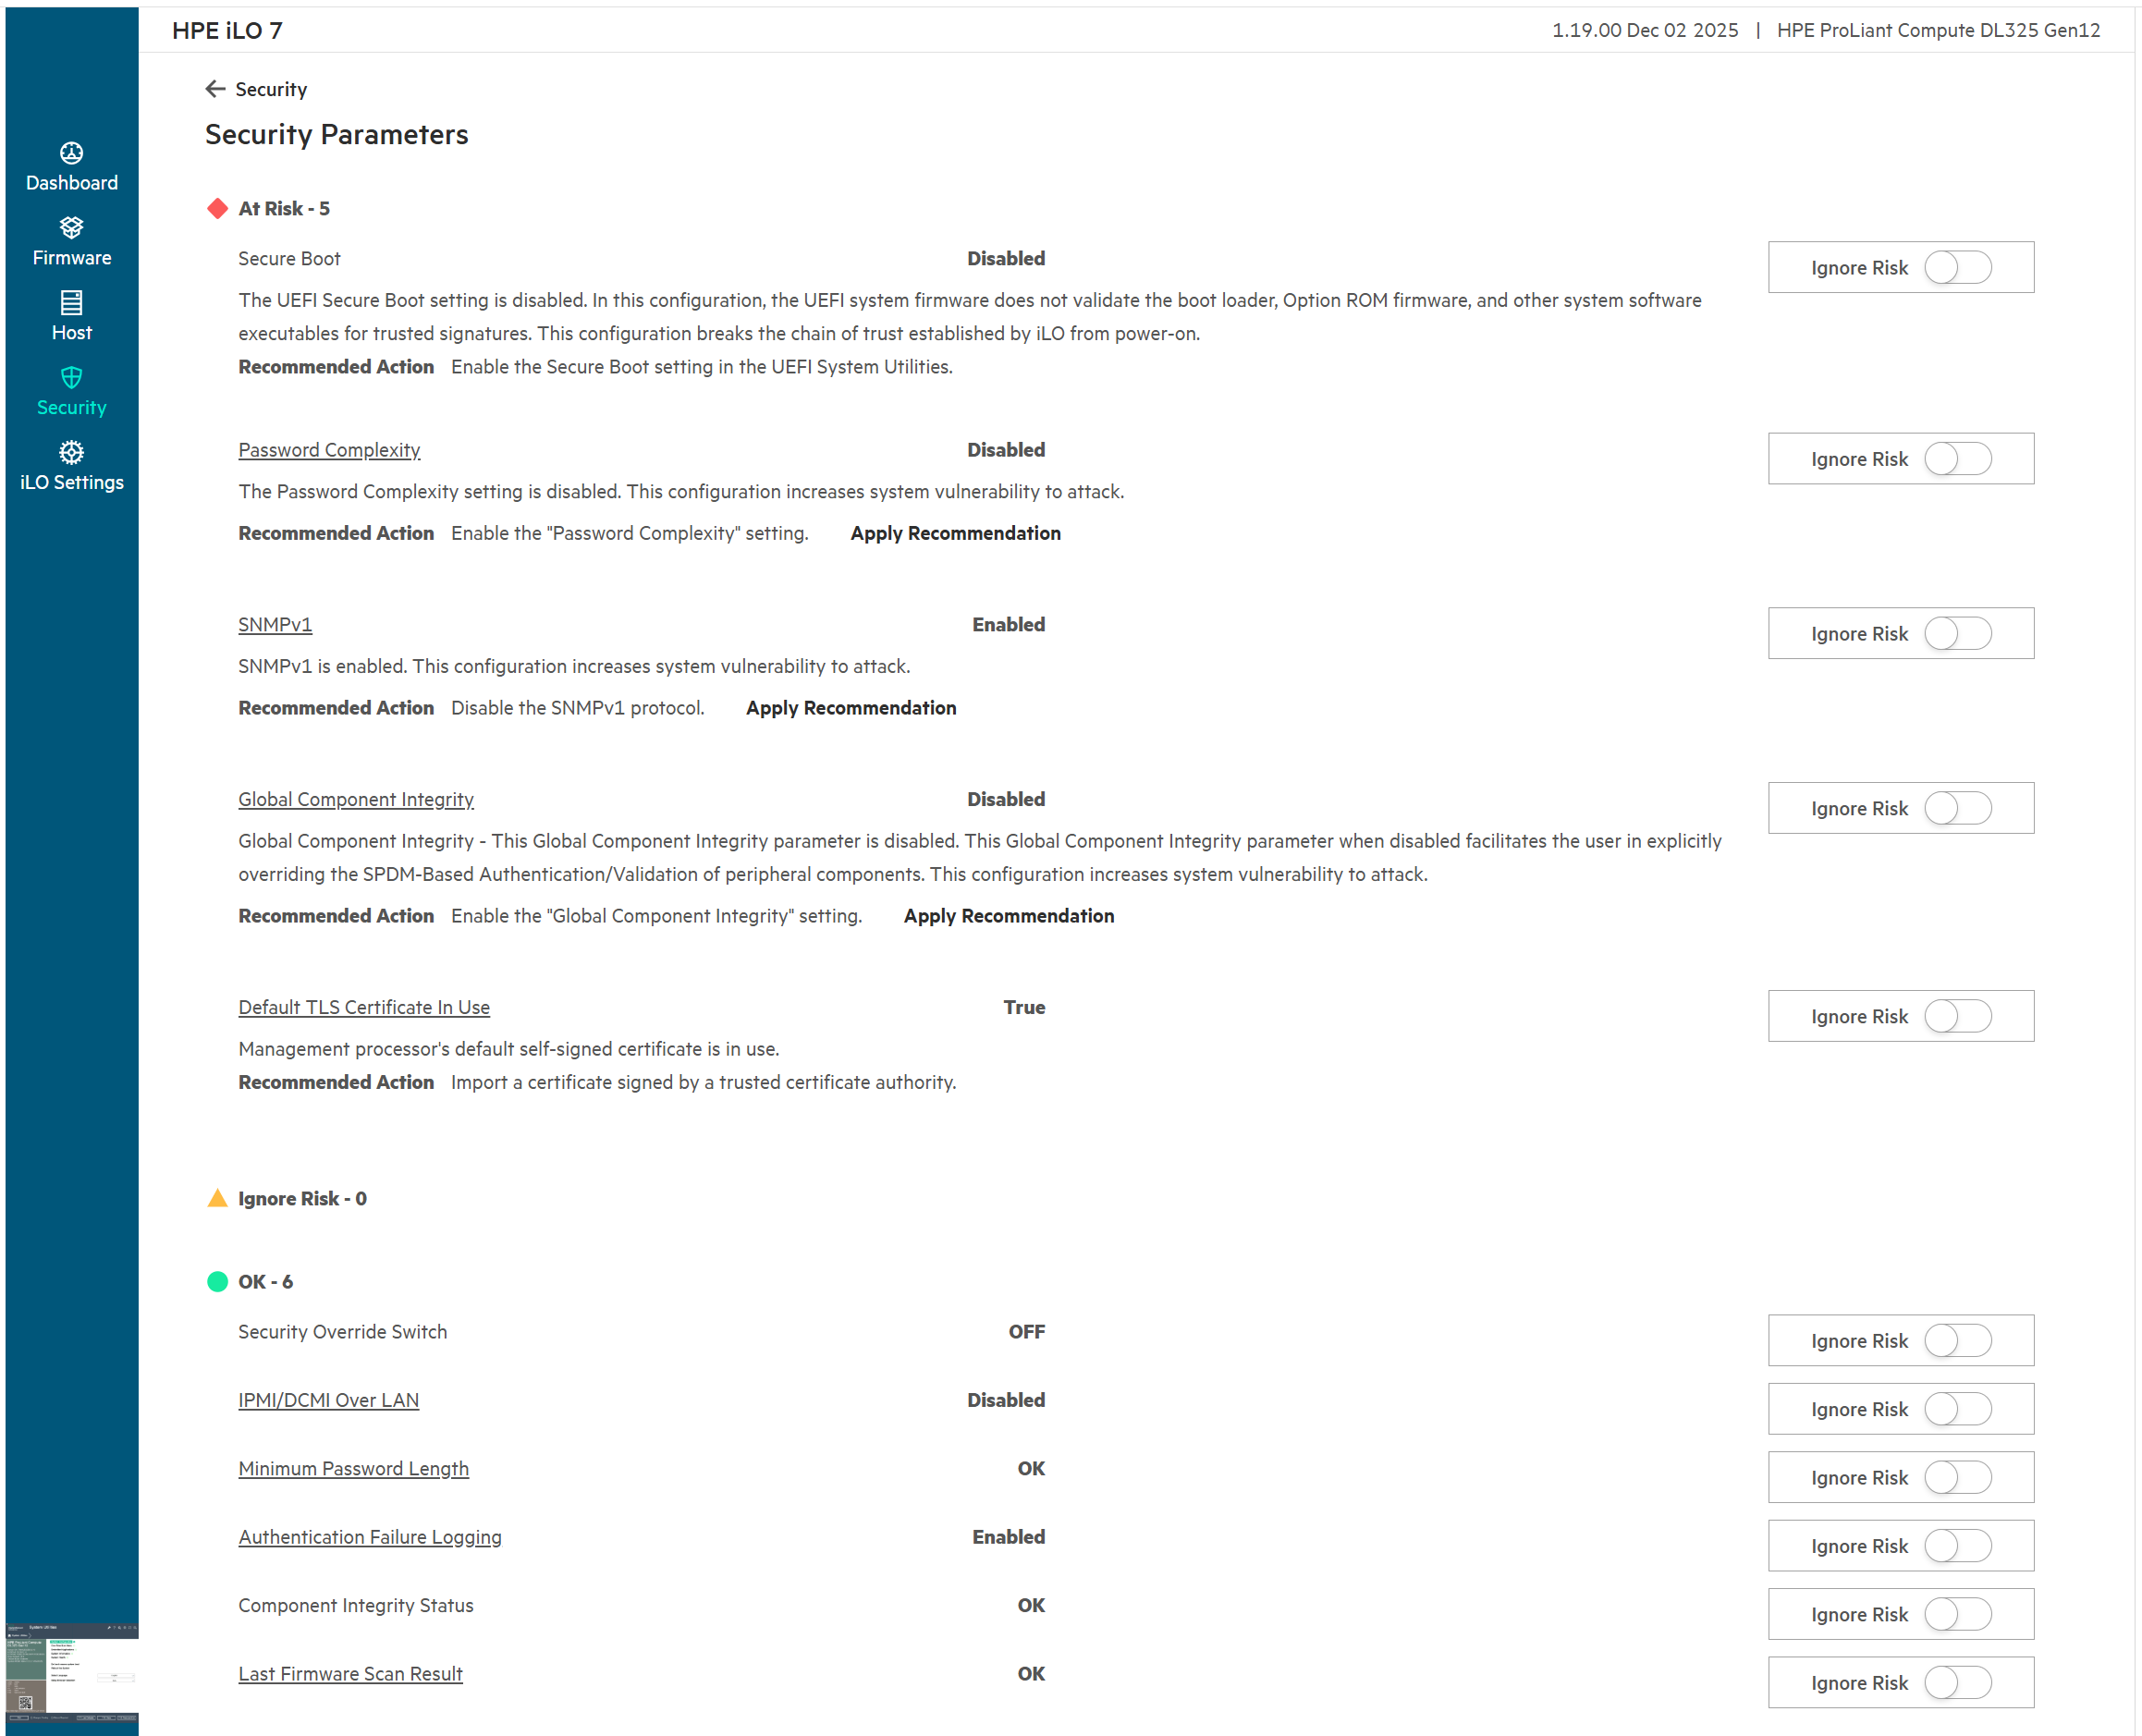
Now review the Security parameters.
-
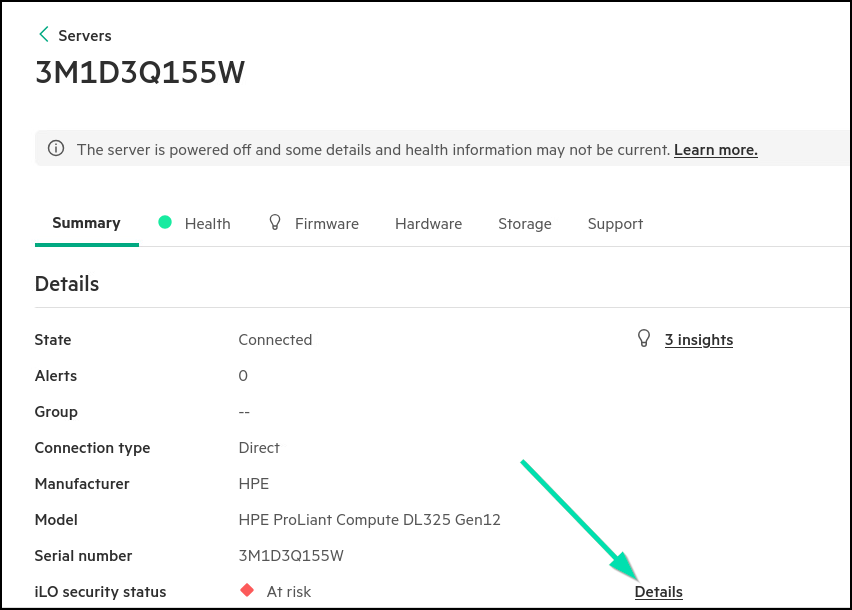
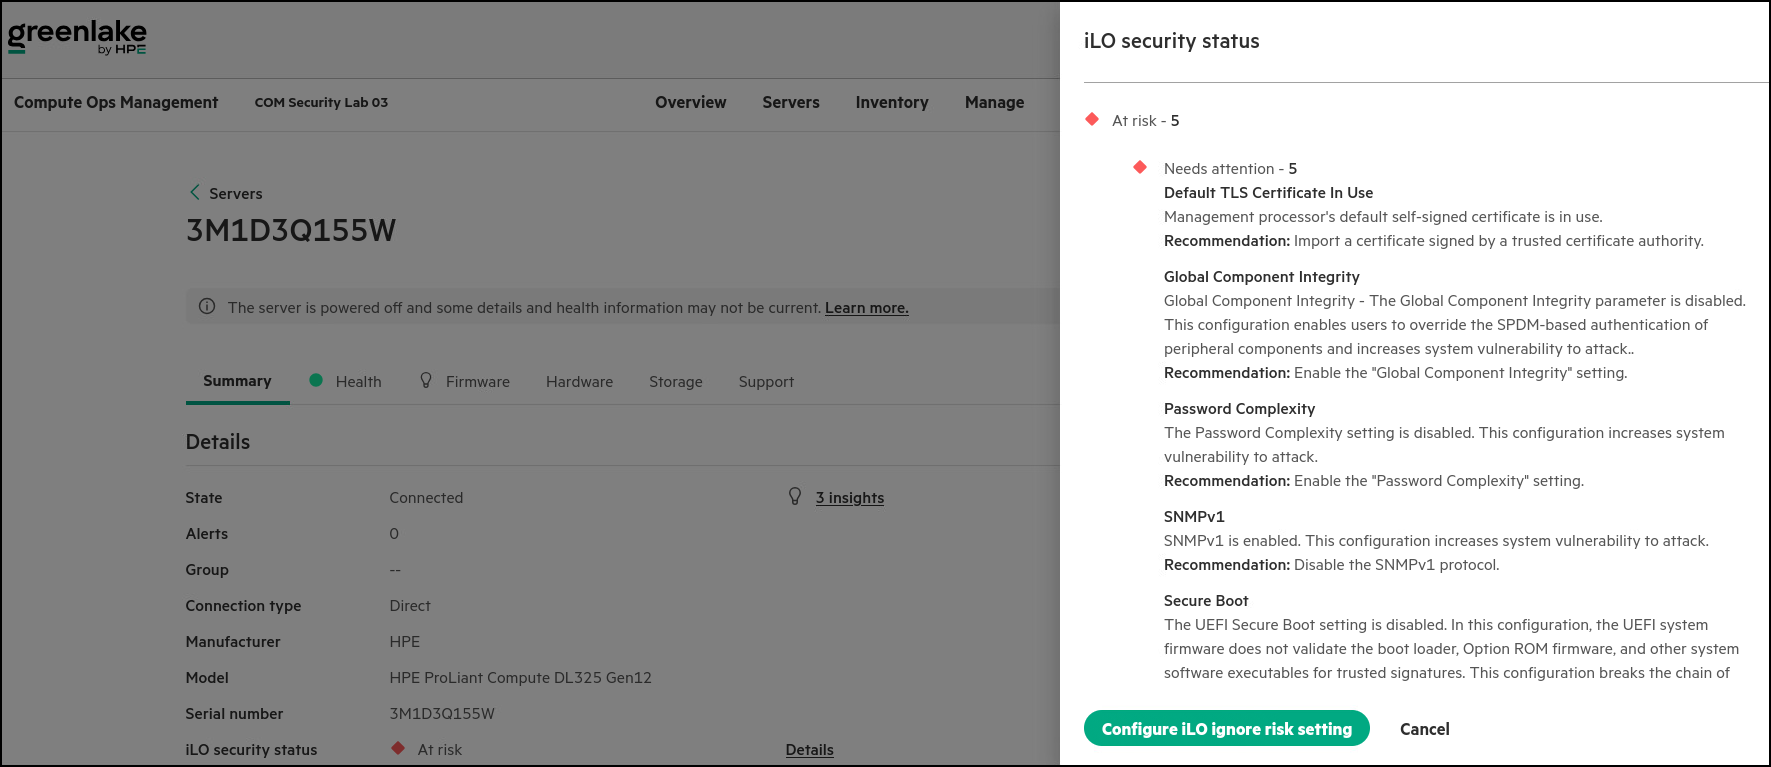
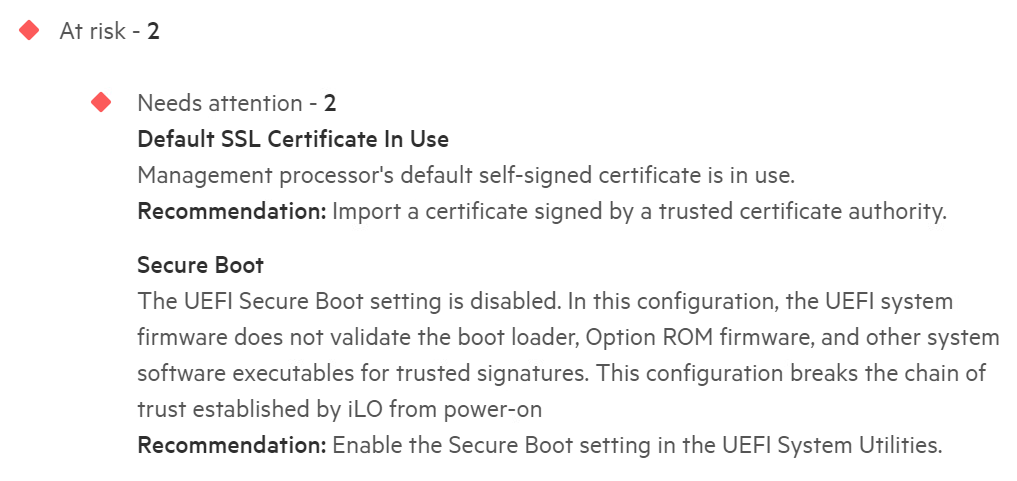
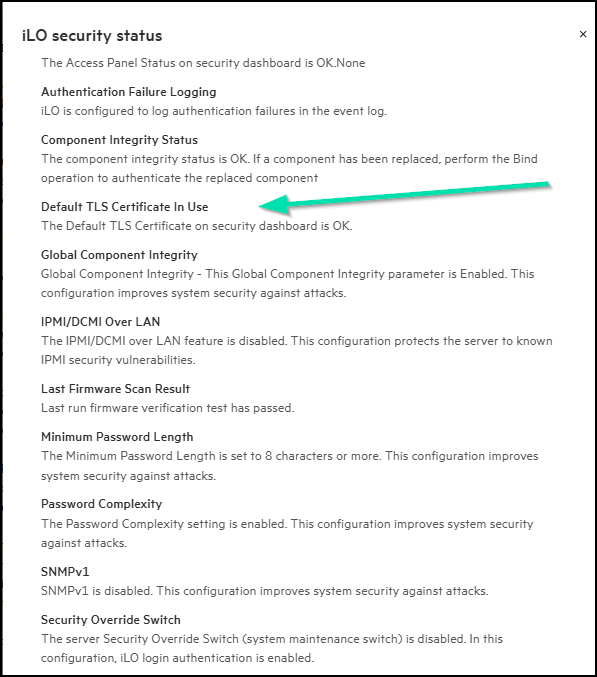
Switch between browser tabs to return to Compute Ops Management. From your Server page in Compute Ops Management, the iLO security status shows At risk. Click on the Details link.

-
What are some of the security items that need to be addressed? ________________________________
-
Cancel out of the iLO security status screen.
-
Return to the HPE iLO7 Security dashboard screen. Select the option for Secure Boot and toggle on the ability to Ignore Risk. This is not a best practice for the “real world”, but we are demonstrating features in HPE iLO7 and COM.
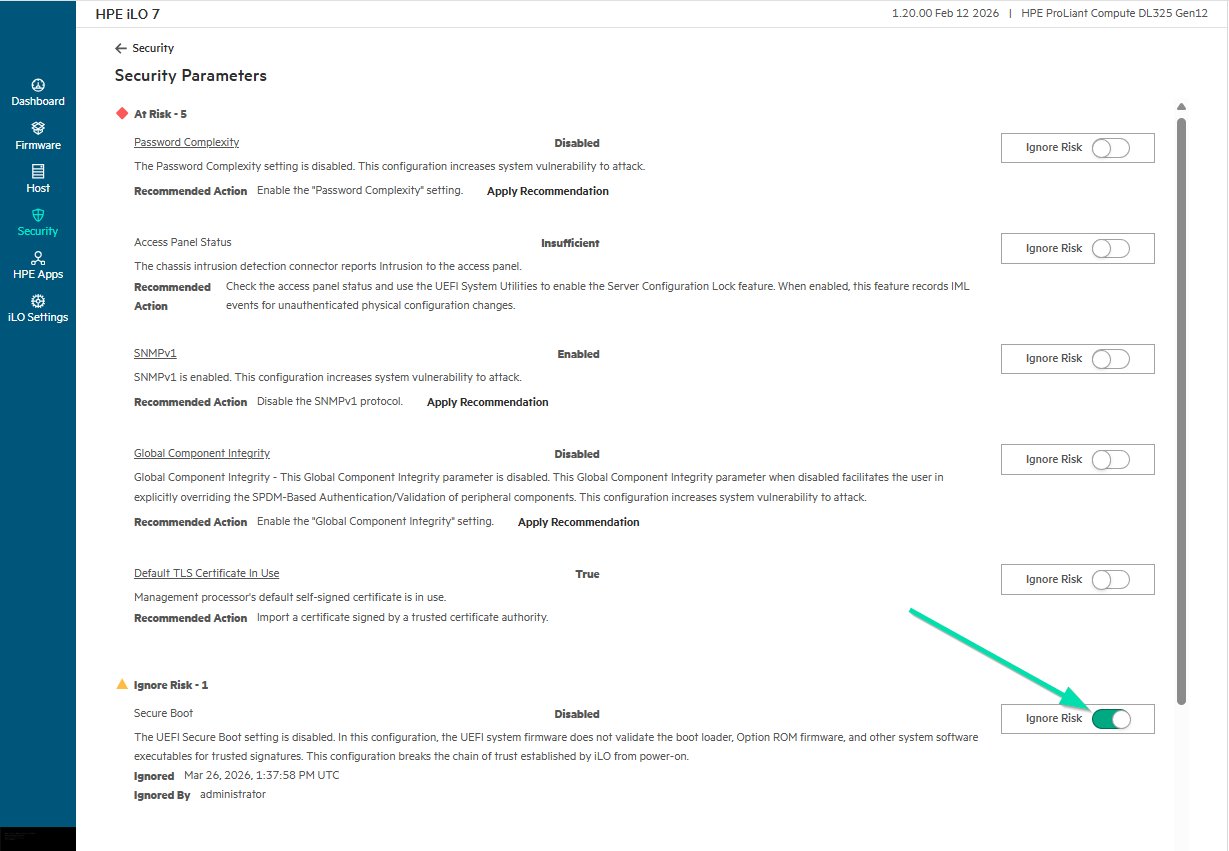
Note: This task can be easily automated using the Enable-HPECOM HPE iLO7IgnoreRiskSetting cmdlet from the HPECOMCmdlets PowerShell module.
-
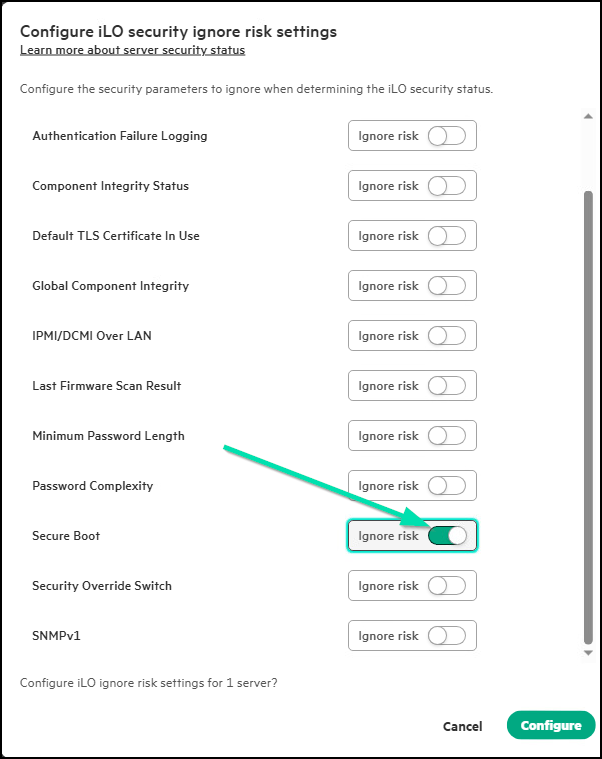
Back at the COM screen, if you click again on Details then Configure iLO ignore risk setting, you see that now we have an error that is being ignored.
-
We will now fix the SNMPv1 error, click on the browser tab that returns you to your HPE iLO7 Dashboard.
-
Click on iLO Settings.
-
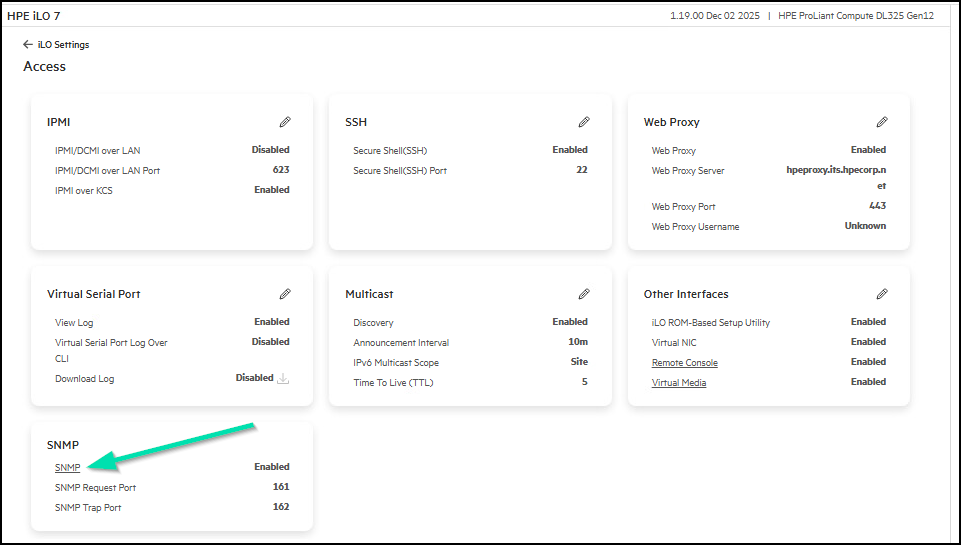
Click on Access.
-
Click on the SNMP hyperlink on the SNMP card.
-
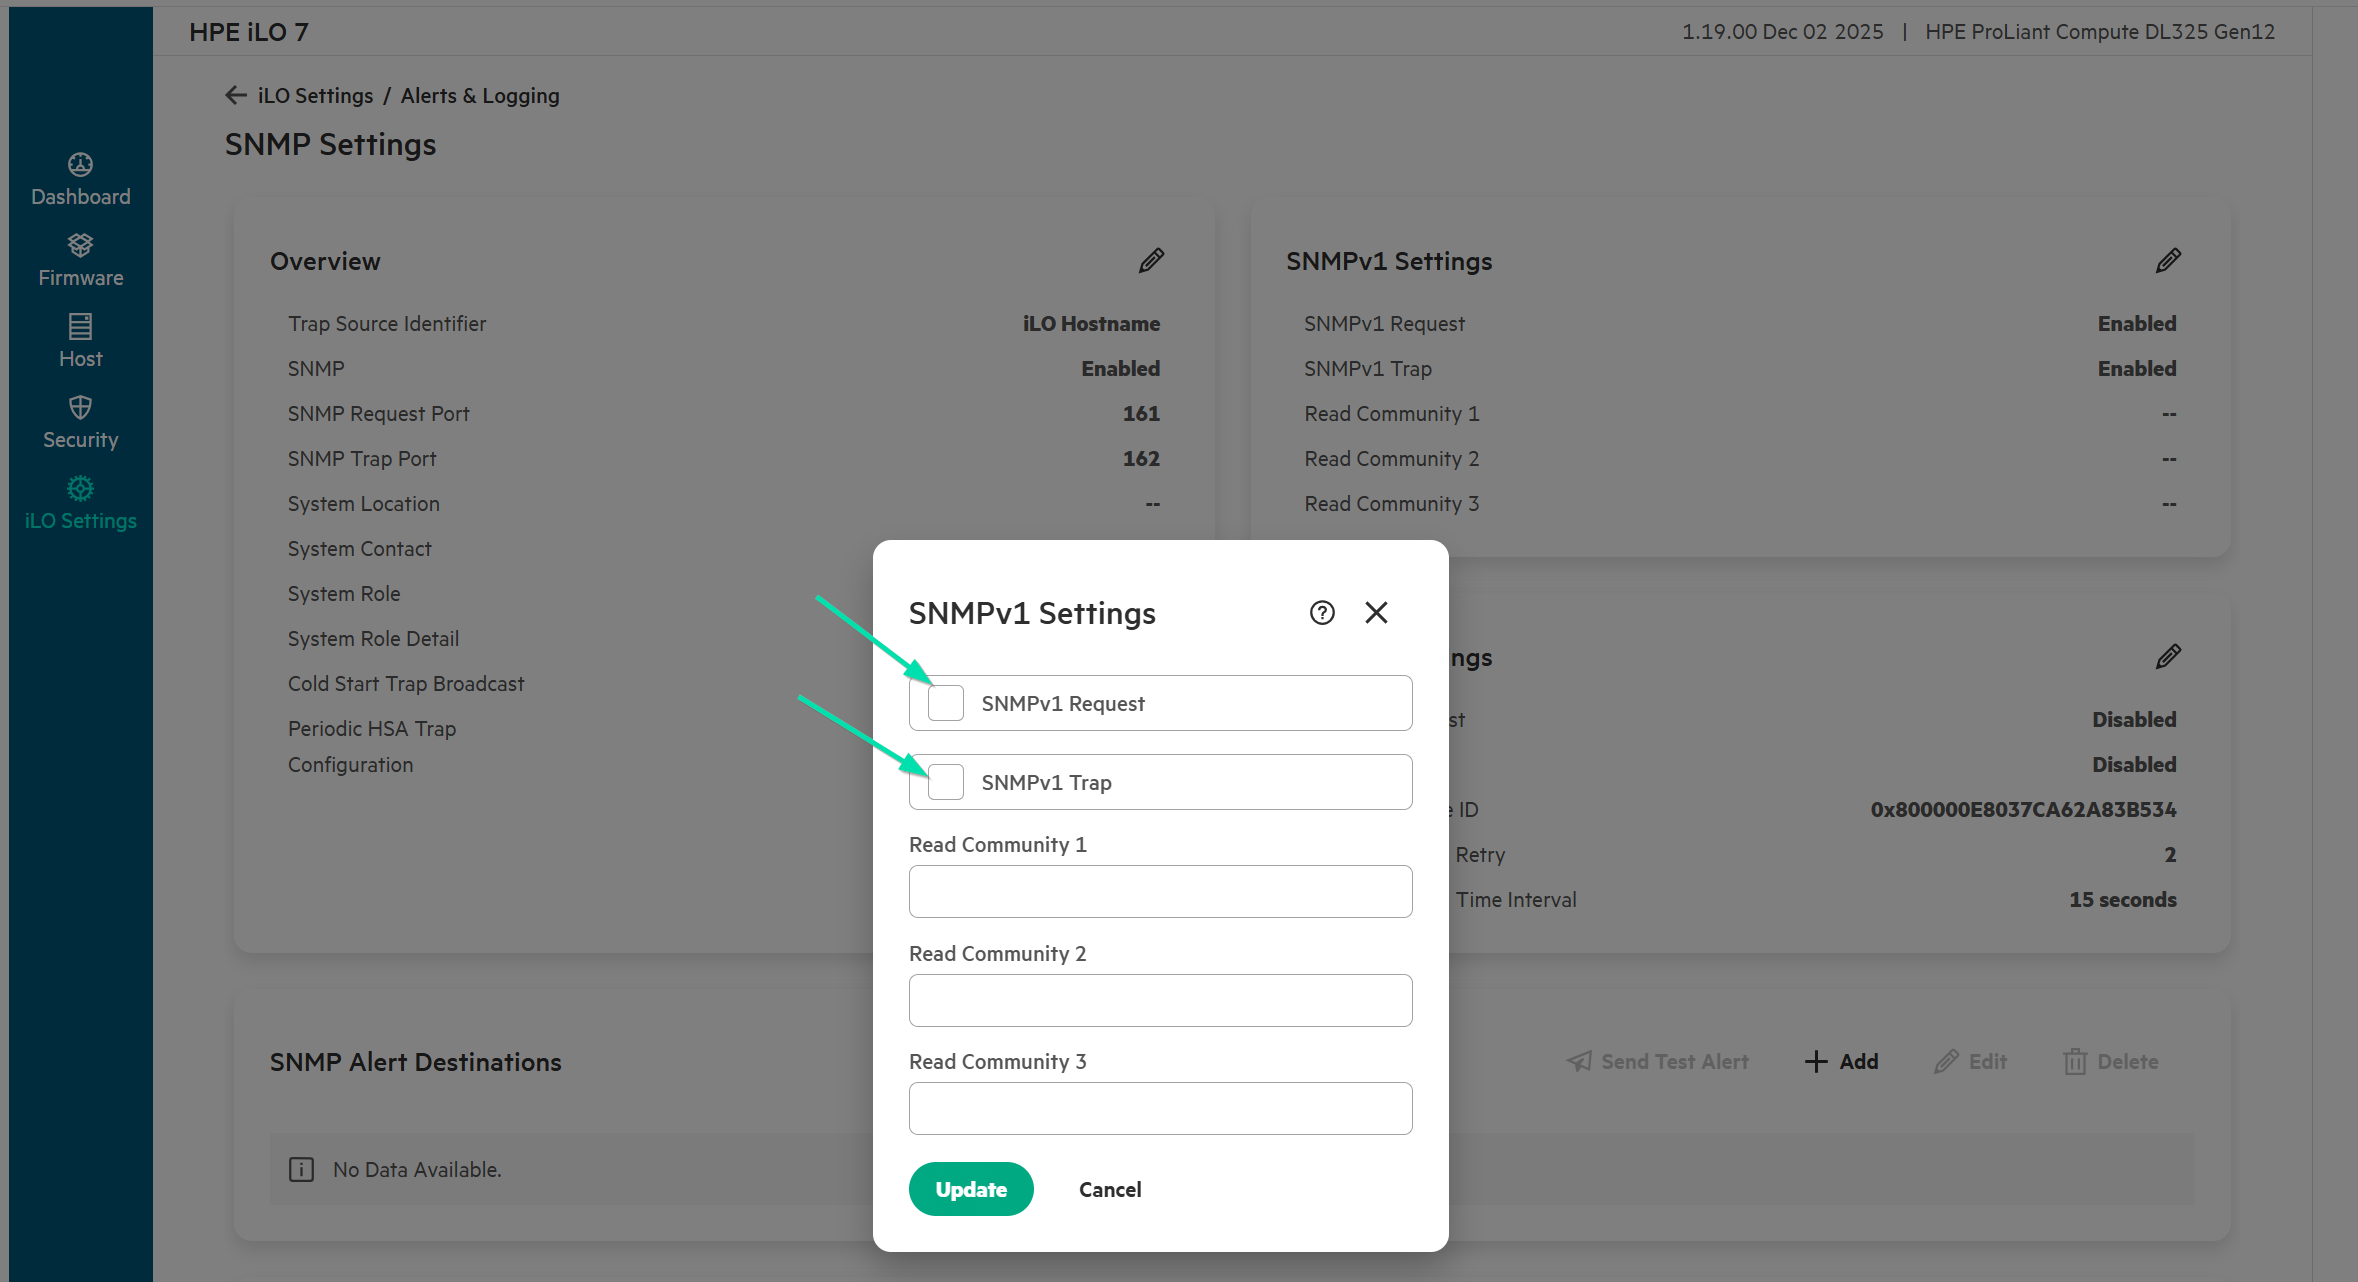
In the SNMPv1 Settings section, select the Edit icon (pencil).
-
Uncheck SNMPv1 Request and SNMPv1 Trap and then click the Update button.
-
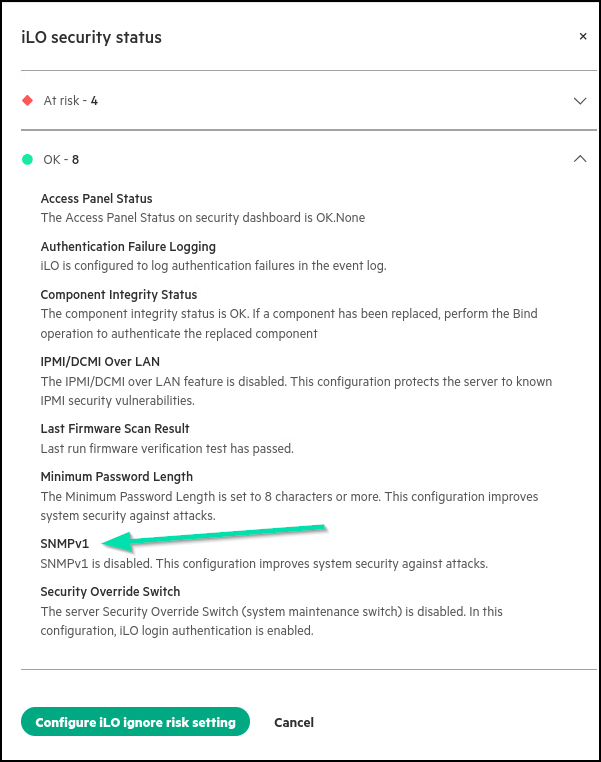
Return to the Security Dashboard in HPE iLO7 and validate that SNMPv1 has been disabled.

-
Return to the Details page that you have loaded in Compute Ops Management. Scroll down and open the OK section. Note that SNMPv1 is no longer a risk.
There are other items that need particular attention, such as Secure Boot and the use of self-signed certificates. These two are essential for HPE iLO7 security. We will later cover how to automatically apply a CA-signed certificate with ACME. For Secure Boot, we will utilize the HPE restful interface to enable this functionality.
-
We will now utilize Compute Ops Management to push out all the recommended HPE iLO7 Security Settings to our assigned Server. Let’s click on Manage and then Groups within Compute Ops Management.
-
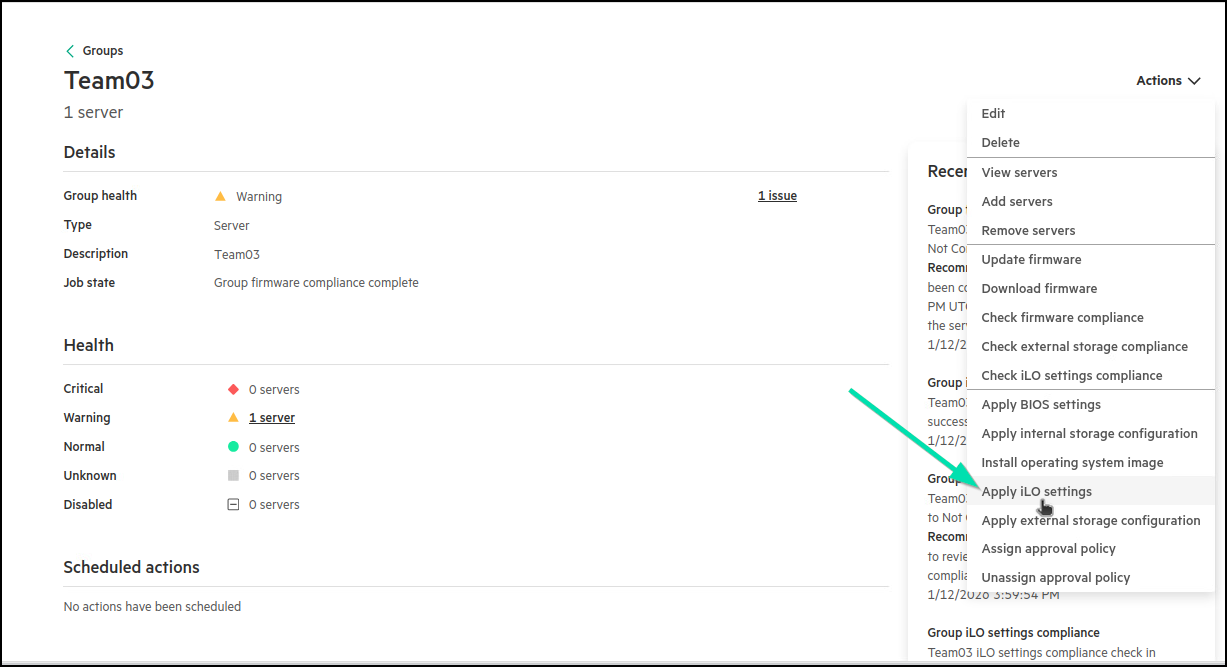
Click on the hyperlinked Name of your Group/Team.
-
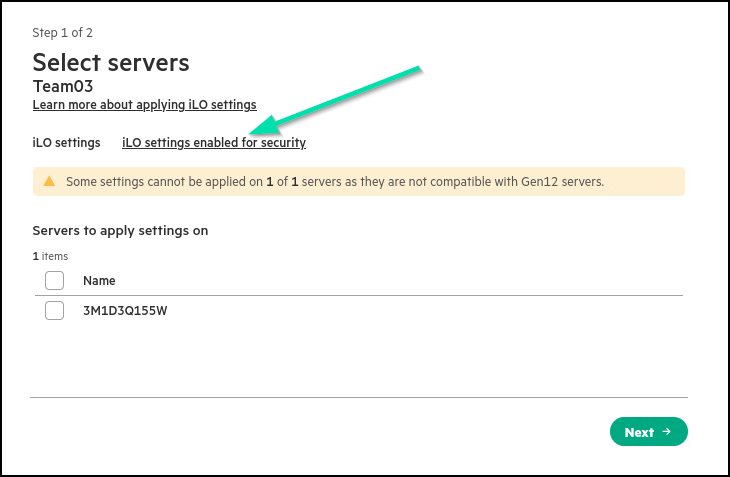
From the Actions drop down menu, select Apply iLO Settings.
-
To view the list of HPE iLO7 settings that will be configured, click the iLO settings enabled for security link.
-
This list shows the HPE recommended iLO settings that will be pushed to our server to reduce the overall security risk:
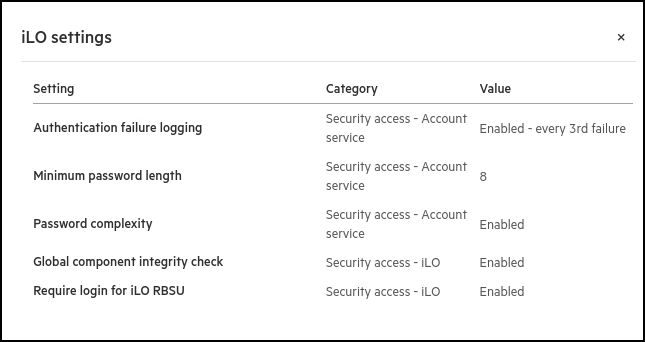
Note: Some iLO security settings might require a server reboot to take effect.
-
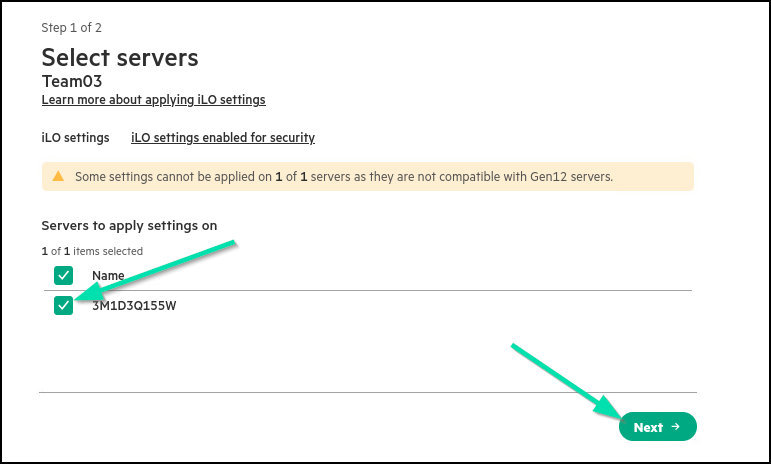
Click the X to close this popup.
-
Select your assigned Server from the list and hit Next.
-
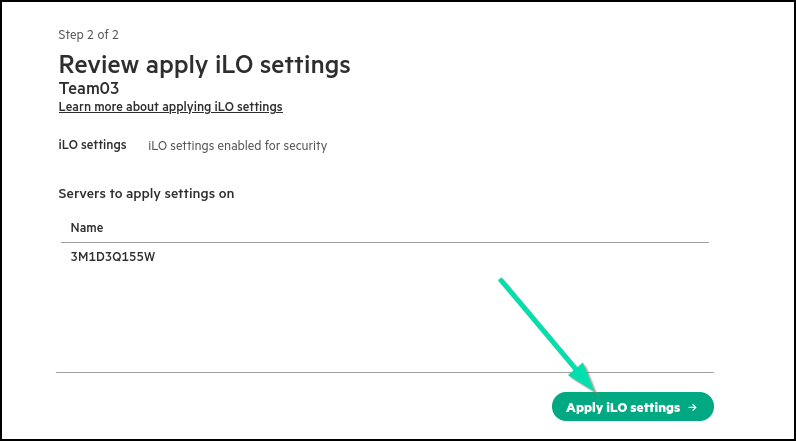
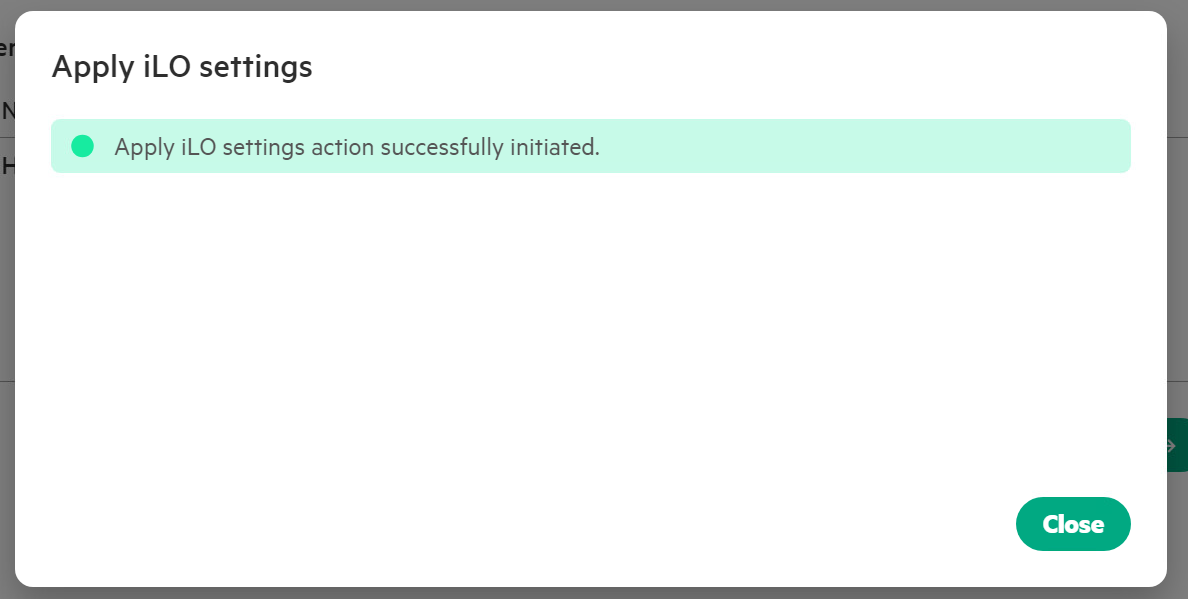
Review your changes, then hit Apply iLO Settings.
-
Hit Close on the success pop up, to return to your Group details.
-
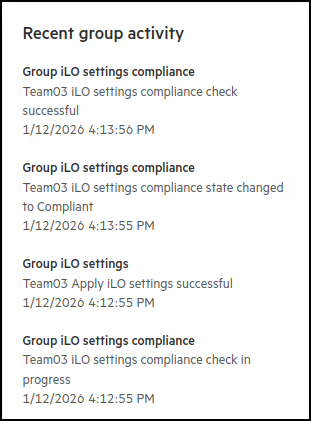
In the Recent group Activity, you should now see the HPE iLO7 settings being successfully applied and the settings compliance changed to Compliant.
-
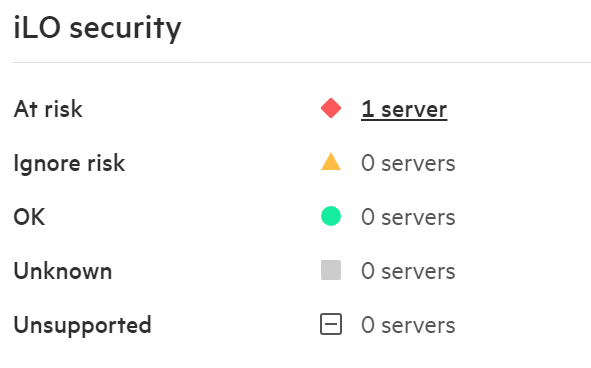
If we look to the left of the screen, we can see our HPE iLO7 Security section still showing At risk. Let’s click on the hyperlink.
-
On the right, click again to select the Server at Risk.
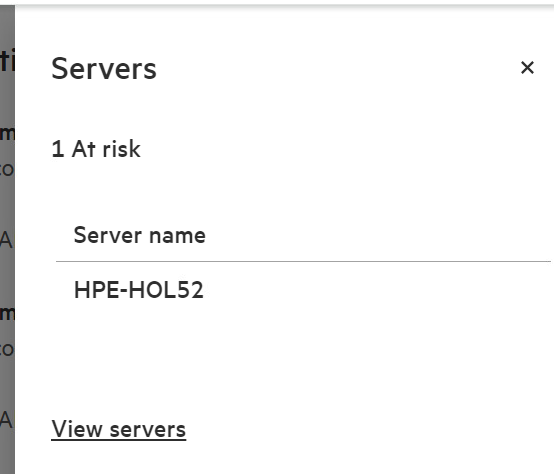
-
We will then be directed to the Details page for our assigned Server. Where iLO security status is seen, Click on Details.
-
You should see two items still at Risk, both have dependencies outside of the COM deployed HPE iLO7 settings which may require manual intervention to resolve.
-
In the next section of this Hands-On Lab, we will be following steps to Request and Apply a Signed Certificate from a trusted Certificate Authority.
-
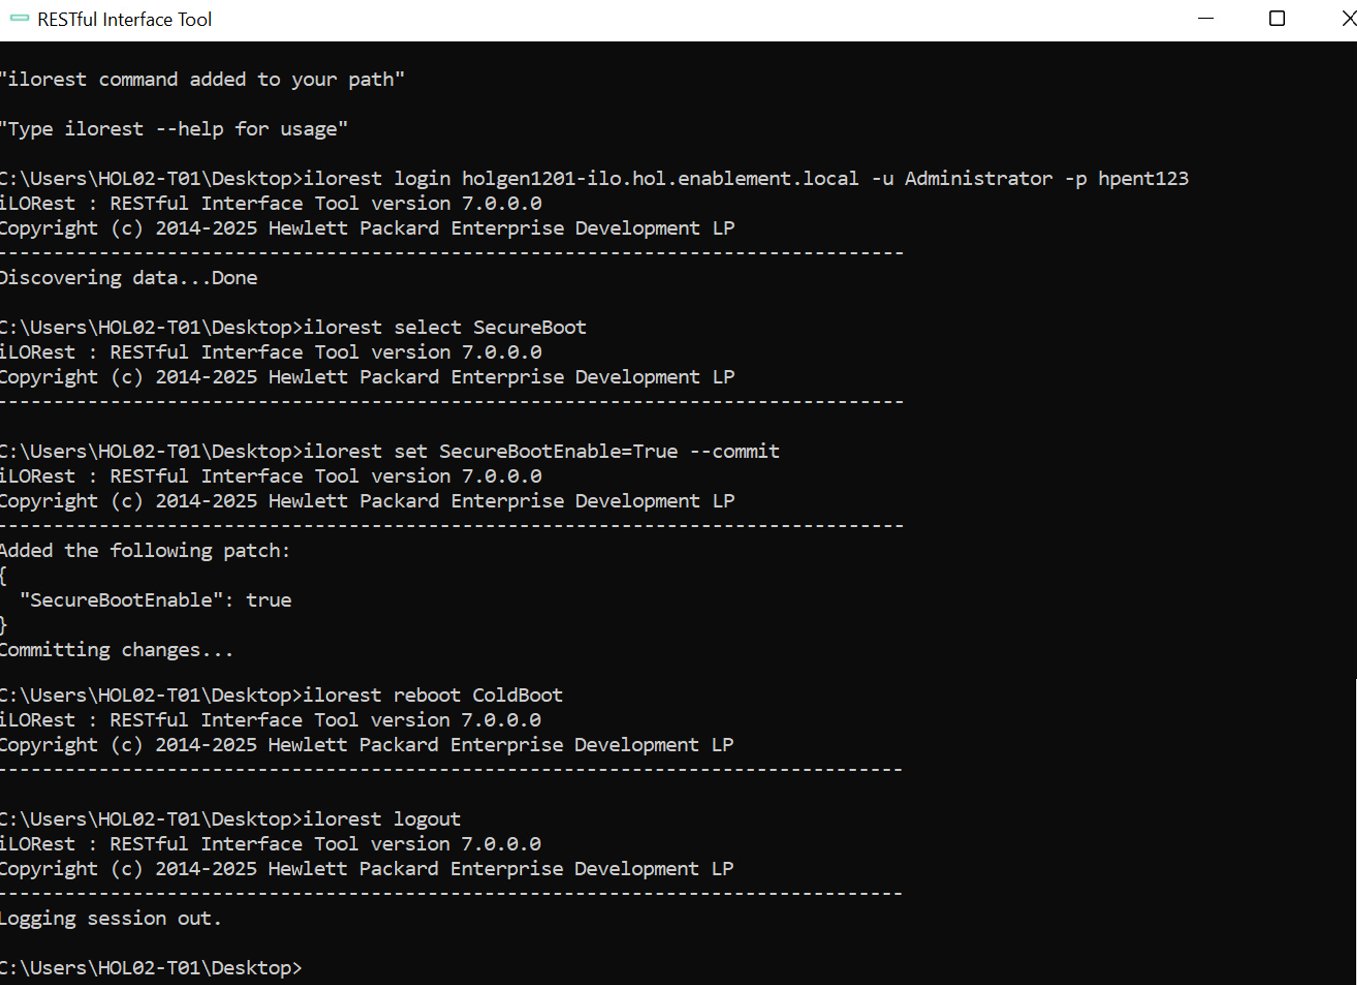
Let’s navigate to the Horizon Desktop and open the RESTful Interface Tool so we can use Redfish to Enable Secure Boot.

-
Copy the following ilorest commands into the RESTful Interface Tool, making sure to replace xx with your Team number.
xx represents your Team Number
ilorest login holgen12xx-ilo.hol.enablement.local -u Administrator -p hpent123Once logged in to your assigned iLO, you can then continue with the following commands.
ilorest select SecureBoot ilorest set SecureBootEnable=True --commit ilorest reboot On ilorest logoutNote: Please ensure to review any error messages and action accordingly, such as powering down your Server first.
-
Now that Secure Boot is enabled, let’s close out the RESTful Interface Tool and head back to our iLO7 to test out one of our Security Settings changes.
-
Return to the HPE iLO7 Dashboard of your assigned Server.
-
Earlier in the lab, we created a new Administrator privileged User with a simple password. Let’s go back to iLO7 Settings, then User Management and look at creating another new user.
-
Then click on Users.
-
Click + Add above the Local Users frame and enter the following settings to create your new user account.
Login Name HPE_Admin1 User Name HPE Admin1 New Password hpent123 Confirm Password hpent123 Role Administrator 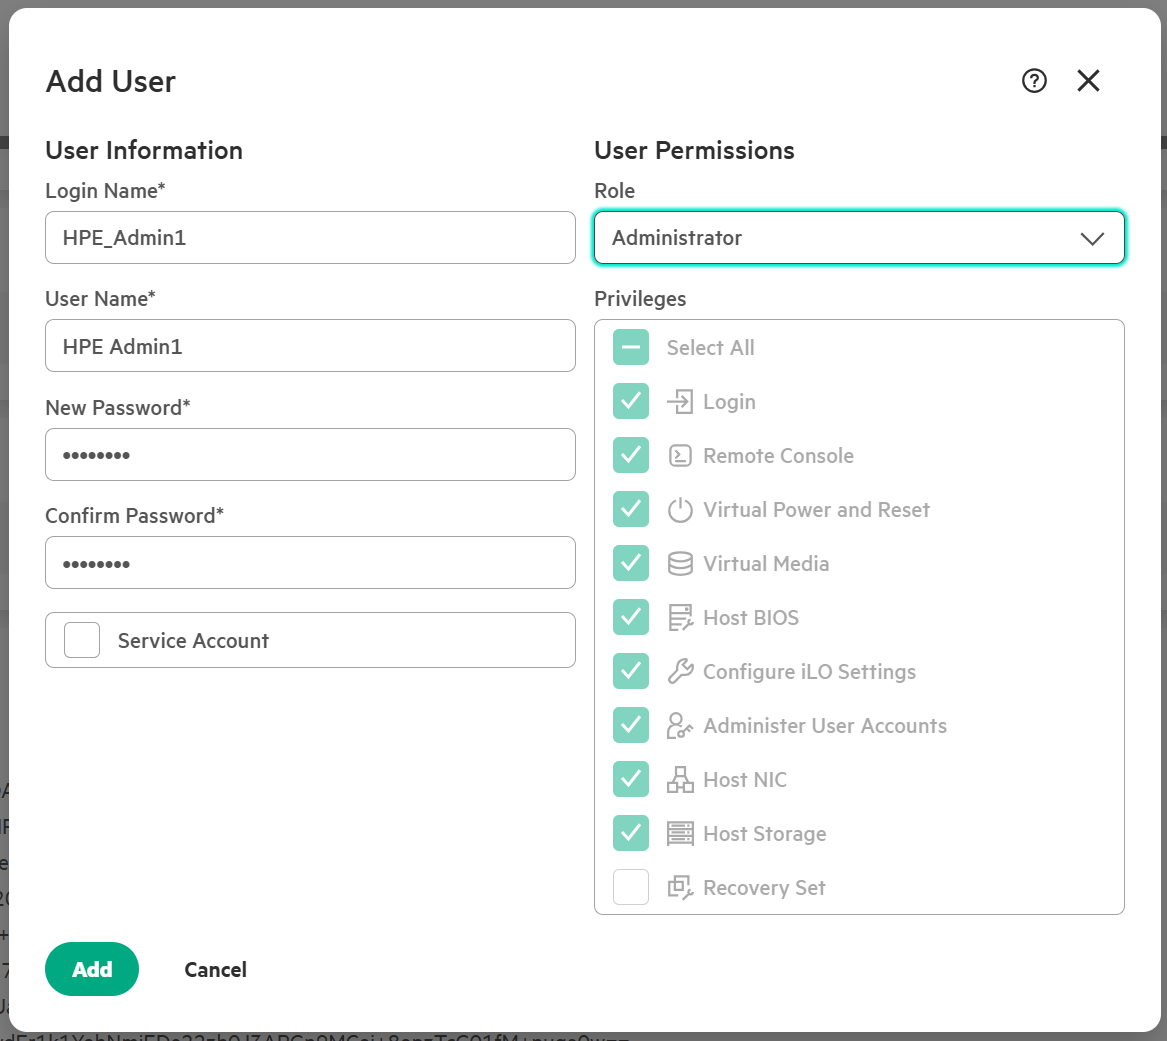
-
When we implemented our HPE iLO7 Security Settings, it forces any new HPE iLO7 Accounts to meet Password complexity requirements. Your current user login is not affected by the change.

-
Set the password as HPESecurePassw0rd! and then click Add. The results should look like the screen shot below.
HPE provides the Security Dashboard for every HPE iLO5, HPE iLO6 and HPE iLO7 enabled platform and aggregates multiple platform’s security status in HPE Compute Ops Management. For more information on HPE ProLiant Security visit www.hpe.com/info/iLO and view the HPE iLO7 Security Technology Brief. The link to the document is at the bottom of the web page.
This concludes this section of the lab.
Task 12 - HPE iLO7 SSL Certificate Management
By default, HPE iLO7 uses a self-signed certificate in SSL connections. While this allows for encrypted communication, it lacks the trust and verification provided by a Certificate Authority (CA). A CA-signed certificate is issued by a trusted third-party CA, which verifies the identity of the server (i.e. the HPE iLO7). This ensures that the communication is with a legitimate HPE iLO7 device, significantly reducing the risk of man-in-the-middle (MITM) attacks where an attacker could intercept and alter the communication.
Using a CA-signed certificate on HPE iLO7 provides several benefits:
-
Trust and Verification: Ensures that both the client and server can verify each other’s identity through a trusted CA.
-
Enhanced Security: Prevents unauthorized entities from intercepting and misusing sensitive credentials.
-
Avoiding Security Warnings: Browsers and other clients trust CA-signed certificates, avoiding confusing security warnings.
To enhance overall security and trust, it is recommended to configure HPE iLO7 with a CA-signed certificate. An easy way to achieve this is by using HPE iLO7’s support for obtaining and renewing SSL certificates automatically via ACME (Automatic Certificate Management Environment).
This method offers several key benefits over the manual method of using a Certificate Signing Request (CSR) and requesting a certificate from a Certificate Authority (CA). It significantly reduces administrative overhead by automating the process of certificate issuance and renewal, ensuring that certificates are always up to date without manual intervention. This automation minimizes the risk of service disruptions due to expired certificates and enhances security by regularly refreshing cryptographic keys. Additionally, it provides a scalable solution for managing certificates across many devices, ensuring consistent and compliant security practices throughout the organization.
To learn more about ACME, see How It Works - Let’s Encrypt.
By default, this feature is disabled in HPE iLO7. In this section, we are going to enable it and configure automatic certificate enrollment in HPE iLO7 to obtain a trusted SSL certificate signed by a CA.
If you are looking for information about how to do it manually, see Generate CSR and Import an SSL Certificate.
-
The first step is to download the root CA certificate of the certificate enrollment server to secure the connection between the HPE iLO7 and the ACME server. This server is our internal lab Certificate Authority (CA) server, running on Ubuntu with step-ca. We’ve saved you from the trouble and provided the root CA contents here:
-----BEGIN CERTIFICATE----- MIIBnDCCAUKgAwIBAgIRANV44hj14S7EMgYtFwMOx+YwCgYIKoZIzj0EAwIwLDEQ MA4GA1UEChMHSE9MQ0EwMTEYMBYGA1UEAxMPSE9MQ0EwMSBSb290IENBMB4XDTI2 MDEwNTAzNTcxMFoXDTM2MDEwMzAzNTcxMFowLDEQMA4GA1UEChMHSE9MQ0EwMTEY MBYGA1UEAxMPSE9MQ0EwMSBSb290IENBMFkwEwYHKoZIzj0CAQYIKoZIzj0DAQcD QgAEhZyWmGjWm5TGlOgipIH1pd+ZnGqCt92BdTTF8hv4F6VDod5a4HsVXNp3+aE6 SFXjt7TQrUEllguFNM7bPVk7FaNFMEMwDgYDVR0PAQH/BAQDAgEGMBIGA1UdEwEB /wQIMAYBAf8CAQEwHQYDVR0OBBYEFKkMIYlOv6LVDXBOFxExMjNWmgDlMAoGCCqG SM49BAMCA0gAMEUCIQCDUN6pBnRH/GWaaN3kPrTX5KniGsMwe/JDAwFEtUKgfQIg X7RdmJcE9ZM1N4GBw7yl5EOaNrayuWnB9LBWmrN5O2s= -----END CERTIFICATE----- -
We can now navigate to our Security page in HPE iLO7.
-
Click on the TLS Certificate card.
-
We will now select Configure Certificate.
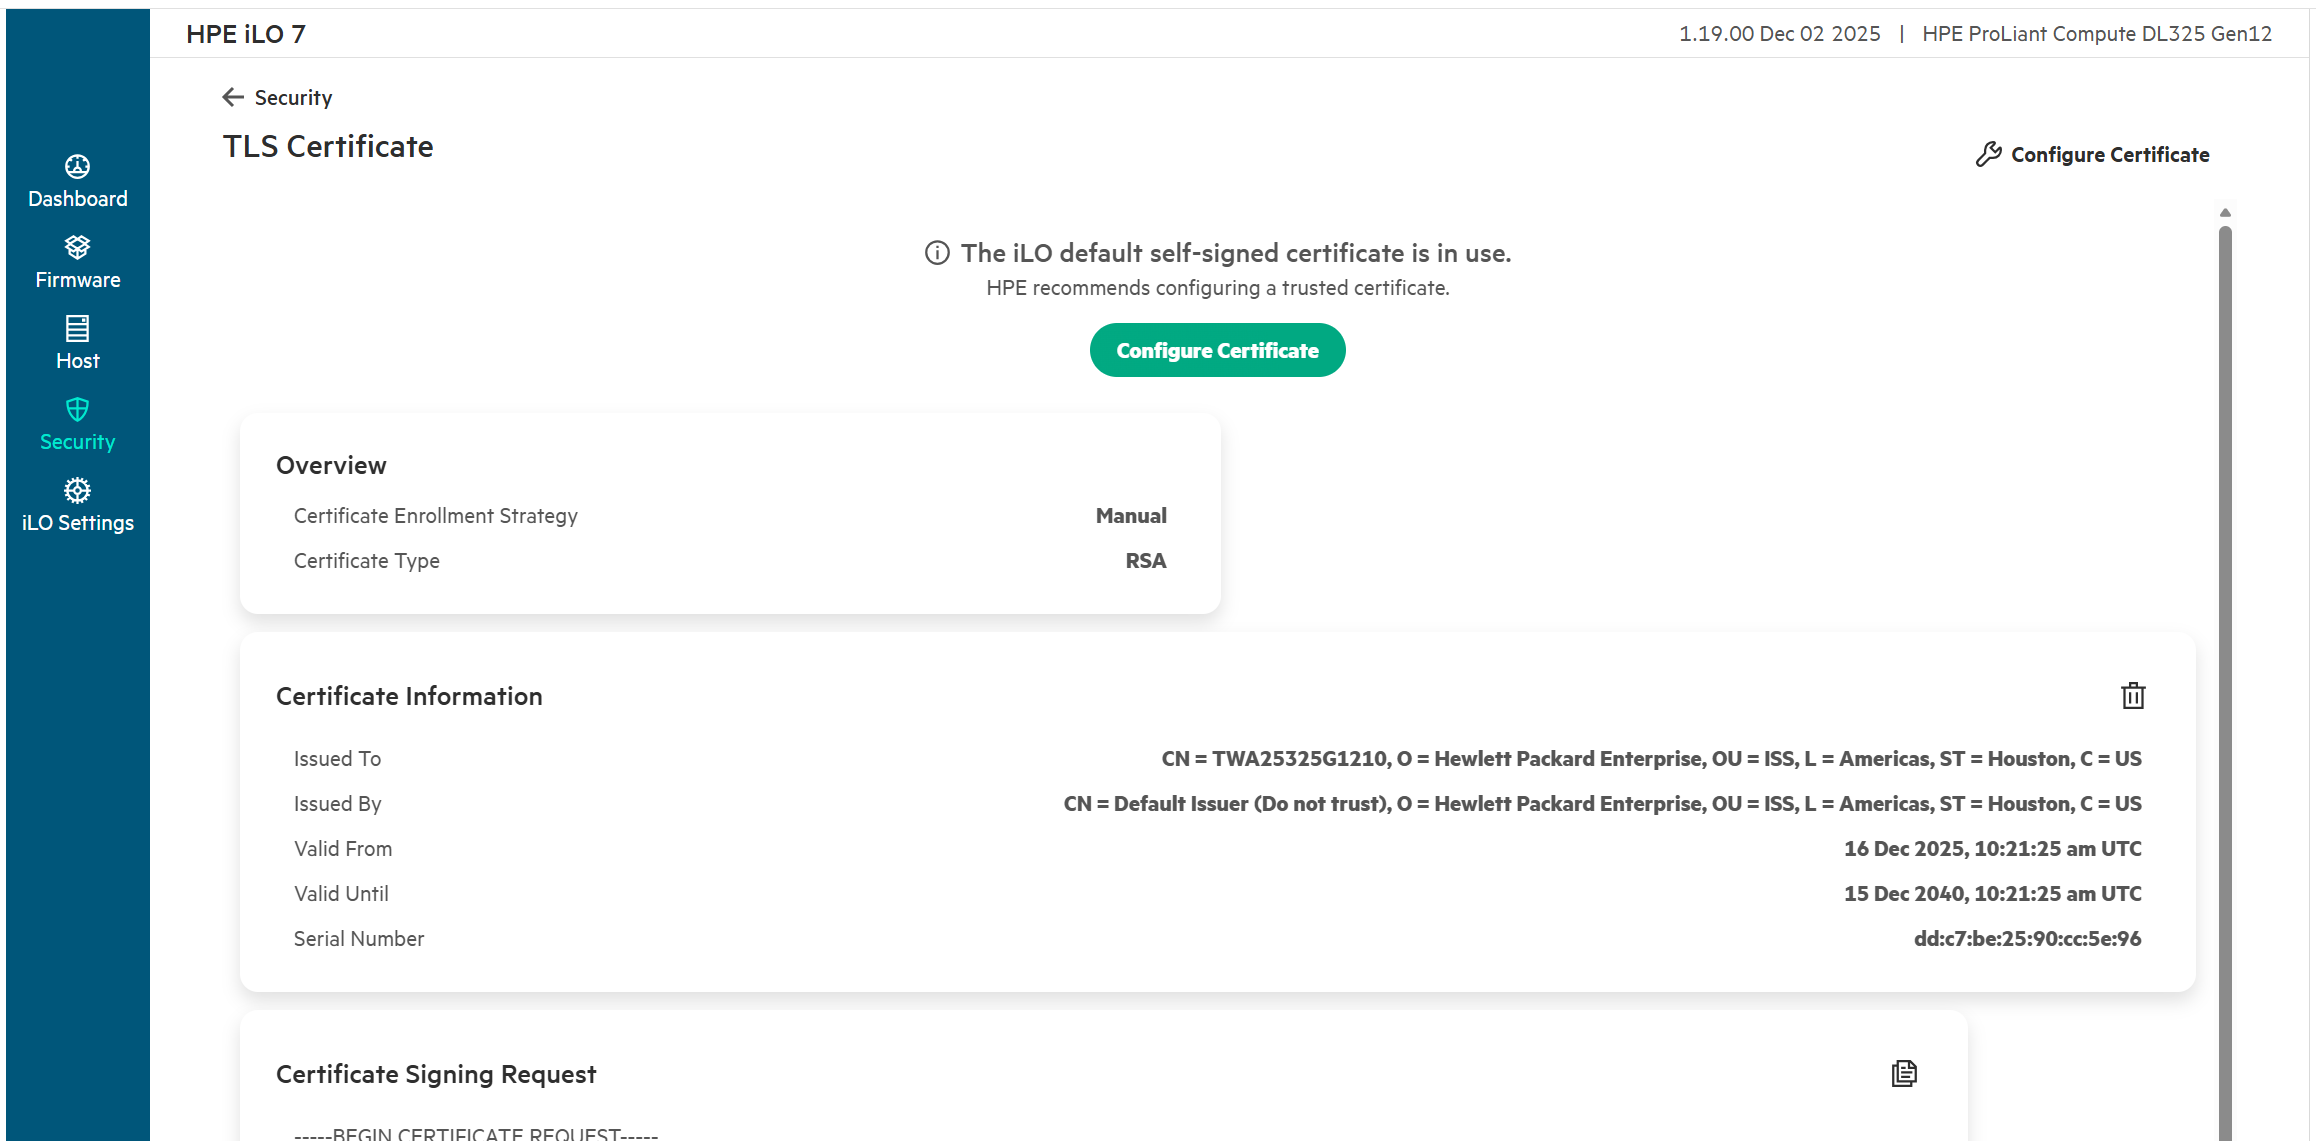
-
Fill in our details for Manage TLS Certificate Automatically.
-
Our Server URL is https://holacme01.hol.enablement.local:443/acme/acme/directory , you will also need to paste in the CA Certificate we shared in Step 1. For other values in the form, see table below. Then click Configure.
Server URL: See text in step 6 Country (C) US State (ST) TX City or Locality (L) Houston Organization Name (O) HPE 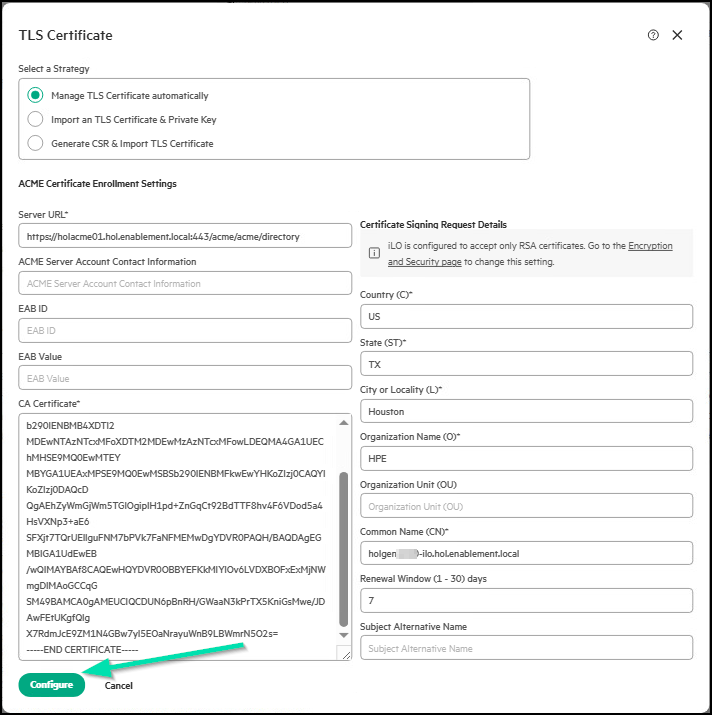
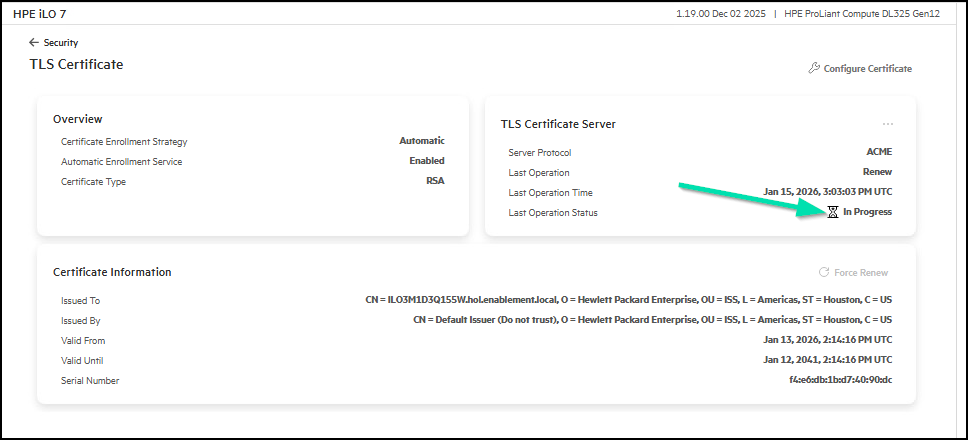
-
You should see that the status of the certificate operation is “In progress” and this takes a minute or so.
-
Soon the status will be Success.
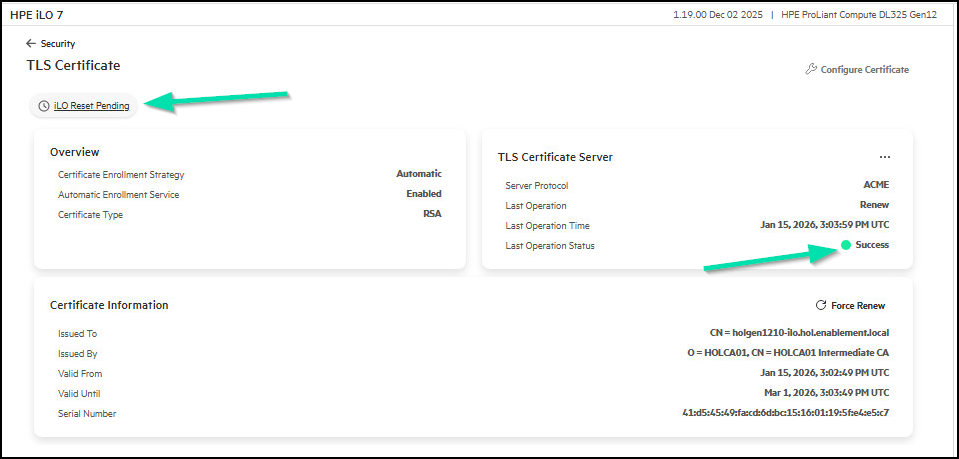
-
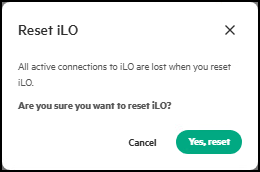
Note, an iLO Reset Pending icon has appeared and will need to be clicked to properly activate the Certificate. Click Yes, reset.
-
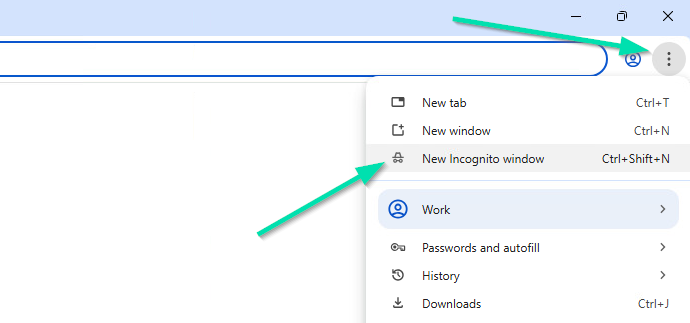
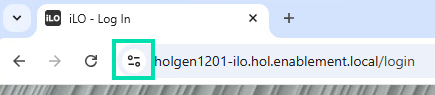
Give the HPE iLO7 a few minutes to reset, then open a new tab in incognito mode to login and confirm that the connection is now recognized as secure by the browser.
Note: For the setup to work end-to-end, the CA certificate must be added to the trusted root certificates of all client machines that connect to the HPE iLO7. In our lab environment, this process is automatically handled by our lab domain policy.
-
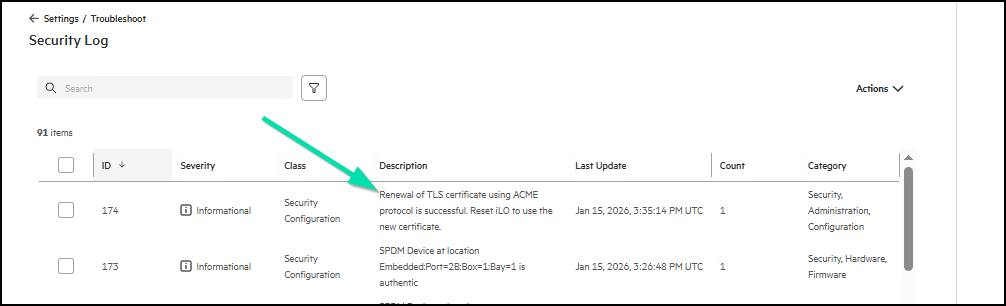
If you get a Failed status, you can check the HPE iLO7 Security logs under Dashboard / Security Log. This is where ACME activity is generated.
-
If you face an enrollment failure, it is recommended to double check all values under the TLS Certificate Server configuration and then perform an update. Only do this if you have an issue. If you take this action what follows will result.
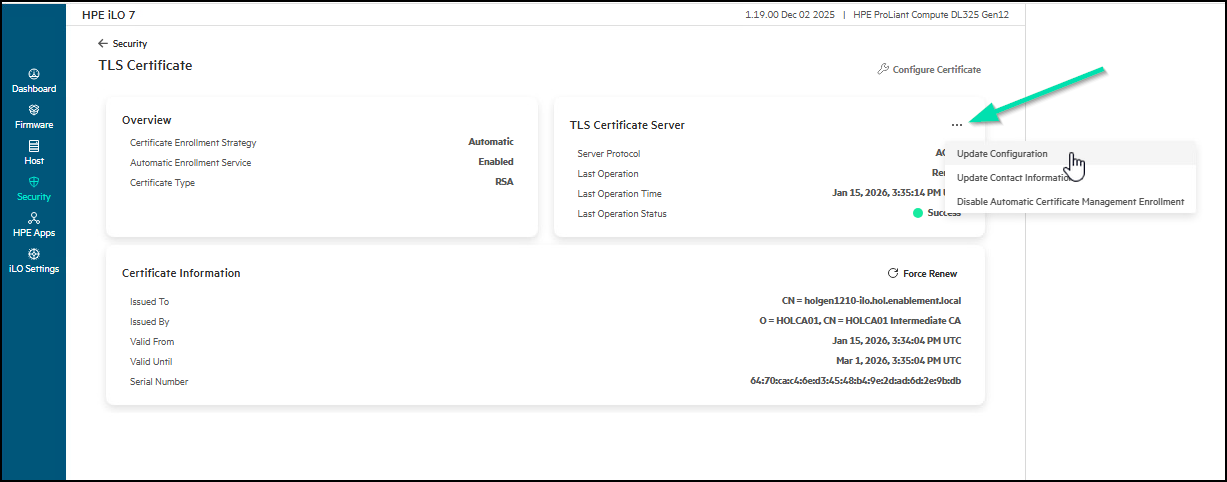
-
Referring to the Security Log, a message that the HPE iLO7 must be reset to use the new certificate is displayed.
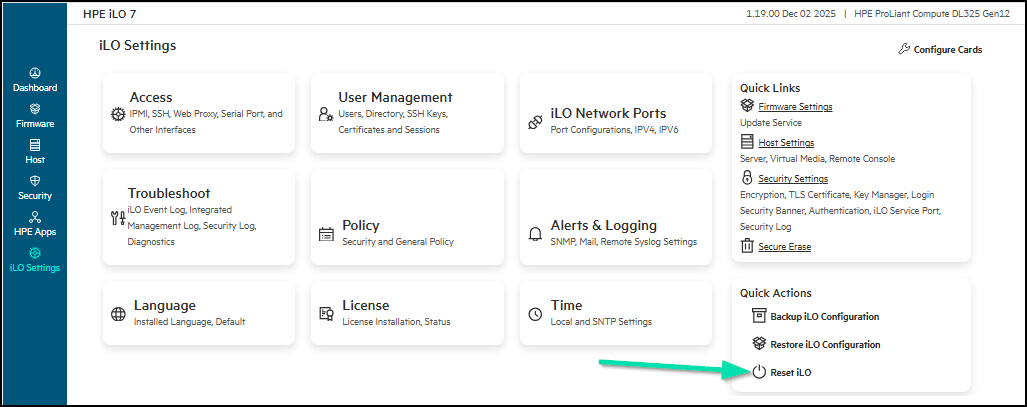
-
Go to iLO Settings and click Reset iLO in the Quick Actions card.
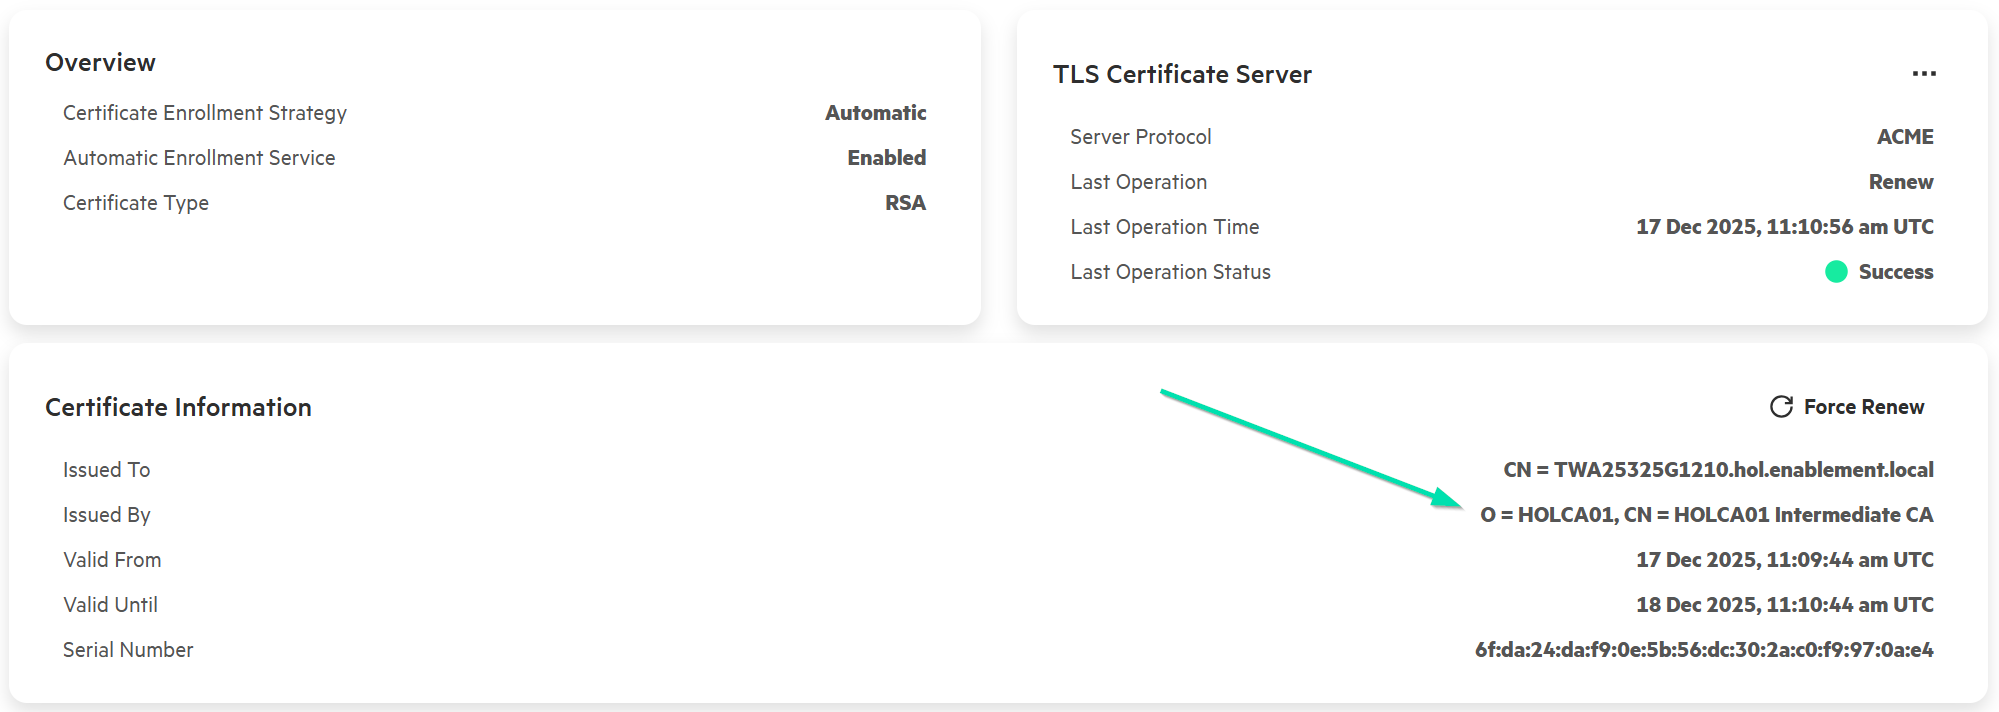
-
A successful Certificate Enrollment, will show that now the HPE iLO7 uses a trusted SSL certificate signed by our certificate authority server:
-
You can now circle back to HPE Compute Ops Management and check the iLO Security Status.
Note: This process can also be automated using PowerShell with this script.
This concludes this section of the lab.
HPE Compute Ops Management Secure Gateway
The HPE Compute Ops Management Secure Gateway is an on-premises virtual appliance that optimizes secure connectivity between HPE infrastructure and HPE Compute Ops Management. Deployed on supported hypervisors (VMware ESXi 7/8), it addresses critical challenges in firewall management, traffic efficiency, and operational control:
Key Benefits:
-
Simplified Firewall Management: Establishes a single secure outbound connection to HPE Compute Ops Management, dramatically reducing firewall complexity, minimizing exposed ports, and shrinking the attack surface.
-
Efficient Traffic Aggregation: Consolidates multiple HPE iLO WebSocket connections into one unified egress stream, streamlining operations and reducing vulnerability risks from fragmented connections.
-
Optimized Bandwidth Usage: Caches firmware components locally when HPE iLOs are updated, eliminating redundant downloads for subsequent server updates, improving update reliability, and conserving bandwidth.
-
Instant Connection Control: Enables immediate disconnection of all HPE iLO-to-COM connections when needed, providing agile response capabilities for compliance requirements, troubleshooting, or security incidents.
For more details on the Secure Gateway, including deployment, configuration, and troubleshooting, refer to the official HPE Compute Ops Management Secure Gateway documentation.
Task 13 - Configuring the Secure Gateway and connecting to COM
In this portion of the lab, we will power on the VM, configure the Secure Gateway through its Terminal User Interface (TUI) and then connect it to HPE Compute Ops Management.
-
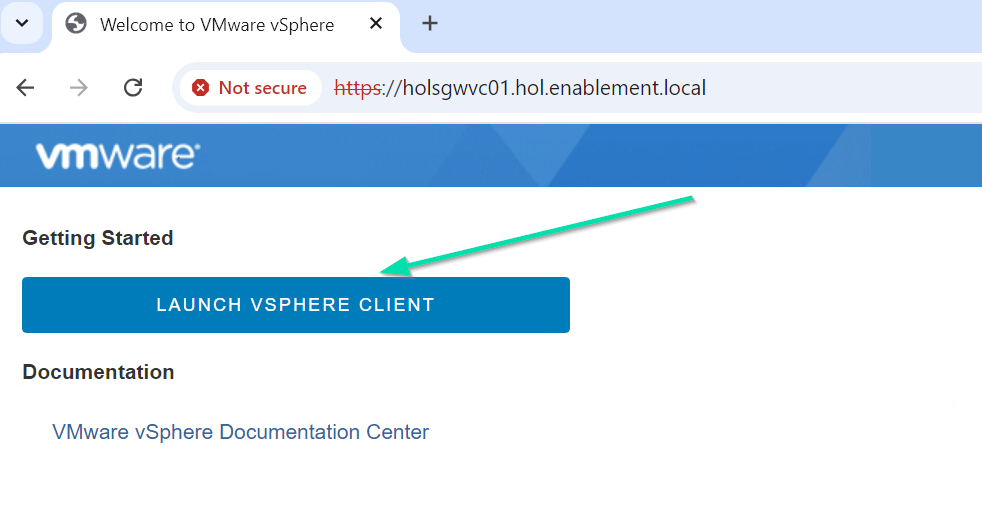
Open a fresh Web Browser or Tab and navigate to your VCenter Server at holsgwvc01.hol.enablement.local
-
Confirm any Certificate Issues to Proceed and then click Launch vSphere Client.
-
Use credentials Administrator@vsphere.local and HPESecurePassw0rd! as the password.
-
You should be now logged in to the vSphere Client

-
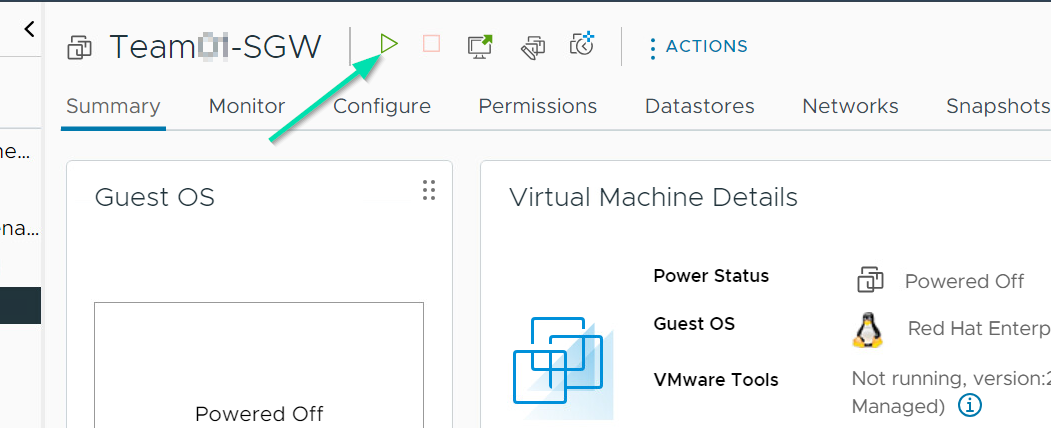
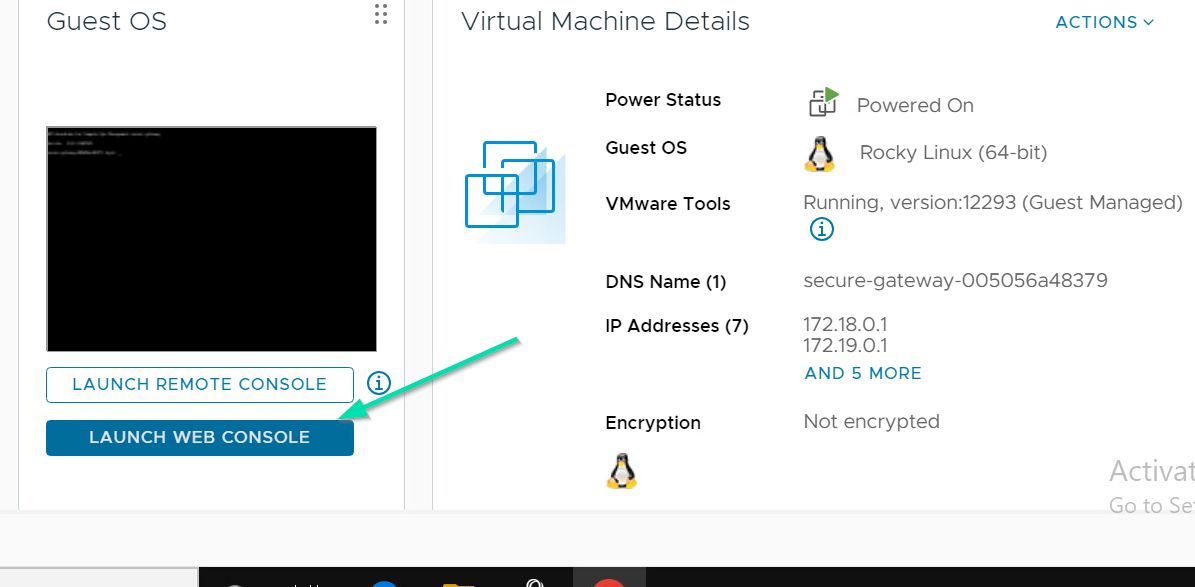
Please find your Team’s pre-provisioned SGW and Power On the VM. There are multiple ways to power on a VM, click the Green Play button or any alternative you prefer.
-
Click Launch Web Console so you can access the Appliance TUI and continue the configuration.
-
Enter the default Username / Password to login which is administrator / admin.

Note: For navigating through the TUI, you will need to use the TAB and Enter keys.
-
For the next two screens we will need to Accept the T&Cs. Click Agree both times.
-
We will now update the password to HPESecurePassw0rd! and click Save.
-
Click Next on Step 1.
-
Enter the fully qualified domain name of your Secure Gateway using the table below.
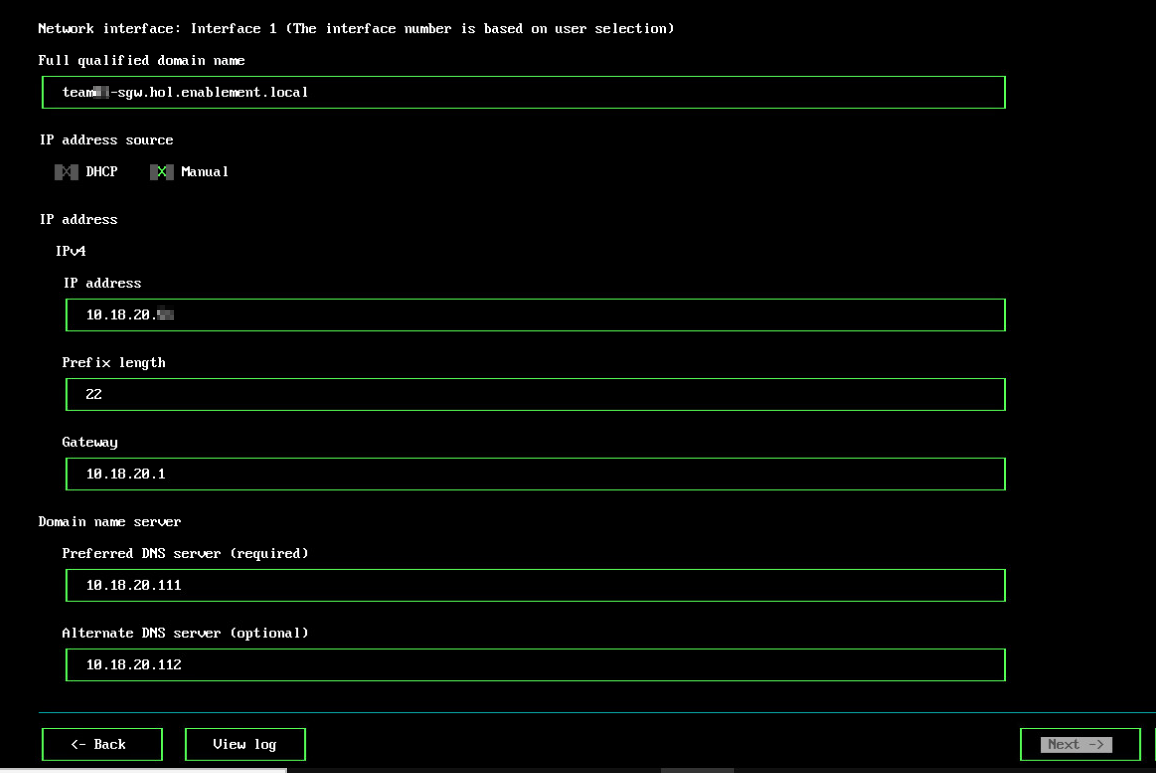
Team Number Full qualified domain name IP address Team-01 team01-sgw.hol.enablement.local 10.18.20.51 Team-02 team02-sgw.hol.enablement.local 10.18.20.52 Team-03 team03-sgw.hol.enablement.local 10.18.20.53 Team-04 team04-sgw.hol.enablement.local 10.18.20.54 Team-05 team05-sgw.hol.enablement.local 10.18.20.55 Team-06 team06-sgw.hol.enablement.local 10.18.20.56 Team-07 team07-sgw.hol.enablement.local 10.18.20.57 Team-08 team08-sgw.hol.enablement.local 10.18.20.58 Team-09 team09-sgw.hol.enablement.local 10.18.20.59 Team-10 team10-sgw.hol.enablement.local 10.18.20.60 Team-11 team11-sgw.hol.enablement.local 10.18.20.61 Team-12 team12-sgw.hol.enablement.local 10.18.20.62 Team-13 team13-sgw.hol.enablement.local 10.18.20.63 Team-14 team14-sgw.hol.enablement.local 10.18.20.64 Team-15 team15-sgw.hol.enablement.local 10.18.20.65 Team-16 team16-sgw.hol.enablement.local 10.18.20.66 Team-17 team17-sgw.hol.enablement.local 10.18.20.67 Team-18 team18-sgw.hol.enablement.local 10.18.20.68 Team-19 team19-sgw.hol.enablement.local 10.18.20.69 Team-20 team20-sgw.hol.enablement.local 10.18.20.70 Team-21 team21-sgw.hol.enablement.local 10.18.20.71 Team-22 team22-sgw.hol.enablement.local 10.18.20.72 Team-23 team23-sgw.hol.enablement.local 10.18.20.73 Team-24 team24-sgw.hol.enablement.local 10.18.20.74 Team-25 team25-sgw.hol.enablement.local 10.18.20.75 -
Tab to IP Address Source and then to Manual. Use the spacebar to place a “X” in Manual.
-
For the IP address, use the table above to select your corresponding IP Address.
-
For the rest of the values use the table below.
Prefix length 22 Gateway 10.18.20.1 Primary DNS 10.18.20.111 Secondary DNS 10.18.20.112 -
Once all values are entered correctly, select Next to proceed.
-
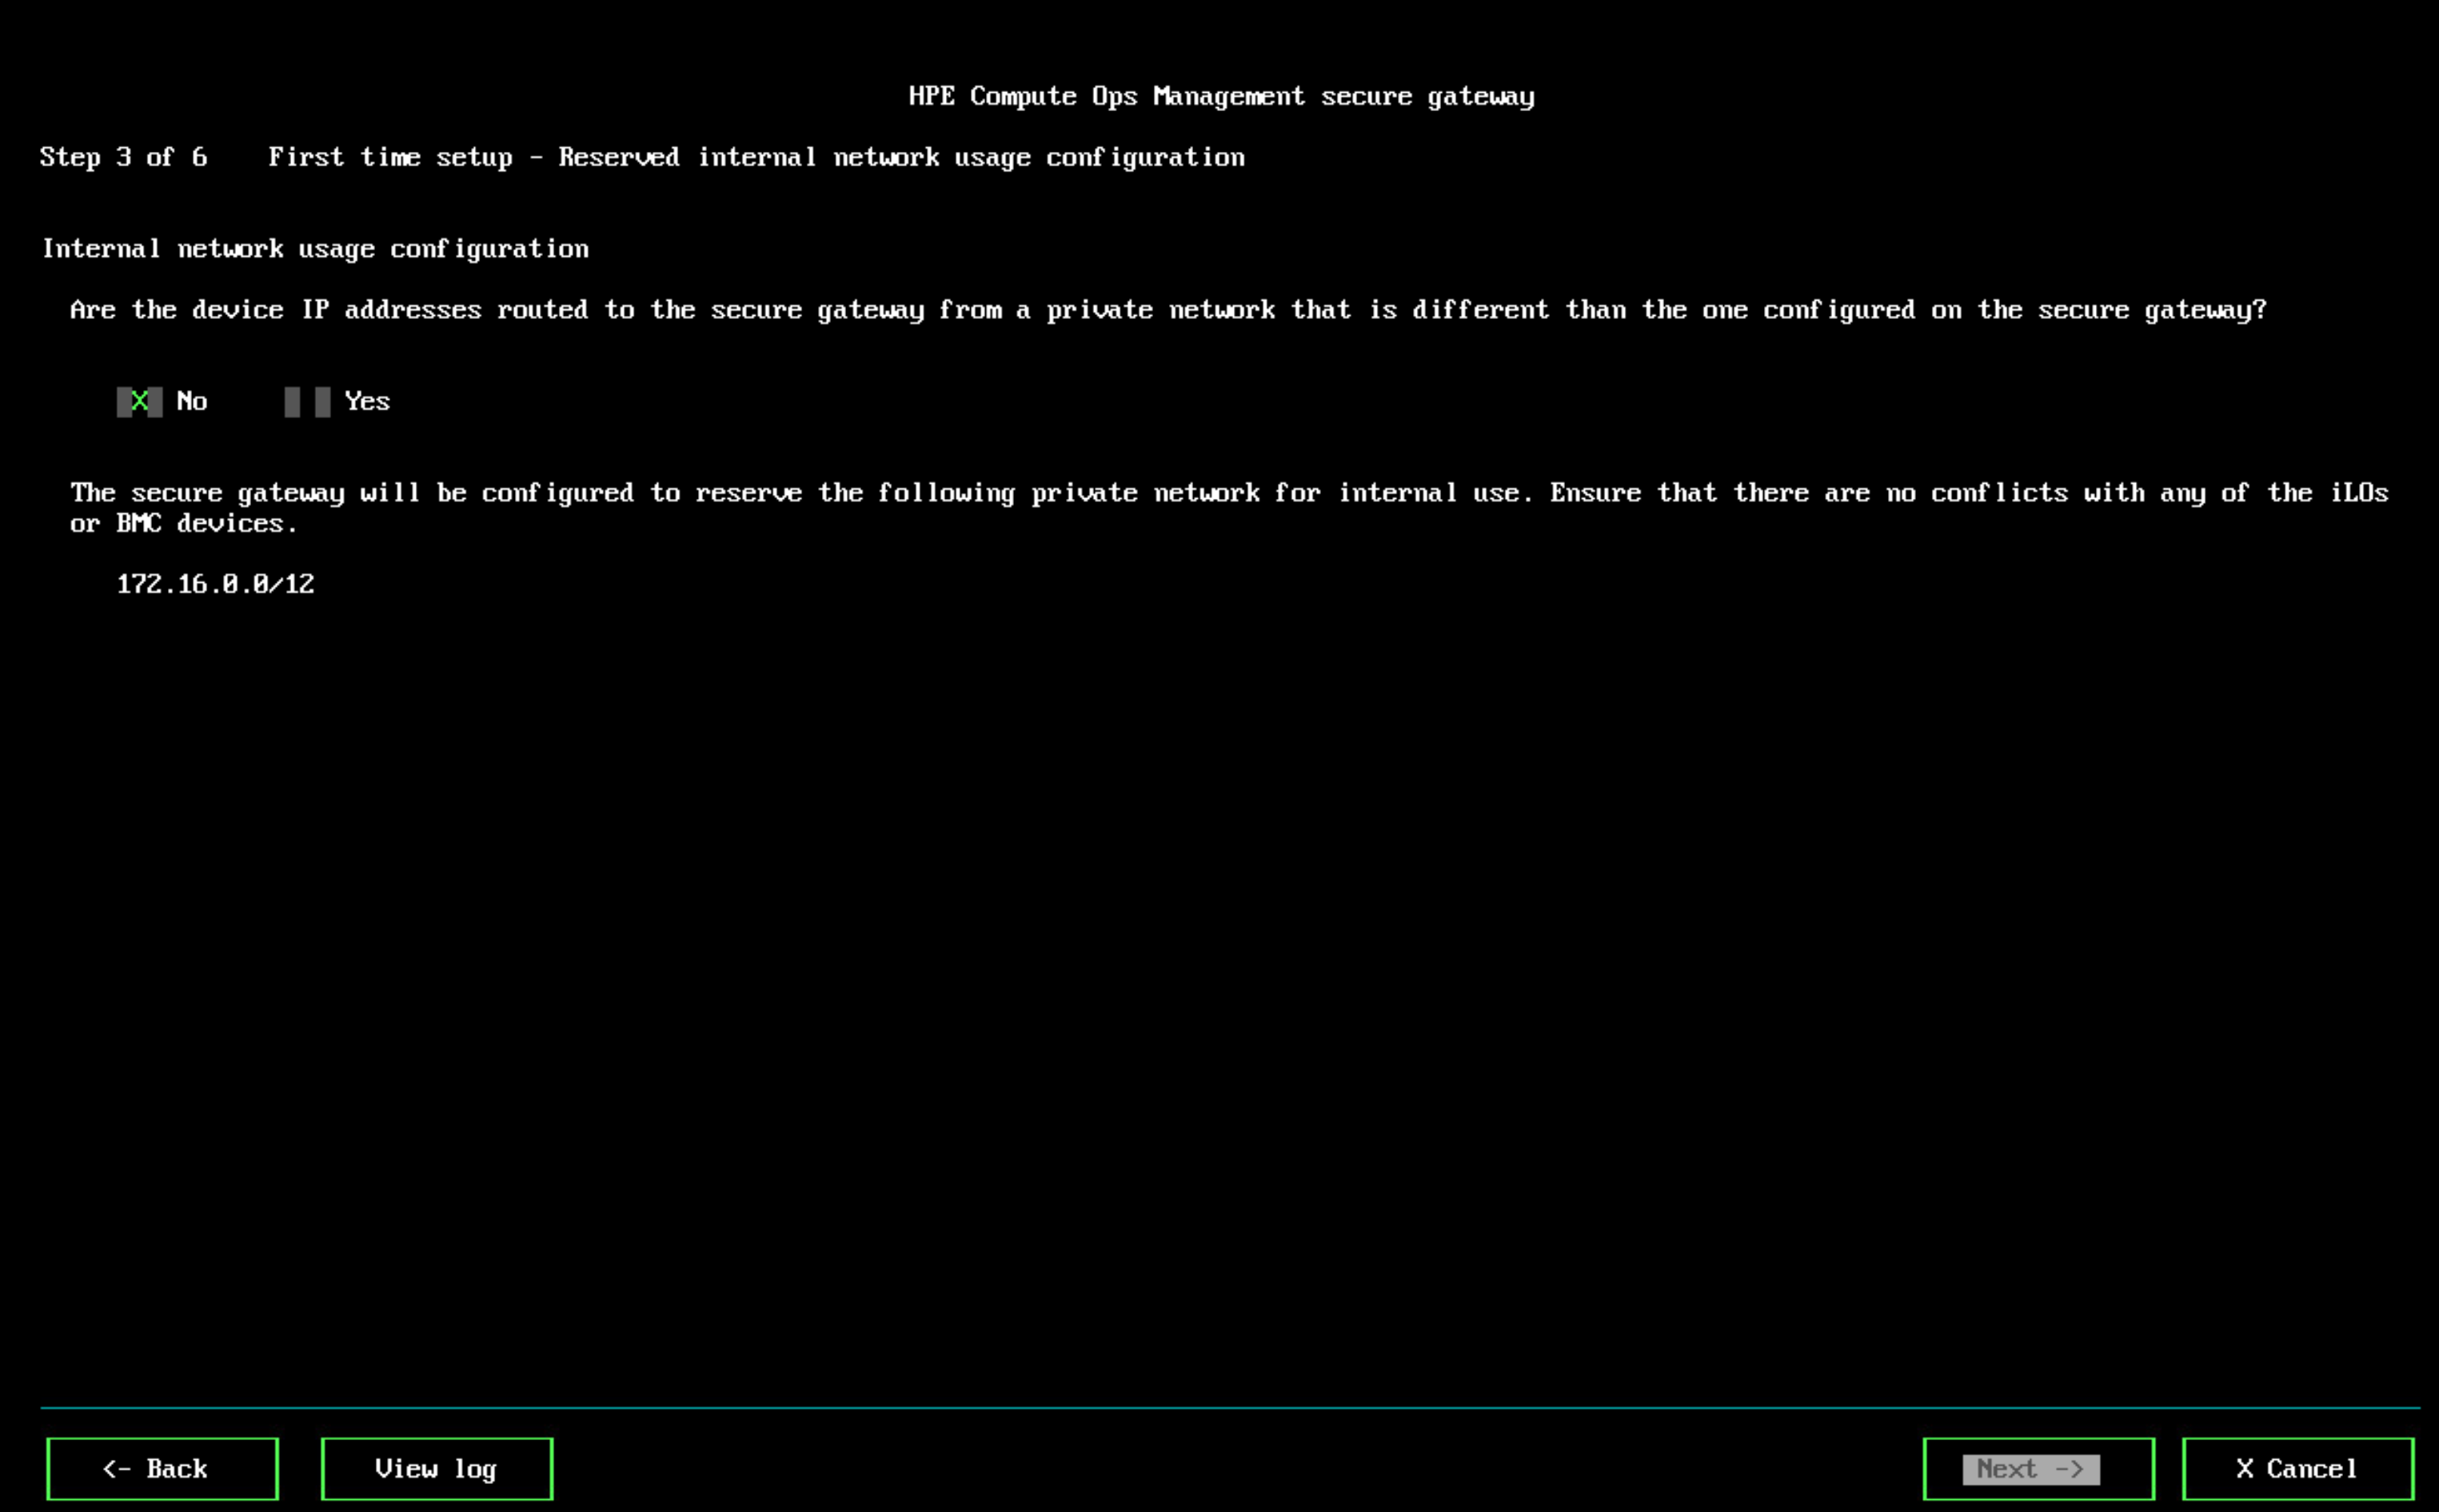
Leave it as the default of No and Tab until you’re at Next -> as our Device IP and SGW’s are on the same network.
-
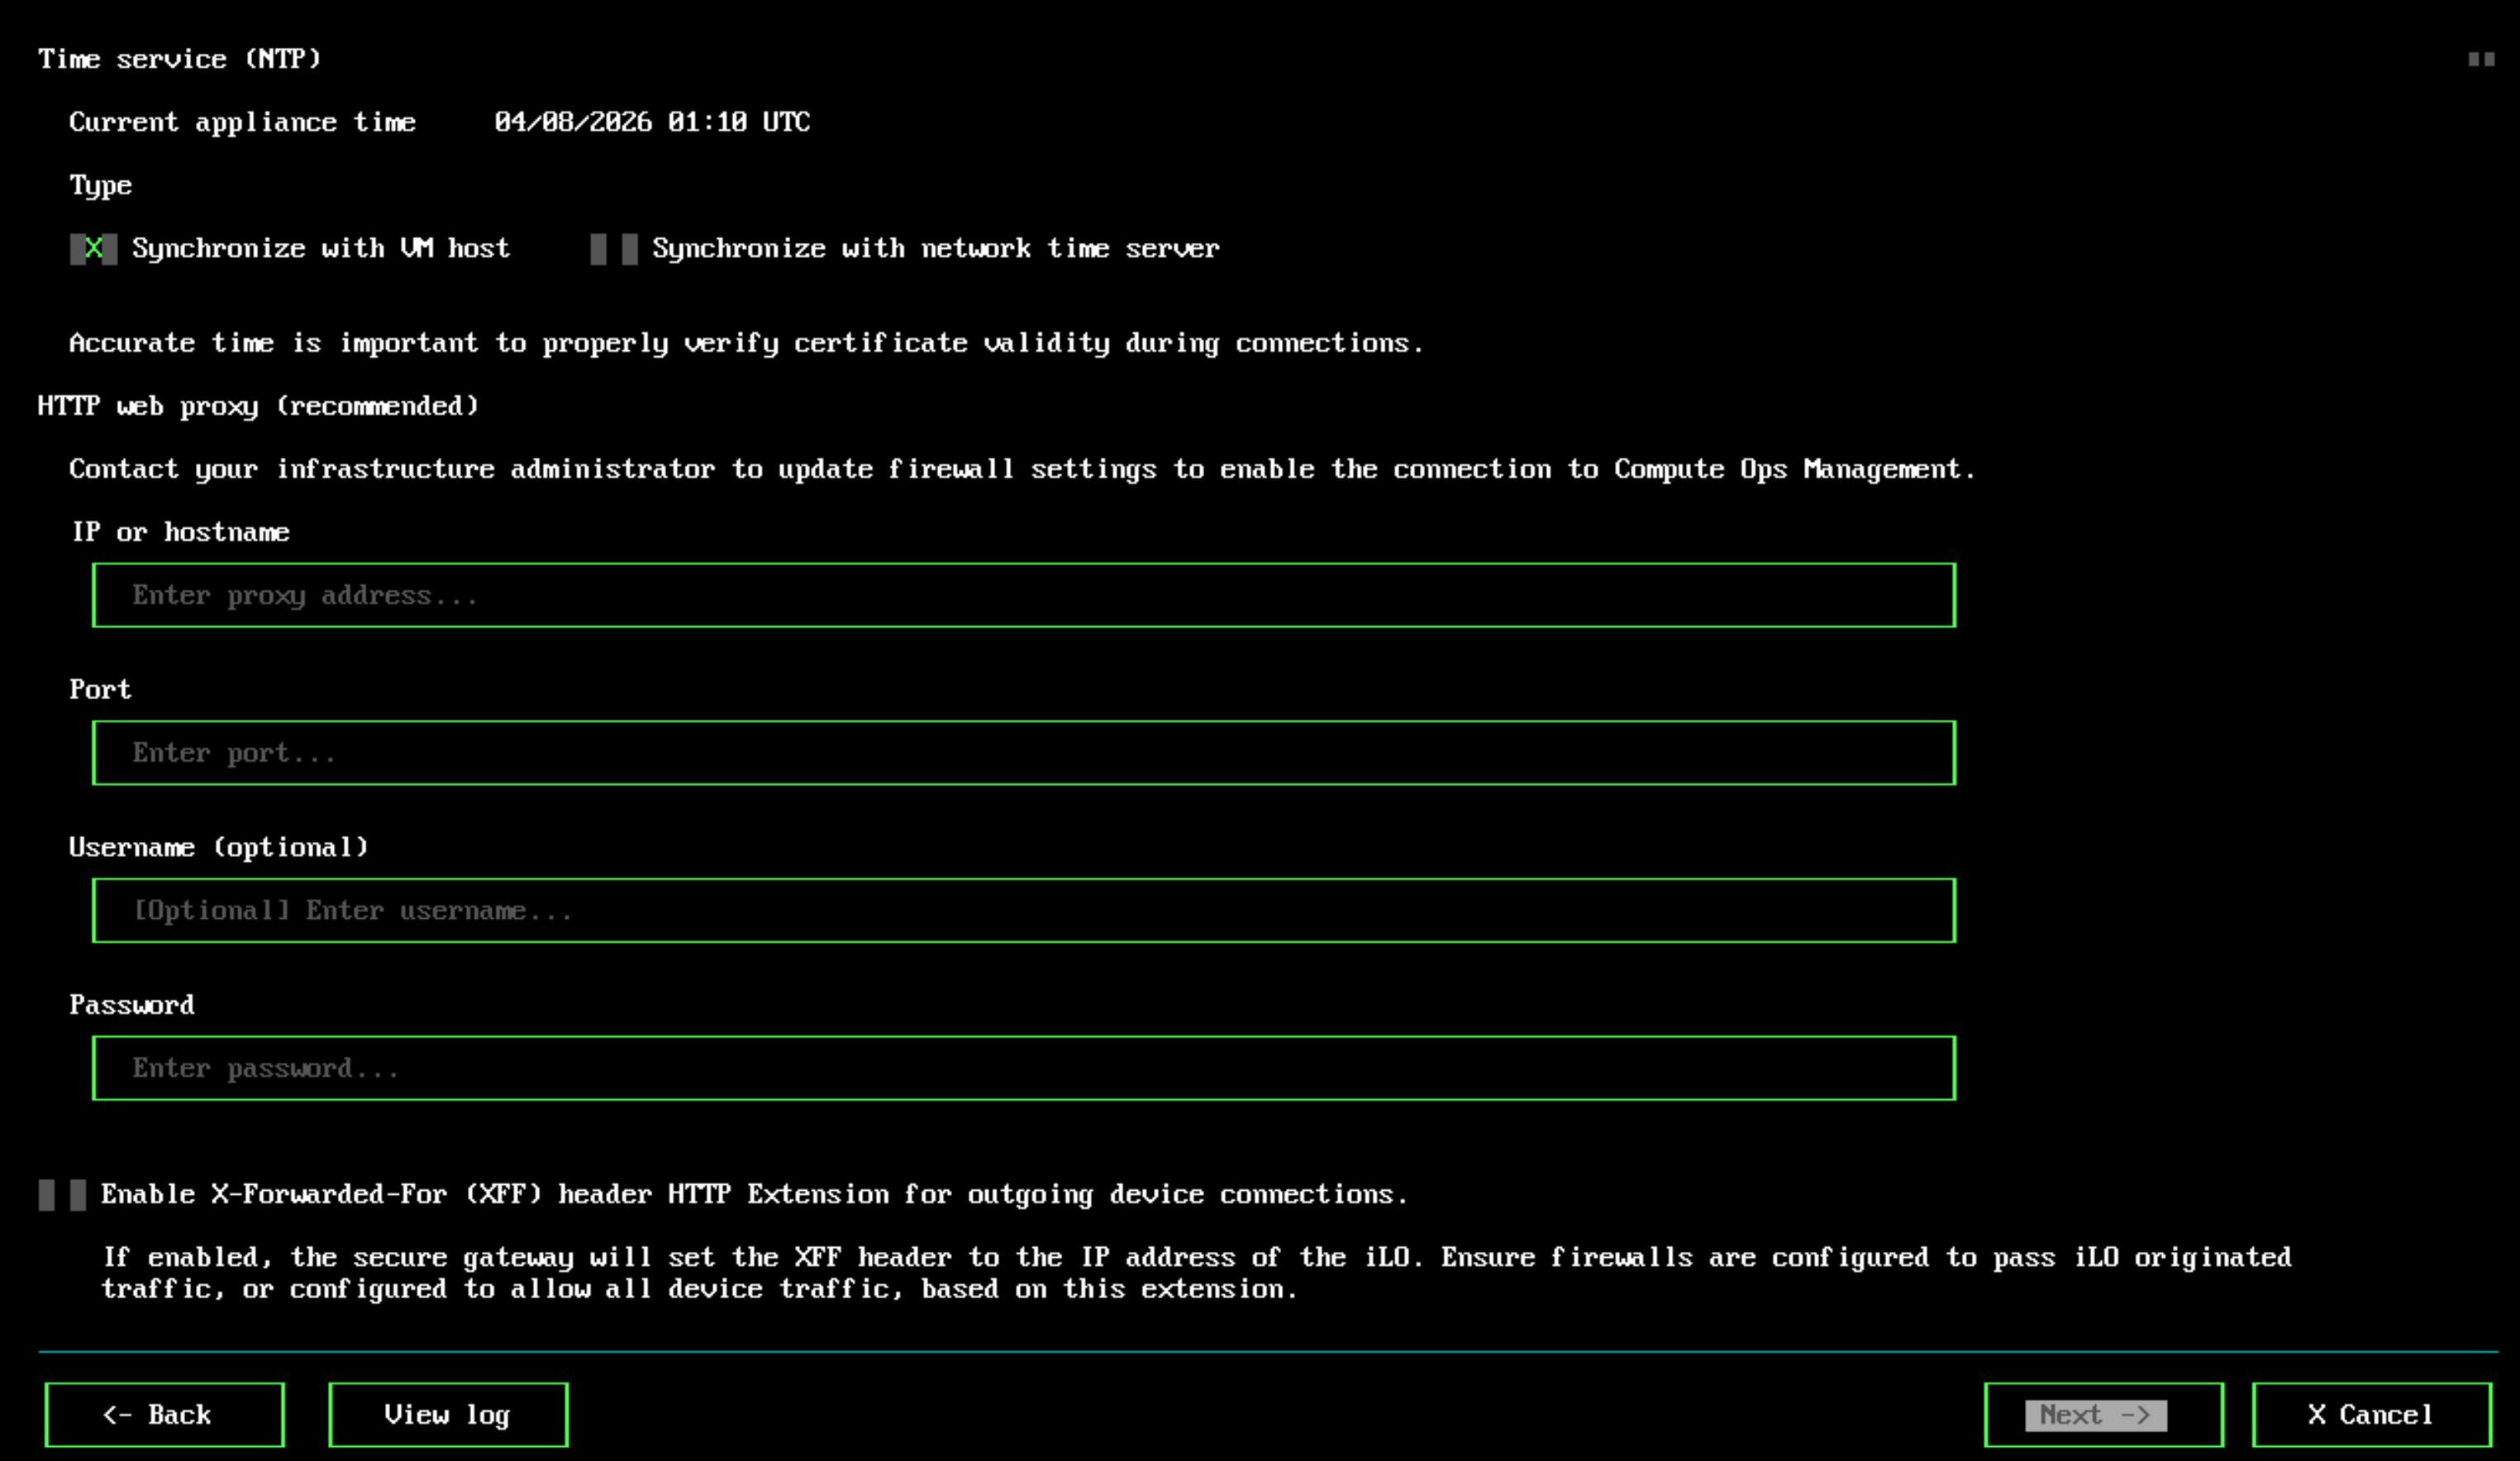
Leave the default options for Time and Web Proxy configuration for step 4 of 6. Tab to Next and press Enter on your keyboard to continue.
-
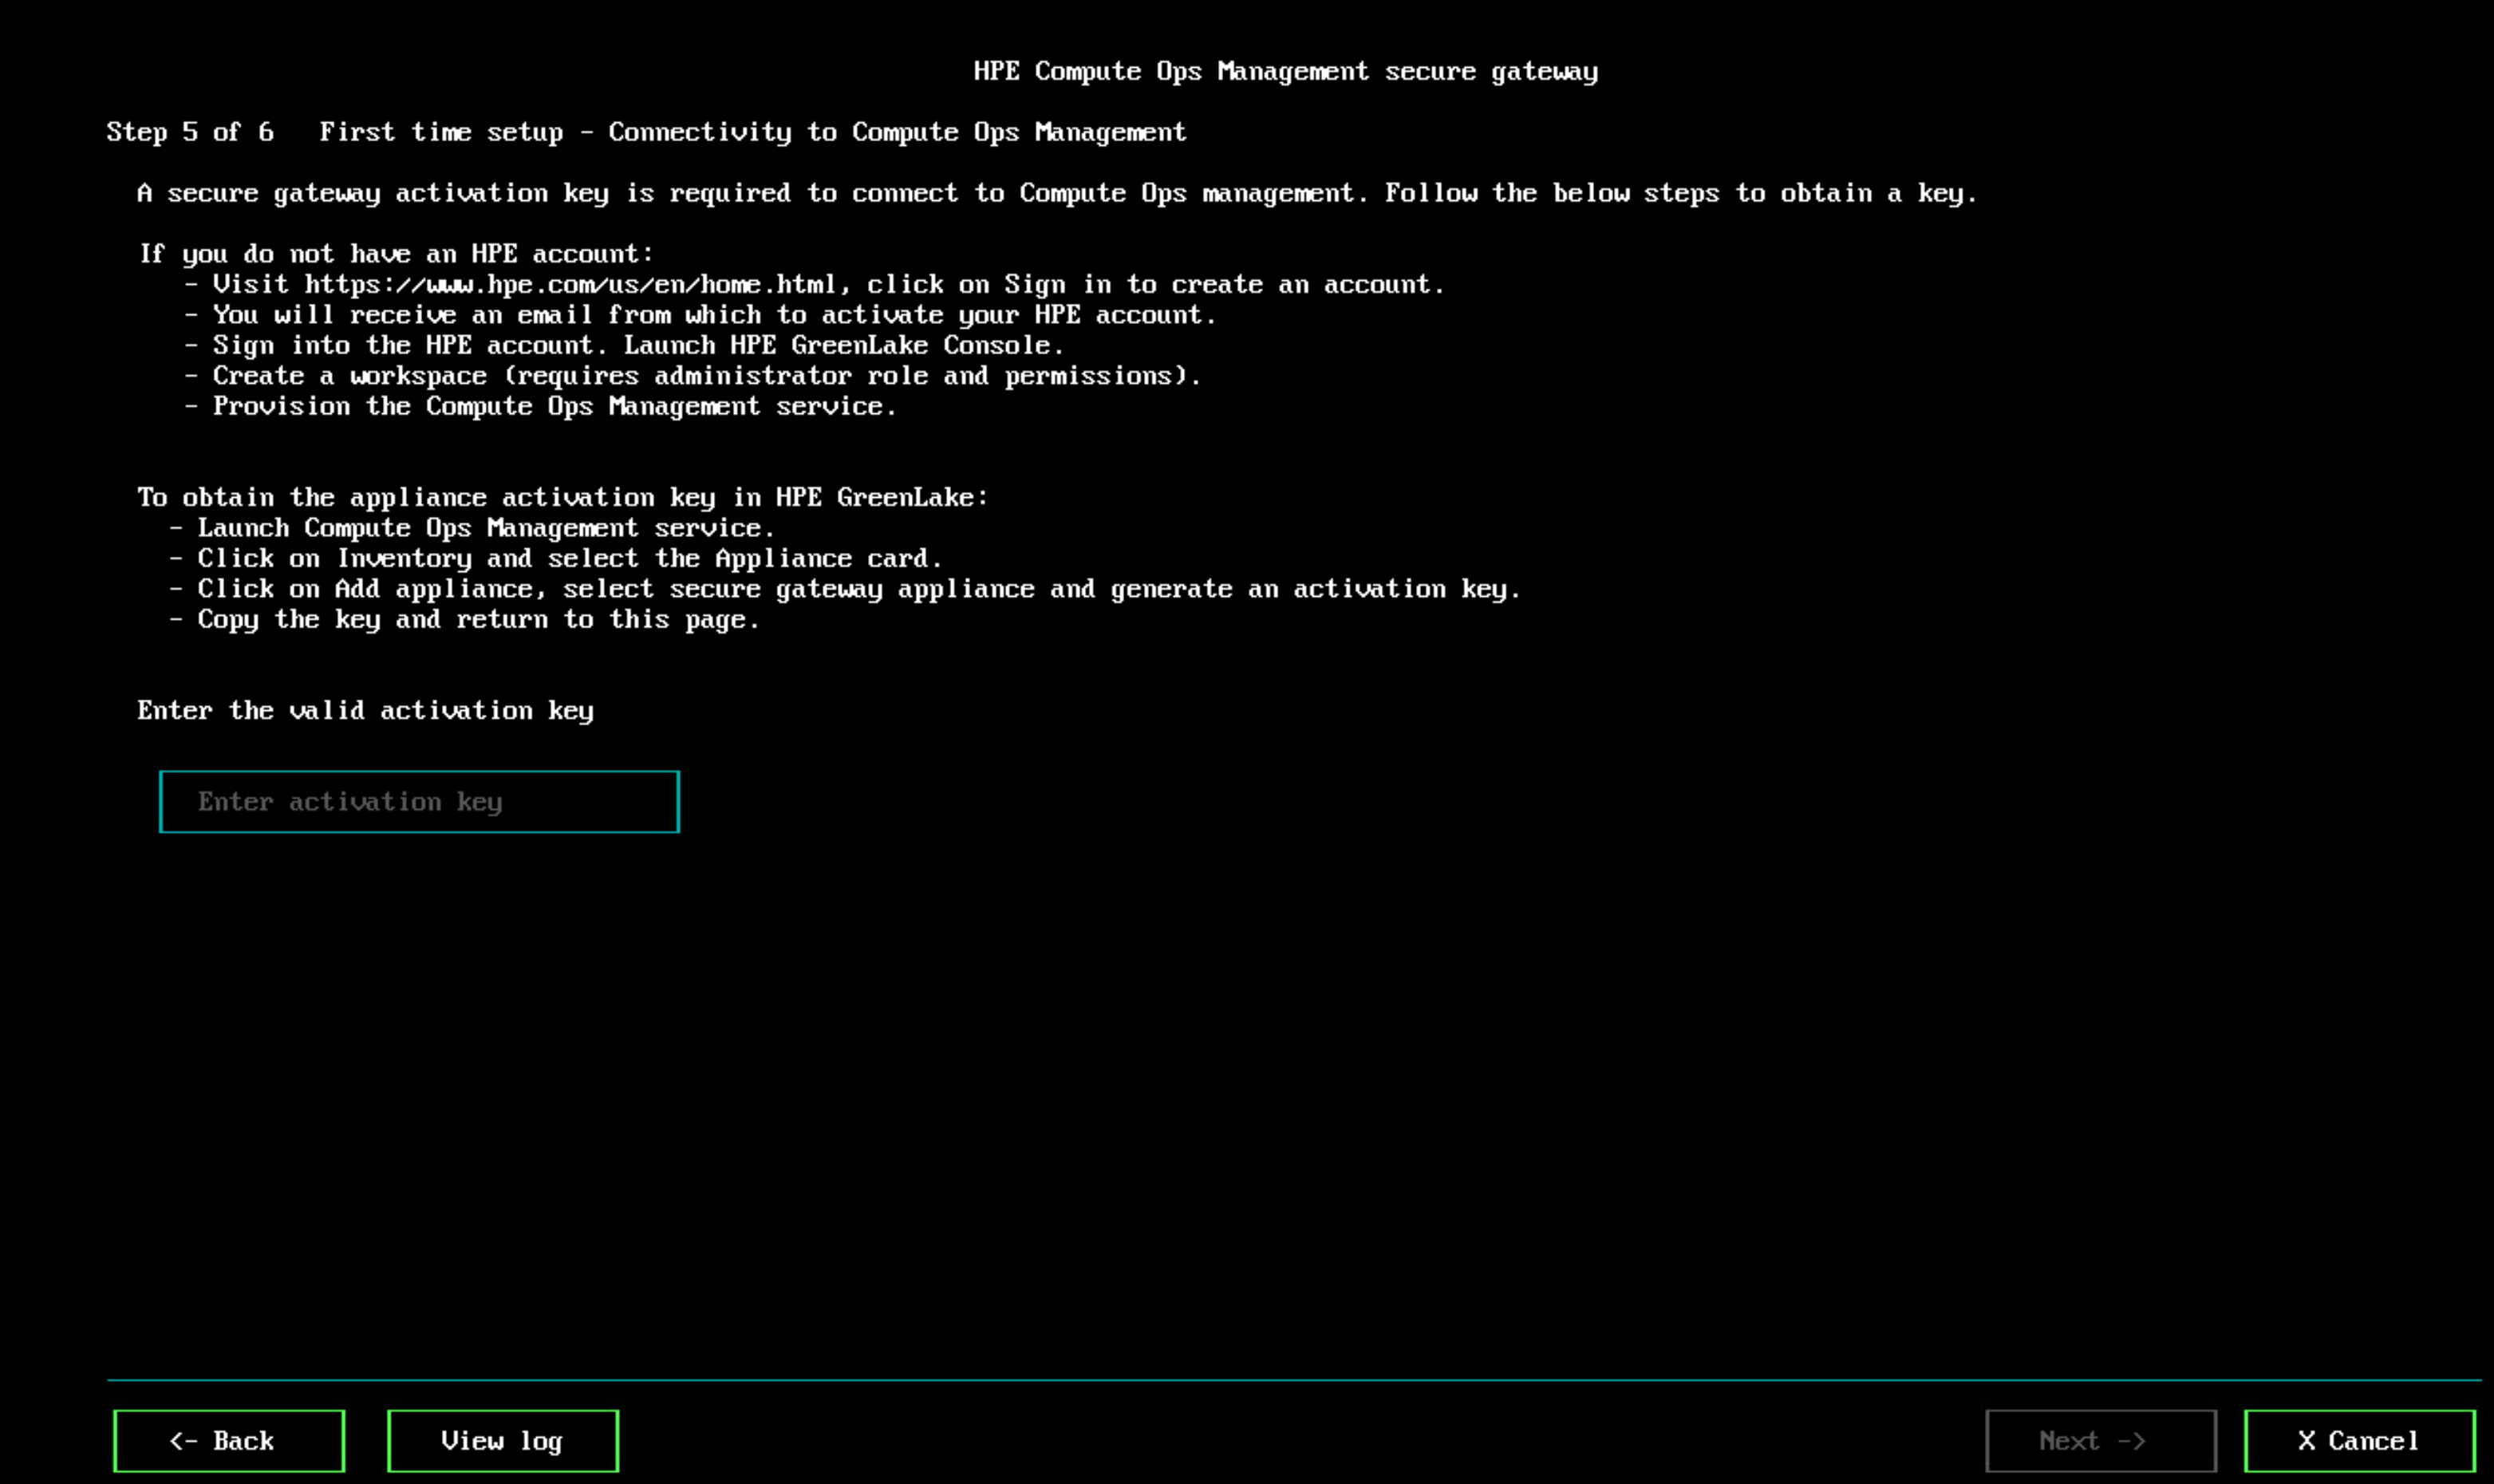
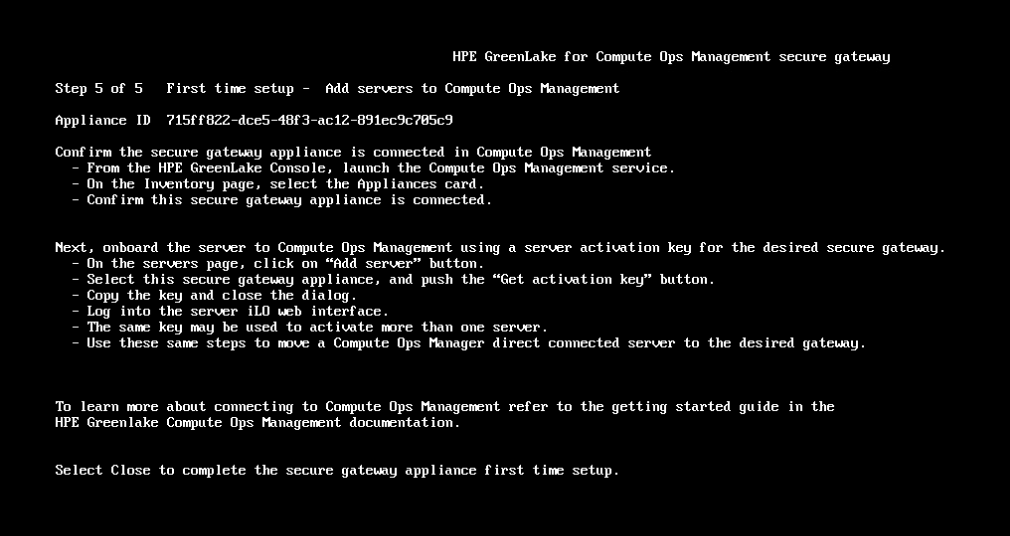
For Step 5 of 6, pause for now and continue with the next steps.
-
Now return to your Web Browser that’s connected to HPE Compute Ops Management.
-
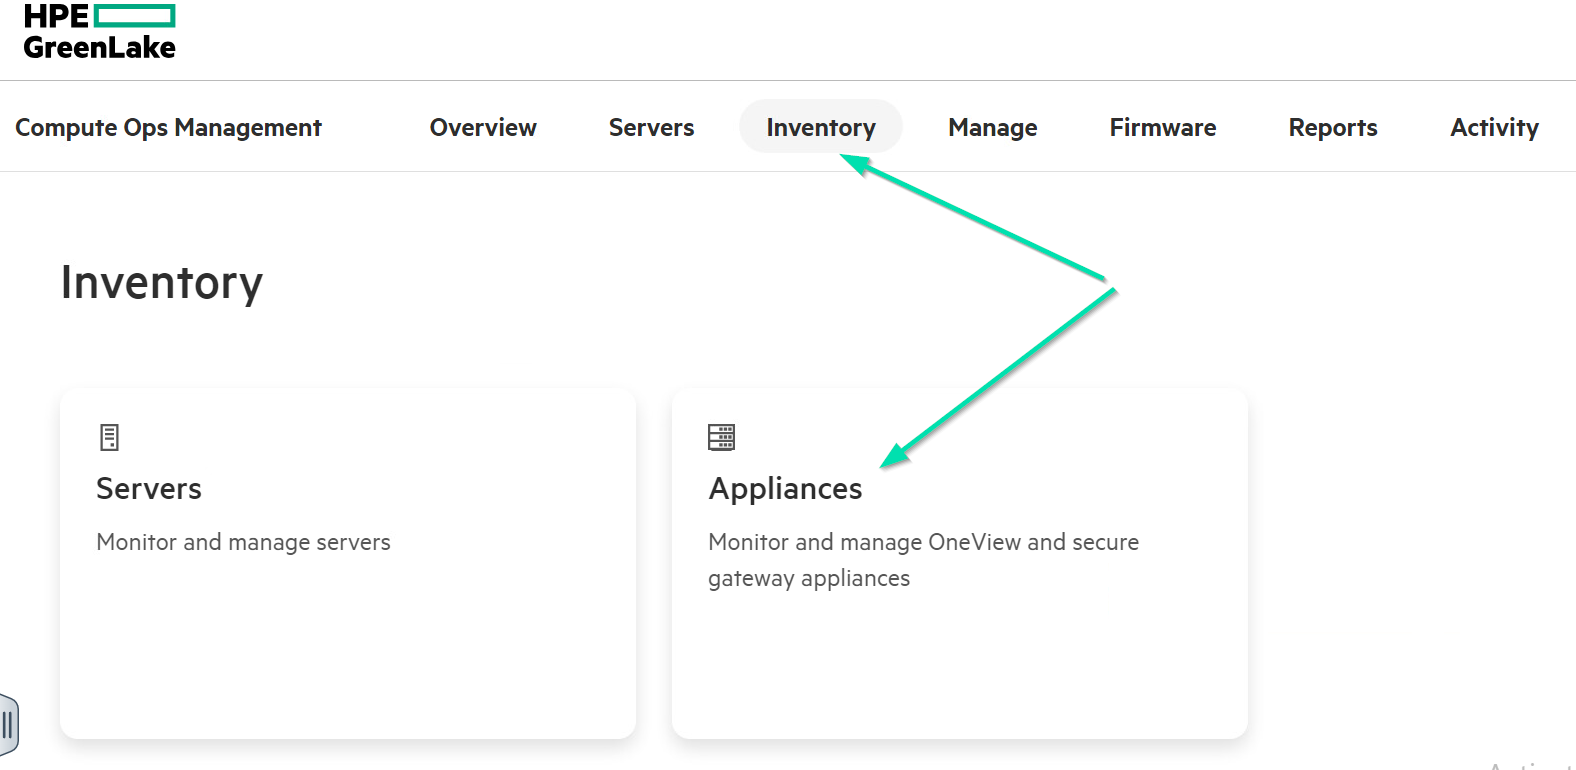
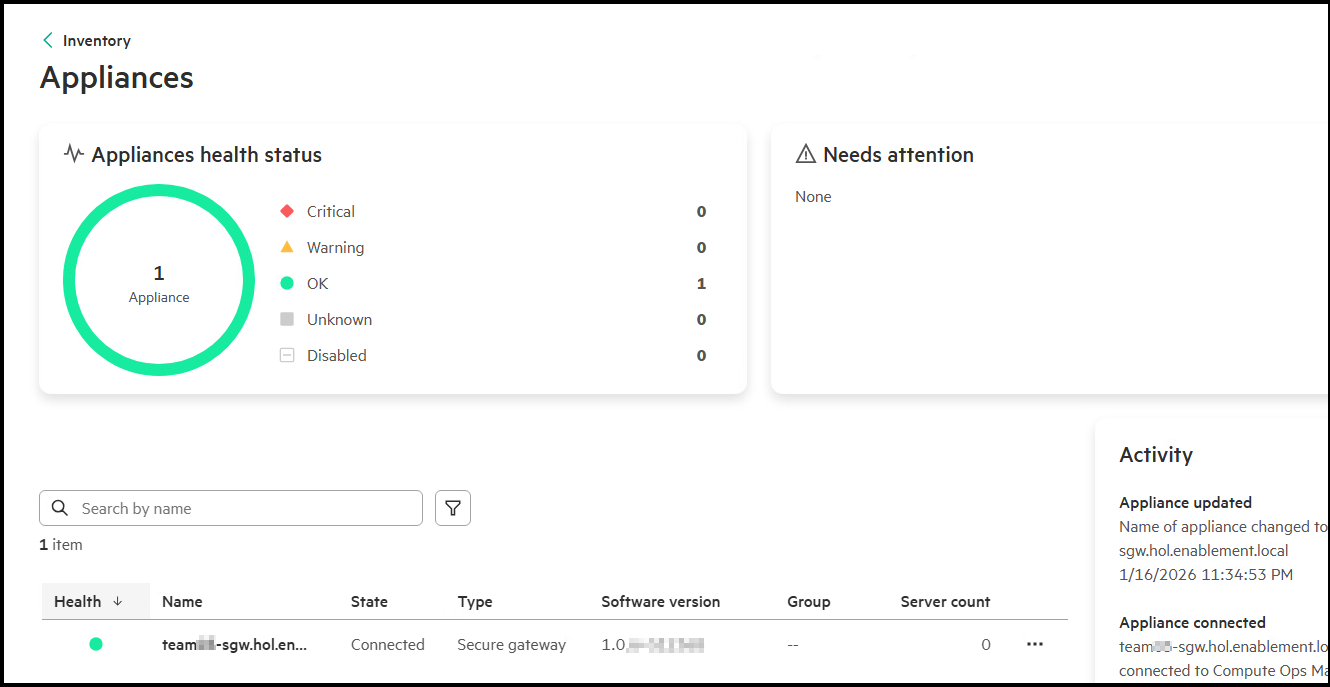
From the COM homepage, navigate to Inventory, then select Appliances card.
-
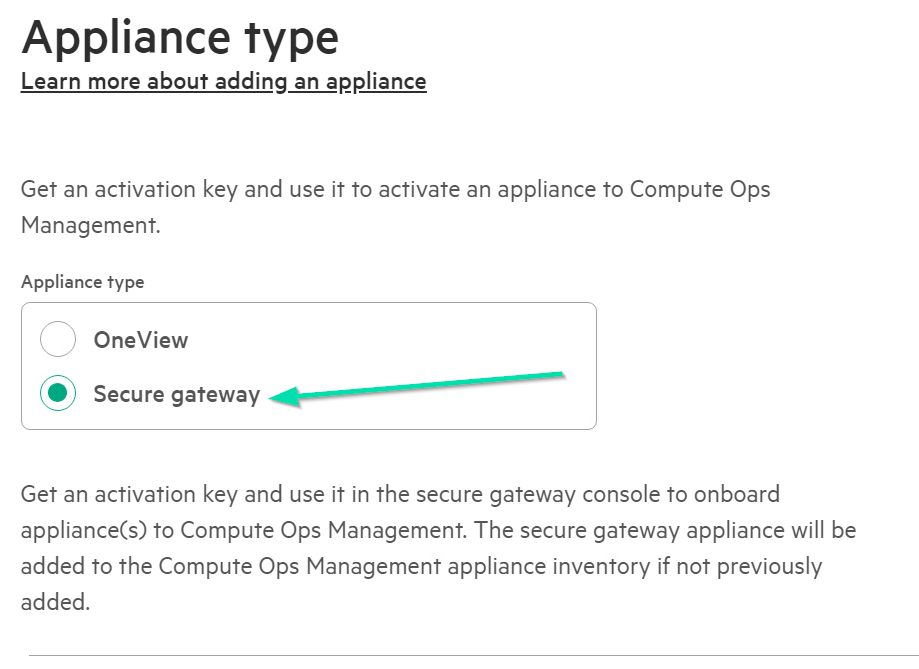
Click Add Appliance, ensure Secure gateway is selected. Click Next to continue.
-
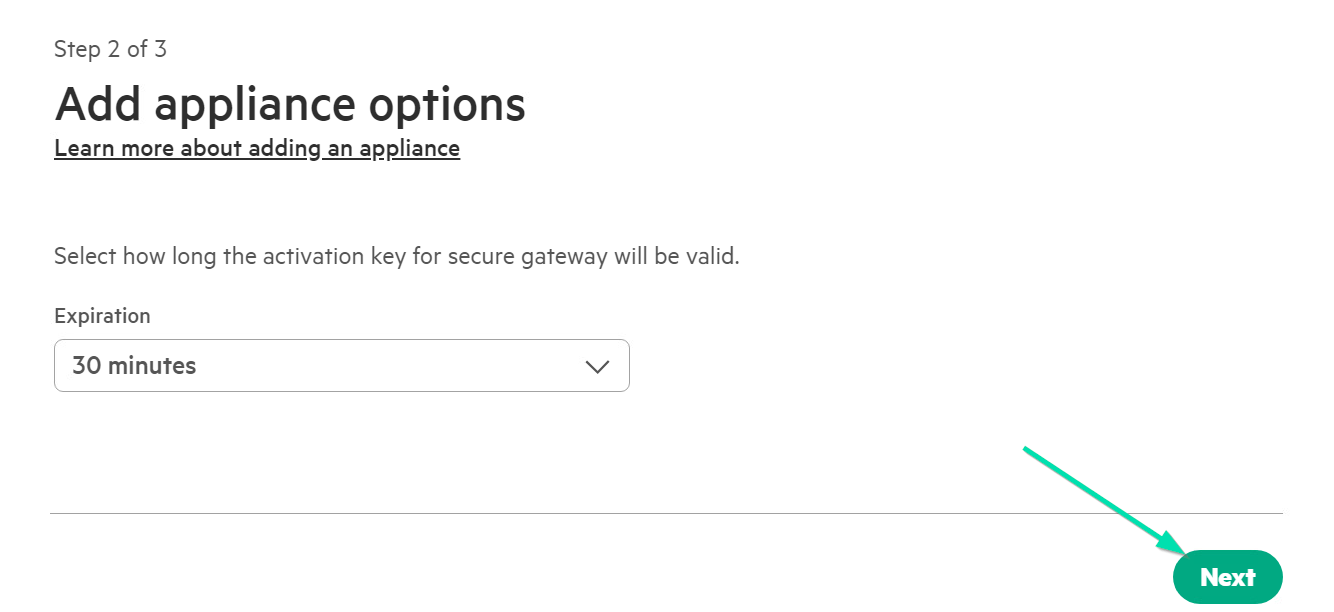
Set 30 minutes for how long the activation key will be valid and select Next.
-
Then click Finish and generate activation key.
-
Take note of the Activation Key and write it down, as copy / paste will not work.
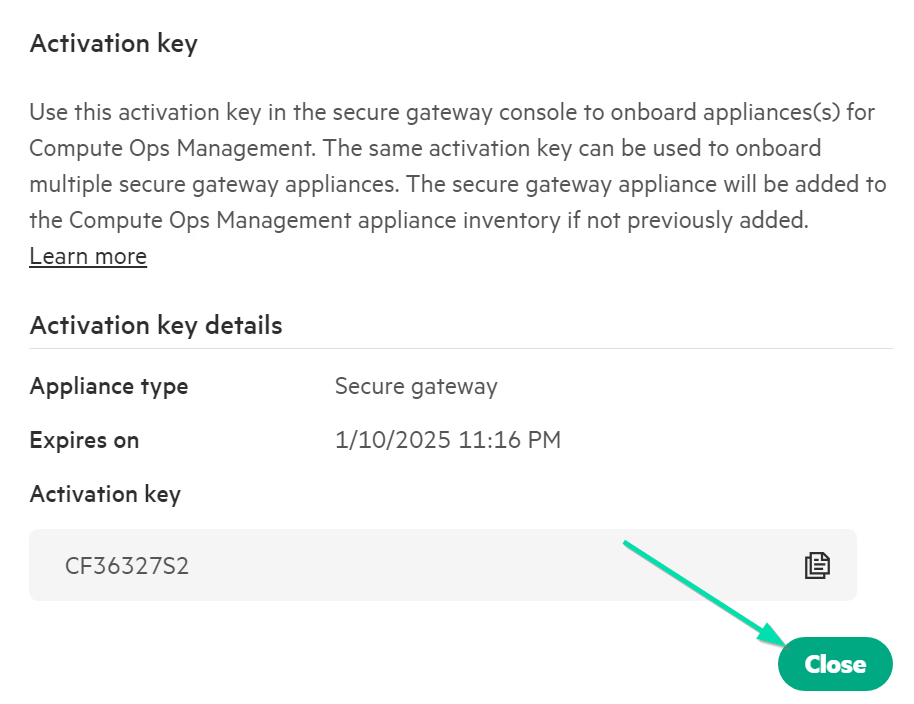
-
Type this into the TUI Step 5 of 6, for the Secure Gateway Appliance and tab to Next and hit Enter to continue.
-
The Secure Gateway should now be connected and you can Close this last informational step.
-
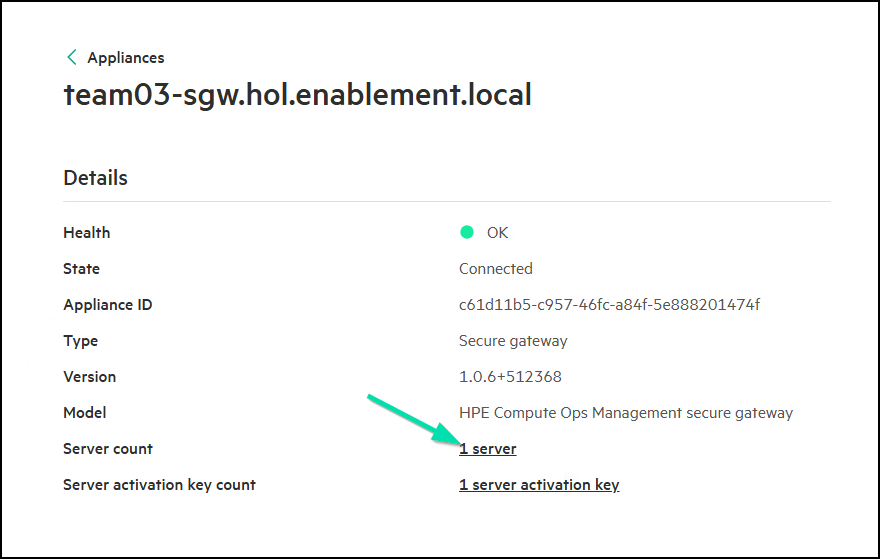
The TUI page should show your Secure Gateway as Connected.
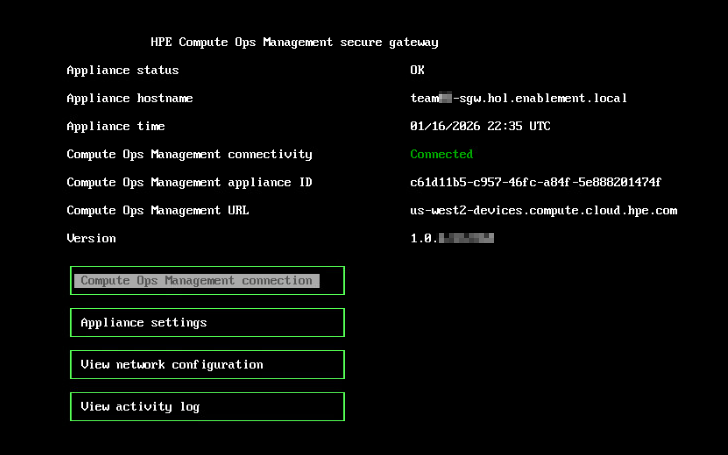
-
The COM Appliances inventory page should display the same information:
This concludes this section of the lab.
Task 14 - Connecting our HPE iLO7 to COM via the Secure Gateway
In this portion of the lab, we will disconnect our existing HPE iLO7 from COM, modify our Proxy details and then create a new Activation Key linking it to the Secure Gateway and apply this to our HPE iLO7.
-
Return to the Web Browser that’s connected to your HPE iLO7 and navigate to Compute Ops Management section on the center of the Dashboard. Click on the HPE Compute Ops Management card.
-
From here, click on Edit Settings option.
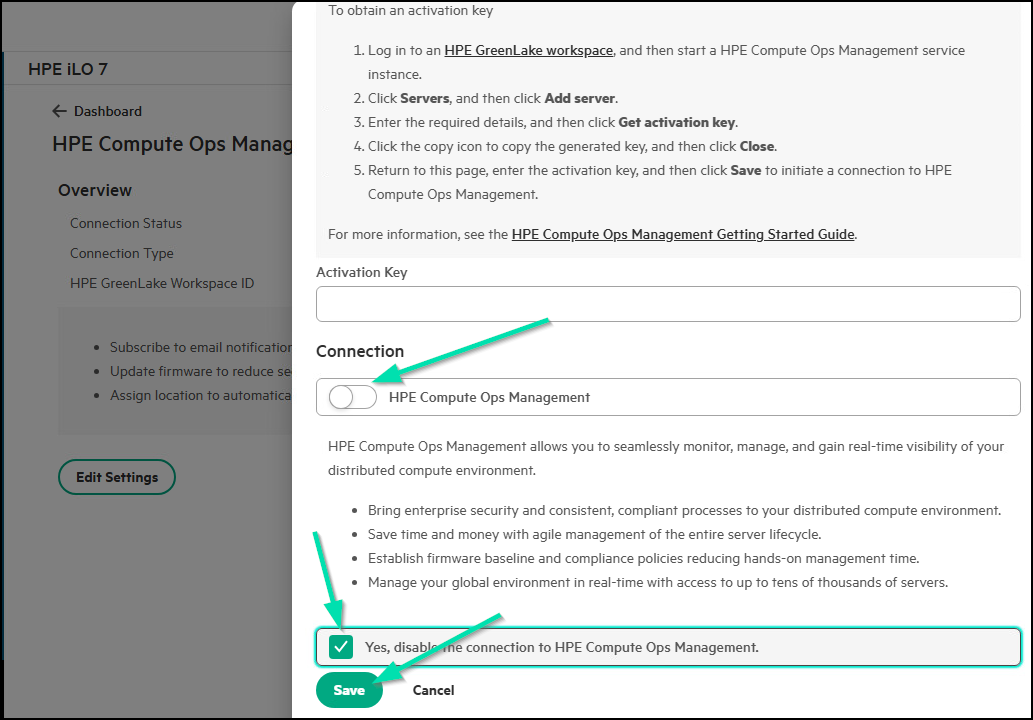
-
Disable the COM connection by clicking on the sliding button next to HPE Compute Ops Management.
-
Then check the box to disable the connection to HPE COM.
-
Click Save to continue.
-
Then navigate to the HPE iLO7 Settings section to update the Web Proxy details under Access.
-
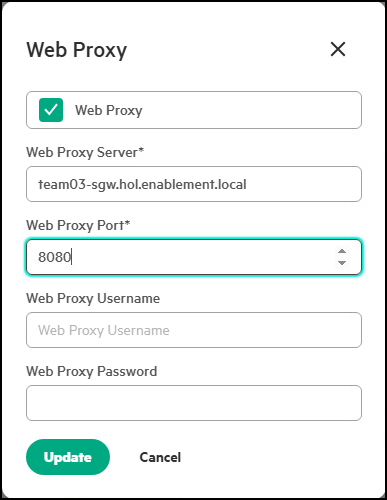
Click the pencil to the right of Web Proxy to update the Web Proxy information.
-
Update the Web Proxy Server to the FQDN of your newly created Secure Gateway Appliance. Refer to your assigned FQDN to know what to enter here. For this example, we will use “Team03”. Additionally, set the Web Proxy Port to 8080. Finally click Update to make the changes.
-
Find your Web Browser or Tab that’s connected to Compute Ops Management and navigate to Servers. You will see your server showing it as Reconnecting or Not Connected depending on how fast you are.

-
Go ahead and click Add server at the top right area of this page.

-
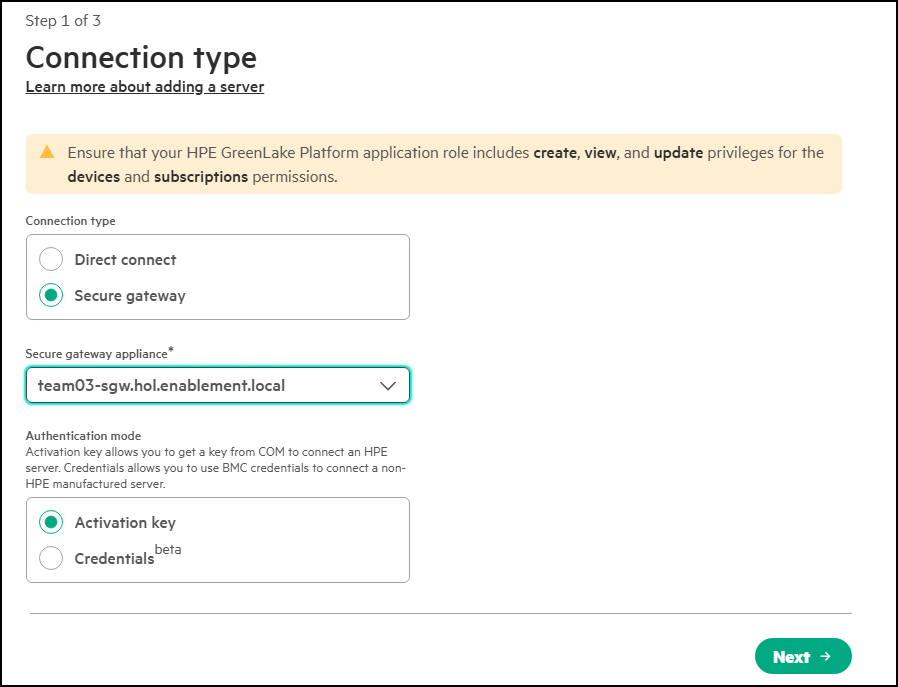
Change the Server connection type to Secure gateway and select your assigned secure gateway from the drop-down menu.
-
For the Authentication Mode make sure Activation key is selected.
-
Click Next to continue.
-
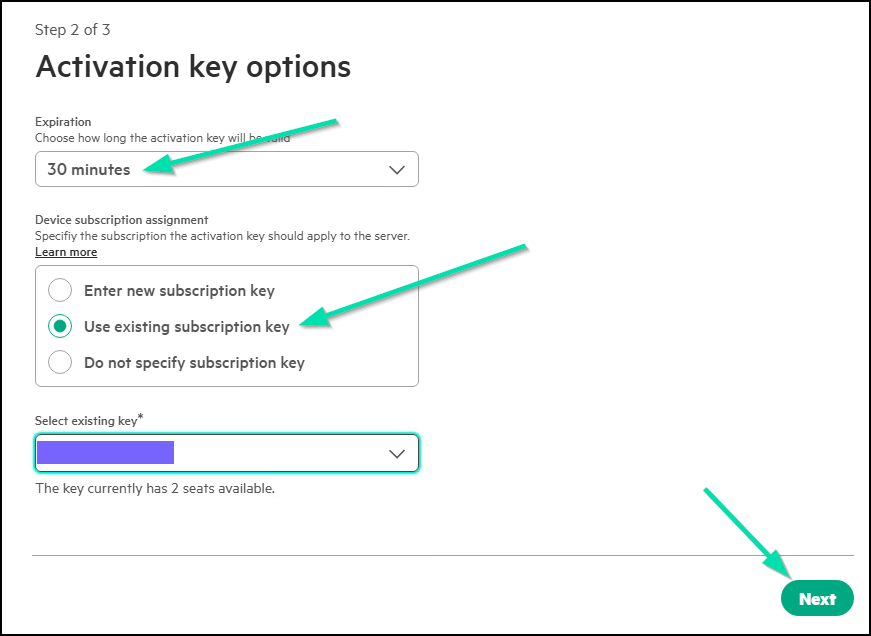
Change the Expiration to 30 minutes and select Use existing subscription key. Finally click Next to continue.
-
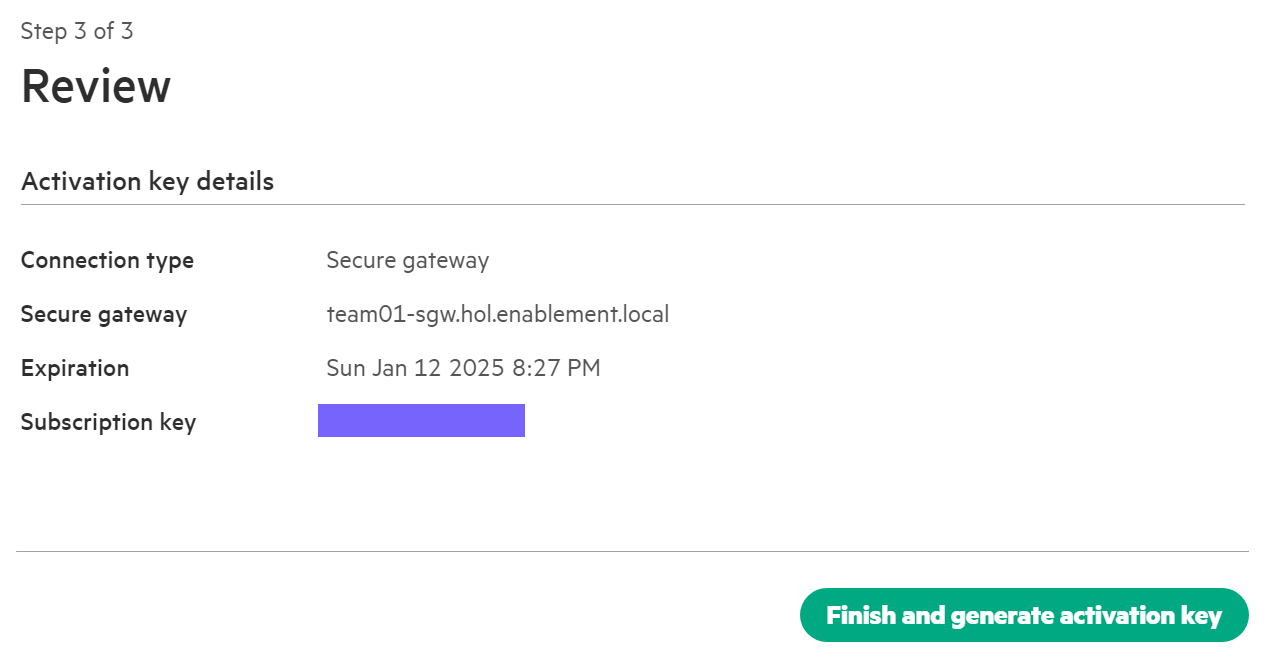
Review your Activation Key Details, then hit Finish and generate activation key.
-
Take note of or copy the Activation key, then close the pop up.
-
Return to your Web Browser or Tab which is connected to your Server’s HPE iLO7, Click on Compute Ops Management.
-
Click Enable.
-
At the Activation Key is required screen, click on Enter Activation key.
-
At the Enter Activation Key screen enter the activation key you captured in the previous step and click on Save.
-
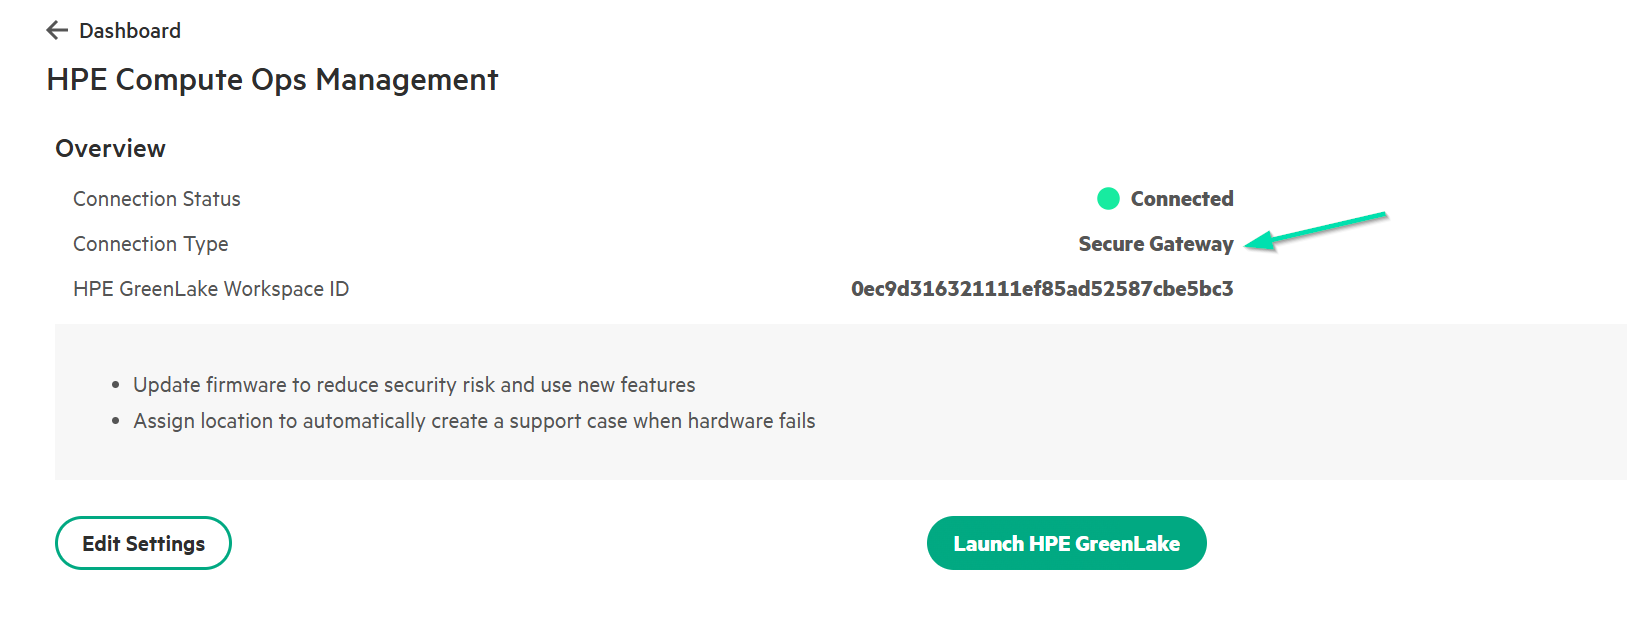
Give it a few seconds and it should then return with a Connection Status of Connected, your workspace ID and Connection Type Secure Gateway.
-
If we then navigate back to our Browser or Tab that’s connected to COM, we will see our Server now Connected and going through its inventory process.

-
If you go a step further and Click on the Hostname of your Server or at this point, possibly the two bolded dash lines - -, you will get detailed information and see you are connected via the Secure Gateway.
-
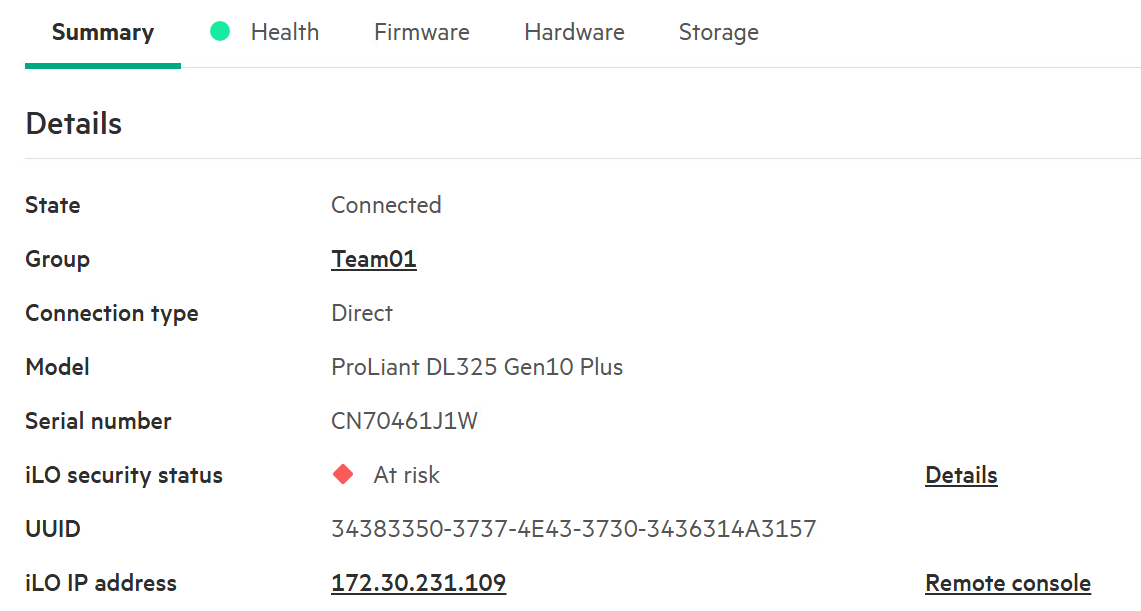
Review the information on the Server Summary information screen.

-
You can also click on the hyperlink for your Secure Gateway to get detailed information for the server as well.
You have accomplished what we wanted to show you in this HOL experience. We hope you get a lot out of it. Thank you for participating in the session.
This completes this HOL experience.
Summary
In this lab, we explored the robust capabilities of HPE’s integrated Lights-Out (HPE iLO7) management tools, specifically HPE iLO7, within the ProLiant Gen12 series. We also examined how HPE Compute Ops Management offers secure and efficient remote management of HPE servers, enabling administrators to access and control systems from virtually anywhere—provided the necessary security configurations are in place.
By implementing HPE iLO7 security best practices—such as secure network access, strong authentication methods, and encryption—users can maintain a secure environment while remotely managing ProLiant servers. This applies across various environments, from remote offices and edge systems to large datacenters. HPE’s unified management strategy ensures consistency in system oversight, regardless of location.
Additionally, we demonstrated how HPE Compute Ops Management integrates seamlessly with a Secure Gateway, highlighting the ease and security of remote management. With HPE ProLiant Compute, HPE empowers IT administrators with both the flexibility and security needed to maintain full control of their hardware, no matter where it’s located.
Want more?
Back home, you can head to the HPE Demonstration Portal and request a time slot to demonstrate these products
For COM Interest, request a 90-day evaluation
Pull out your phone and view HPE GreenLake and HPE Compute Ops Management, to move to the next step in a wholistic IT system management strategy.
Login: com.demouser@gmail.com
Password: Refer to login sheet
 \
\