HPE Compute Scale-up Server 3200 Web-UI
Living Lab experience
Introduction
This hands on lab lets you navigate in the Web UI of an HPE Compute Scale-Up Server 3200 simulator.
💡 Note
The CSUS 3200 ~Web-UI simulator is great for
GETrequests. However,SETrequests will not be effective and may return errors.
Connecting to the lab environment
To access the HPE Compute BU Enablement Environment, we will use VMware Horizon. Follow these steps:
-
Using your Chrome browser, navigate to the appropriate URL based on your network location to open the Horizon Access Portal:
-
External to HPE (not connected to HPE VPN): https://labs.compute.cloud.hpe.com
-
Internal to HPE (or connected to HPE VPN): https://techenablement.hpecorp.net
-
-
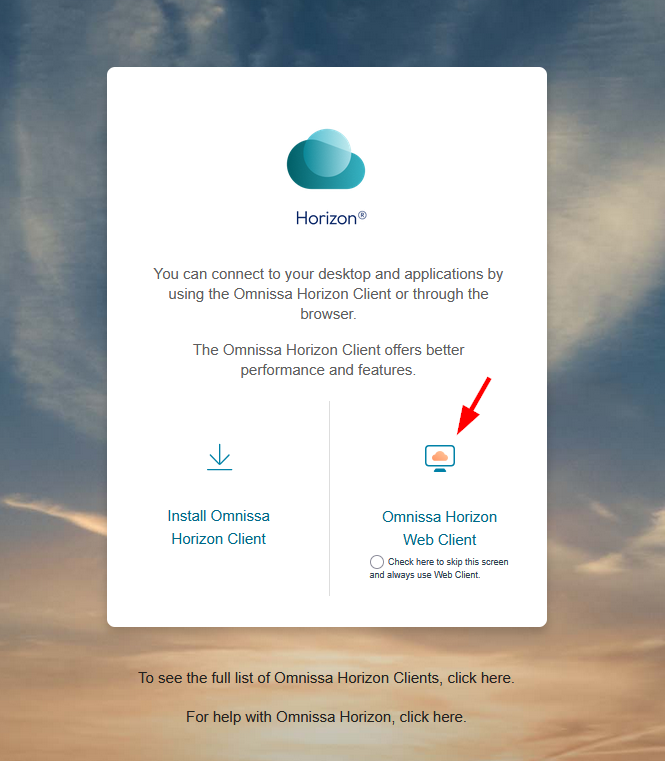
On the Horizon login screen, click the Omnissa Horizon Web Client button.
-
Login with the credentials provided in your login sheet.

-
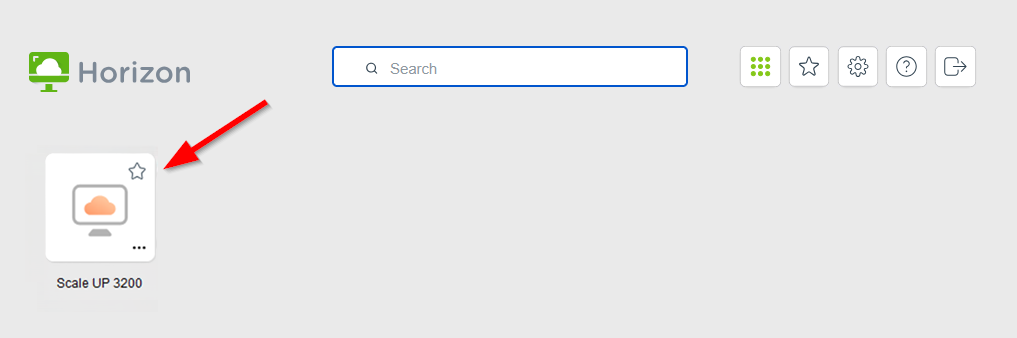
Click on the graphic that represents your Lab environment.
Since Horizon is presenting a remote desktop session inside of your desktop’s browser, it may be helpful to hit F11 key at this time to set the browser in full screen mode.
Start the simulator
-
To launch the simulator, click twice on the
ClickMe.baticon.
-
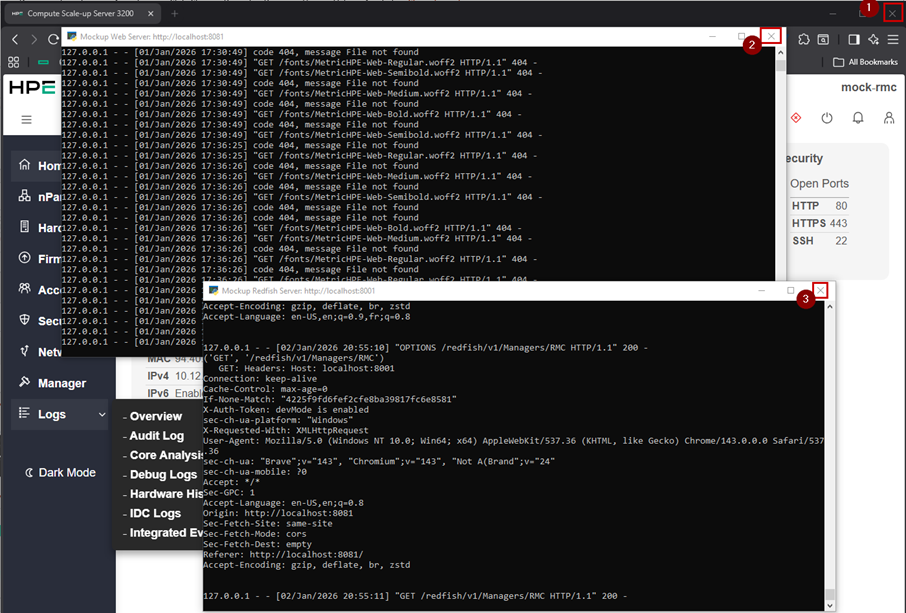
A
CMD.exeterminal is started, launching two Python windows and the defautl browser pointing the CSUS simulator: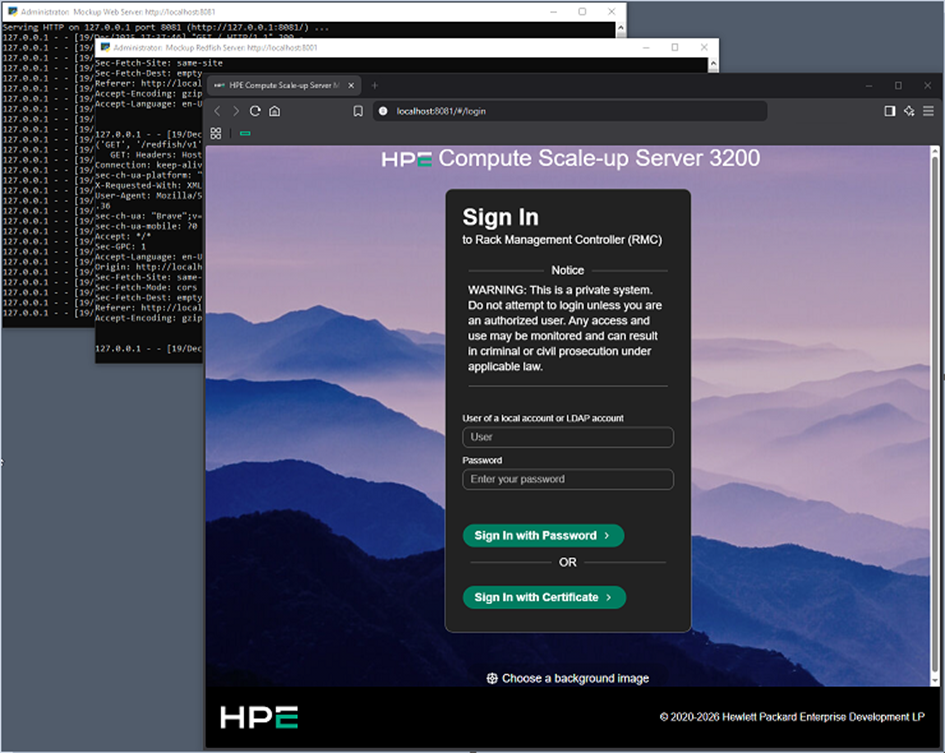
Access & login
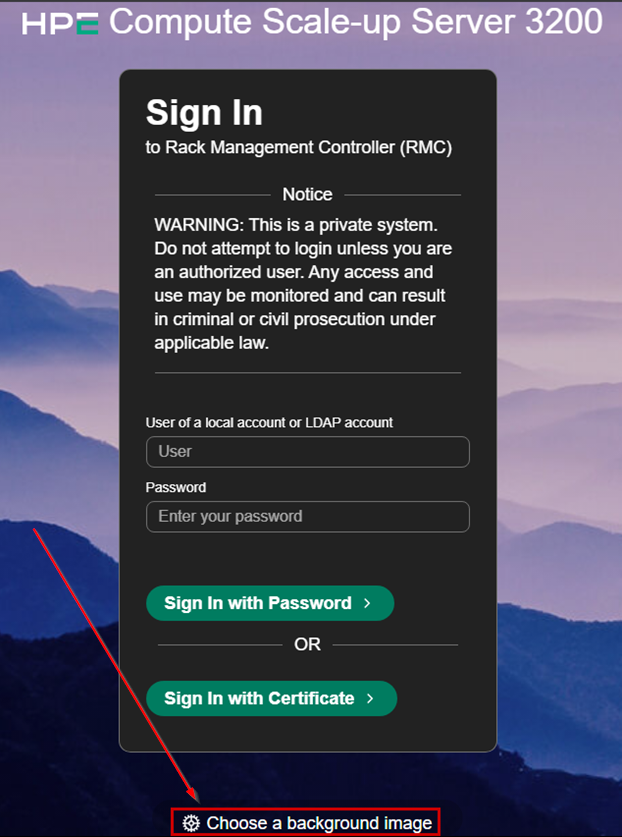
If you have several CSUS 3200 systems in your data centre, you can customize the background of each of their graphical user interfaces to better identify them.
Modify the splash screen background by clicking the Choose a background image button.
If not already done, maximize the size of your browser by clicking the F11 key to avoid any vertical or horizontal scroll-bar.
-
Select a background image
-
Click on the Information icon
-
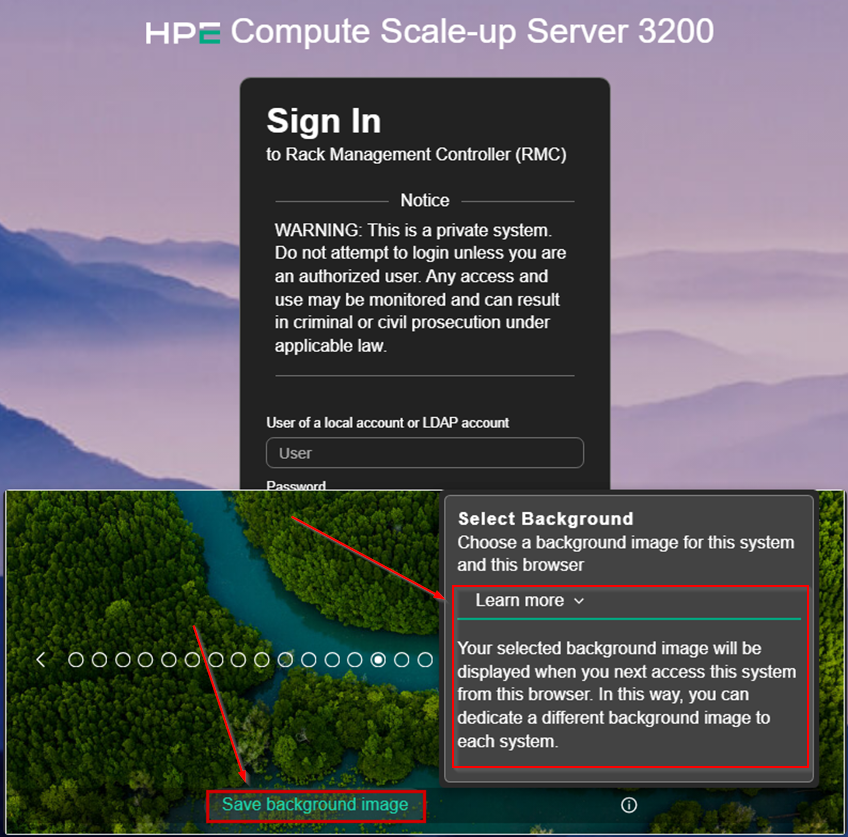
Click on
Learn more
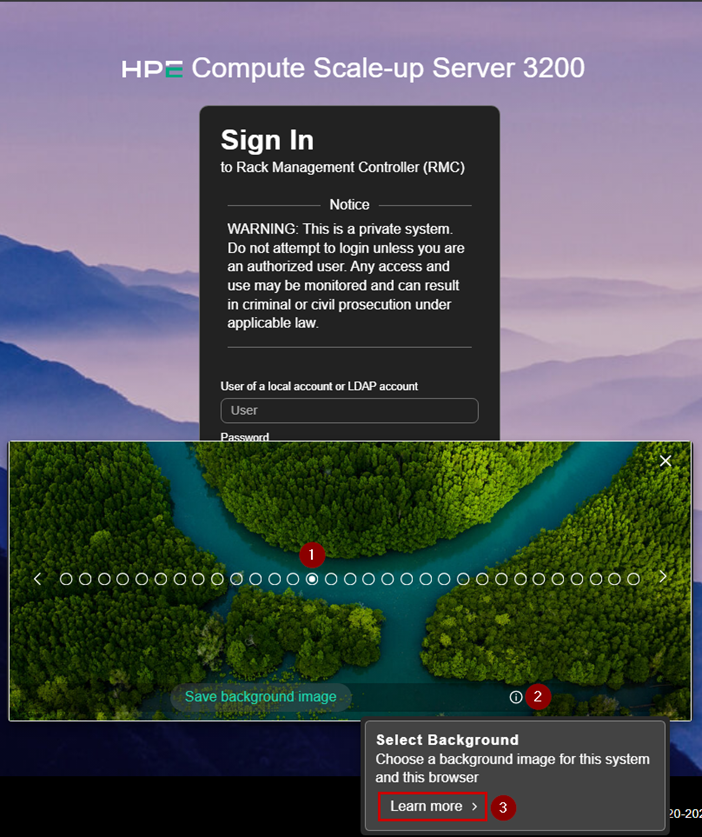
Read the Learn more section and then save the chosen background if desired.
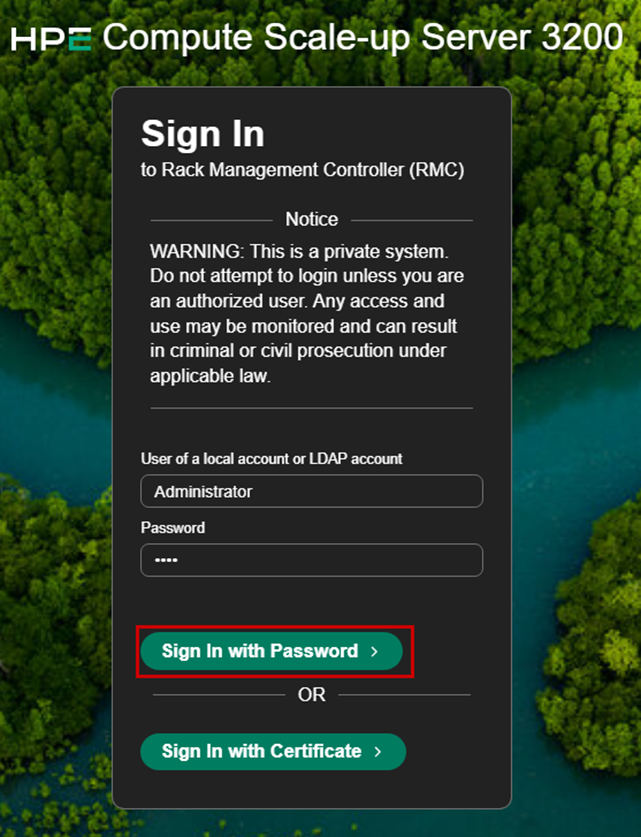
Login as Administrator with upper case A
Supply any string for password and hit the Sign In with Password > button.
💡 Tips
- RMC supports certificate-based multi-factor authentication (MFA) using CAC or PIV smart cards. Certificate cards must be associated with a local or LDAP RMC user. Read the
Certificate Authenticationparagraph in the Administrator guide for more detail.- The simulator will let you login when selecting
Sign In with Certificate, but you may get errors later.
Choose your preferred mode (Dark or Light) by clicking the last button in the left navigation pane.
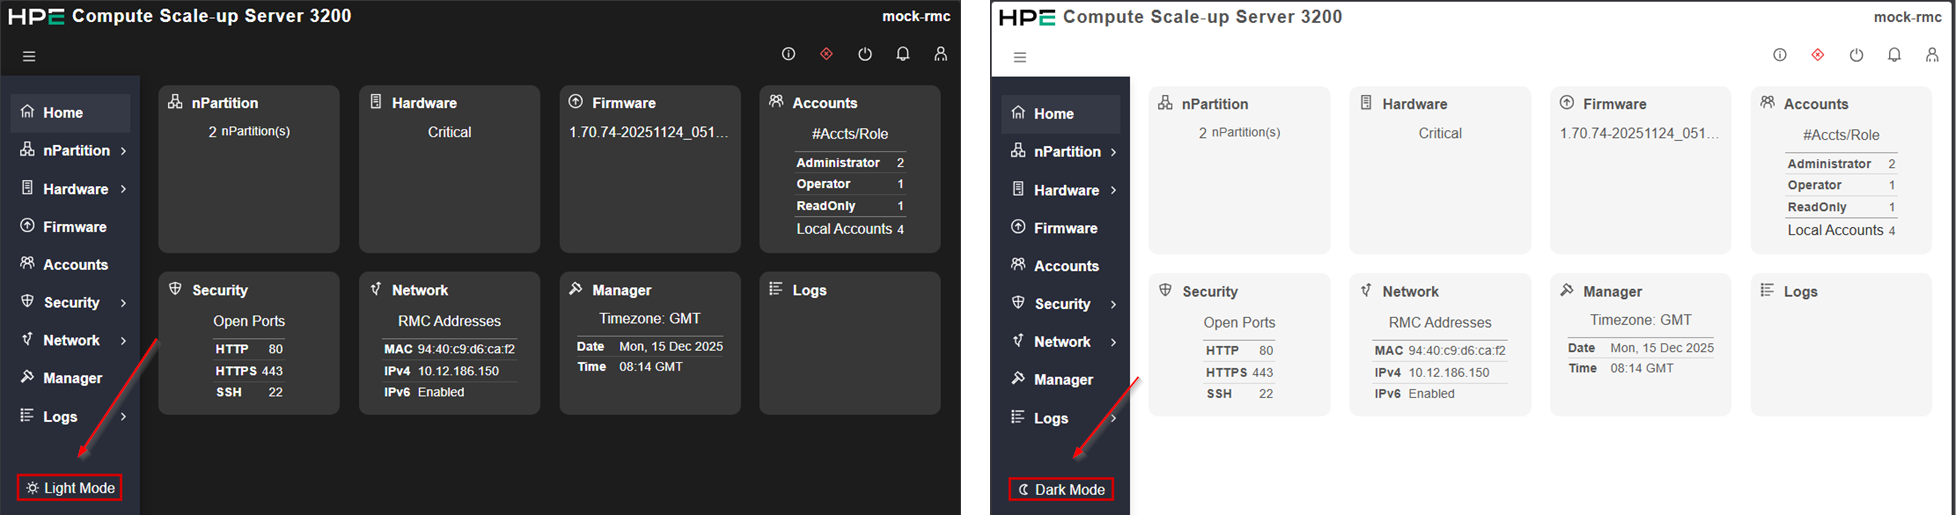
Click the upper left menu icon to toggle the display of the left pane menu.
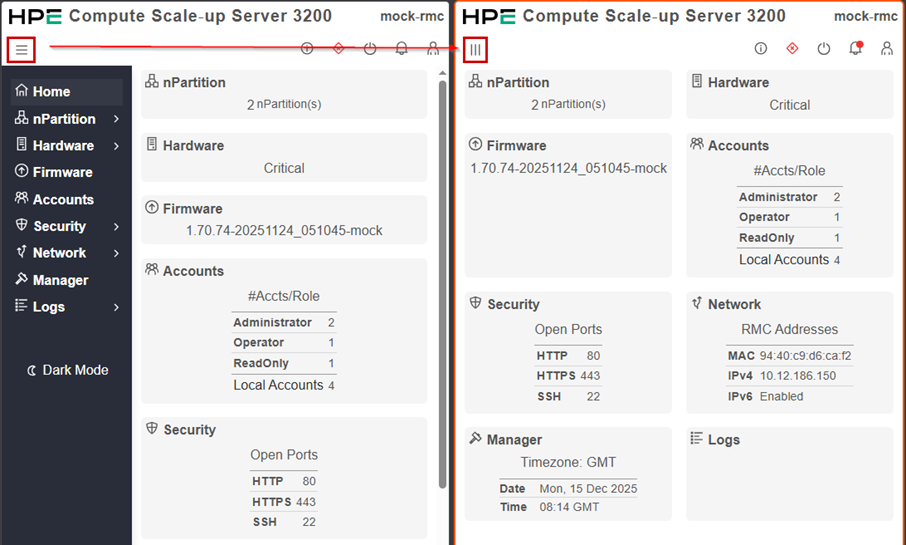
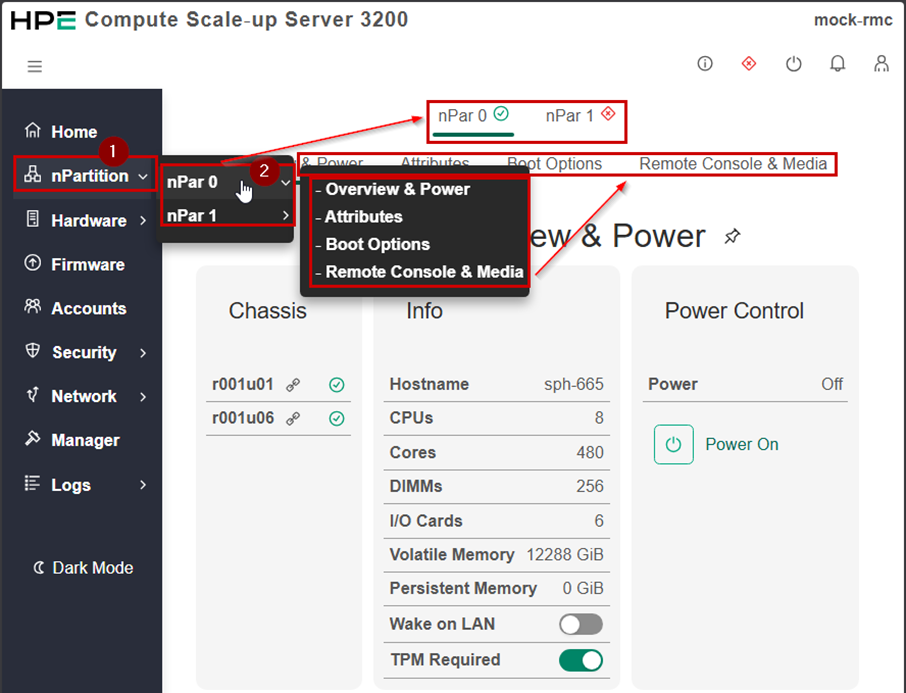
When the left navigation pane is visible, click nPartition to display it in the main pane.
Hover over the nPartition item in the left pane to view the horizontal tabulations.
Hover over nPartition – nPar 0 to view the horizontal tabulations of nPar 0
Hit the ESC key to collapse all sub-menus
nPatition - Overview and power
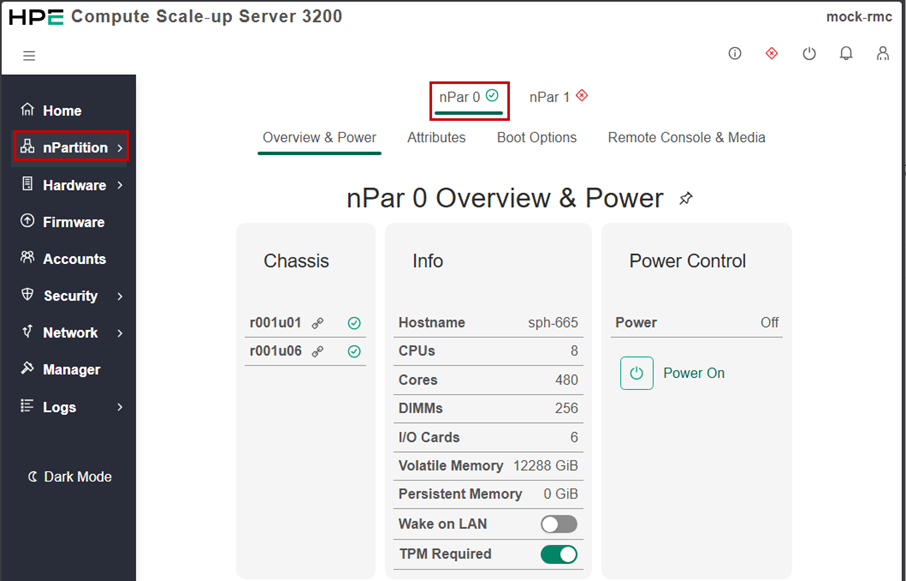
If not already done, click the nPartition menu item to display an overview of nPar 0
- The Chassis tile lists two chassis in this nPar:
- r001u01 in rack 1 at U-position 1
-
r001u06 in rack 1 at U-position 6
- Review the different properties in the Info tile
- Review the different Power options in the Power Control tile.
💡 NOTE:
The creation of nPars is part of the
Managersubsystem.
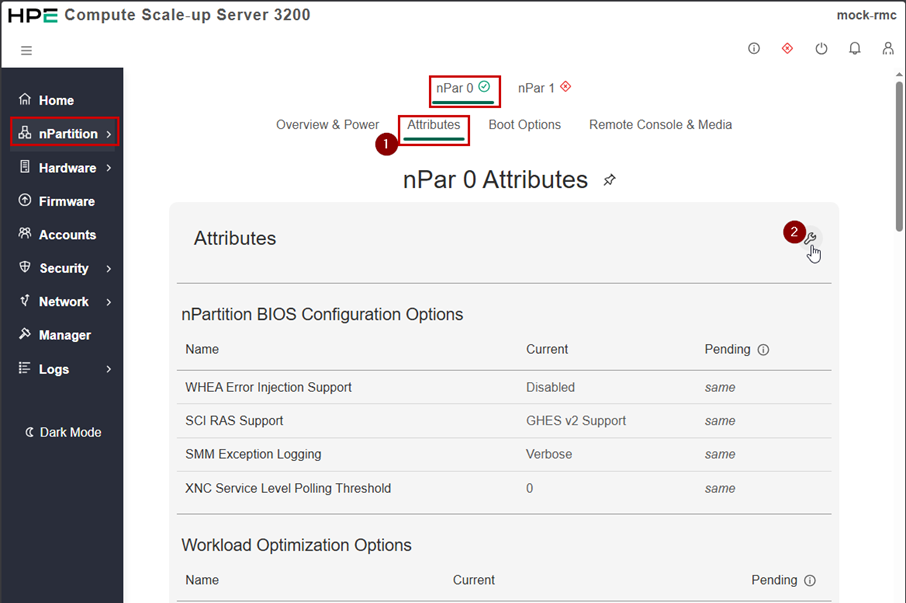
From the nPartition subsystem, click the Attributes tabulation
Review the different BIOS attributes.
Click on the wrench icon:
- Modify one or more parameters
- Click on the
Apply BIOS attributesbutton - If the simulator returns an error, exit the form by clicking on the top right cross icon
From the nPartition subsystem, select the Boot Options tabulation.
Review the three tiles content: Secure Boot, Boot Order and Boot Source Override
In the Boot Order tile, click the icon to view the boot device paths.
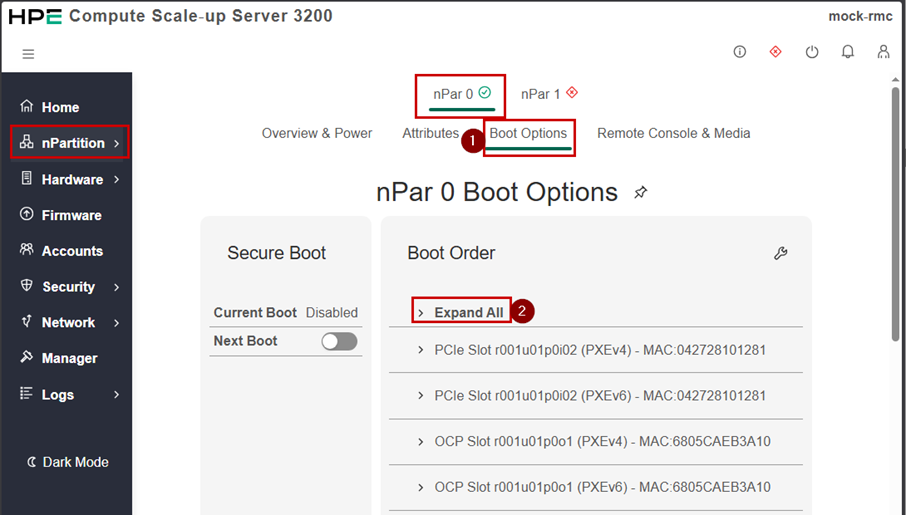
In the nPar 0 Boot Options tile, click the Boot Order wrench icon
Select a boot entry and drag it in another position.
Apply the modification.

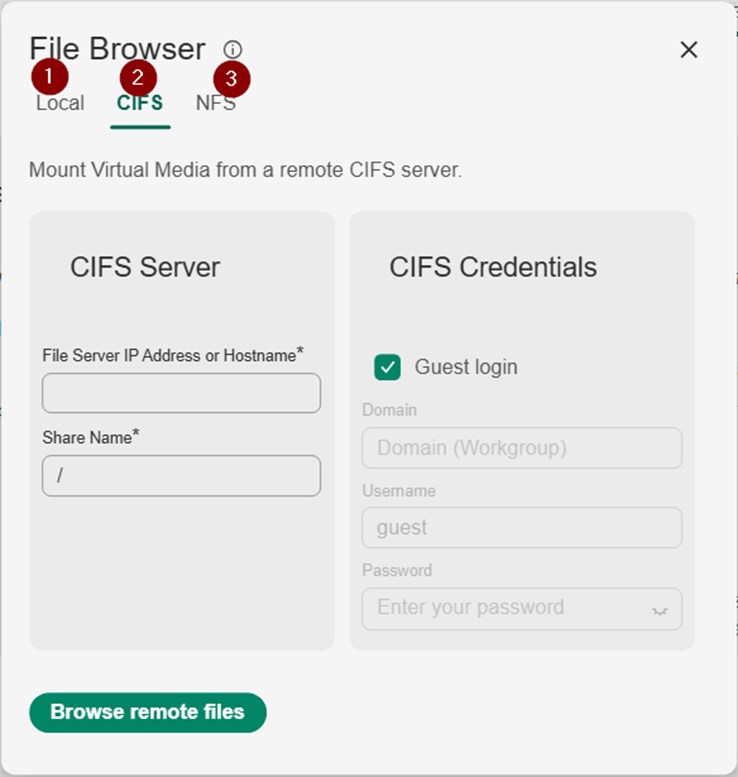
Select the three possible file systems (Local, CIFS and NFS) and review the different dialog boxes.
Exit the media dialog box by clicking on the upper right cross icon.
Hardware
This section navigates through the hardware subsystem including chassis, fans, power and several other components.
In the left navigation menu, select the Hardware sub-system.
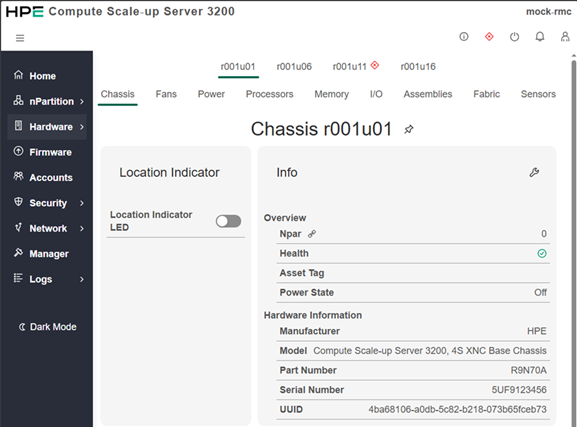
Chassis
By default, the main pane focuses on the chassis description.
Review the content of the two tiles (Location Indicator and Info).
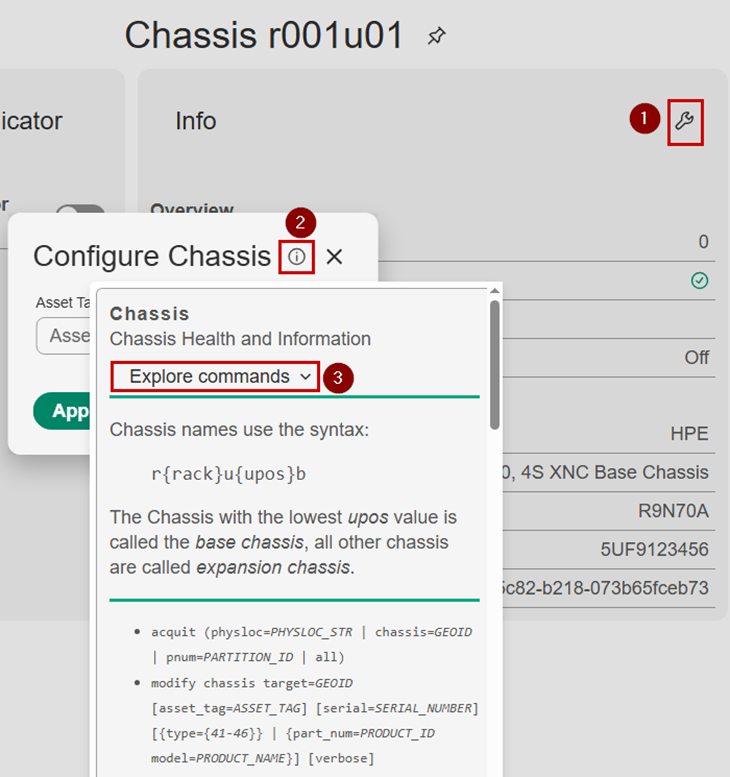
In the Info tile, click on the crank icon and then on the Configure Chassis Info icon.
Expand the Explore commands and review the CLI commands related to a specific chassis.
Come back to the main Chassis view by hitting the ESC key twice.
In the Hardware subsystem, feel free to browse and review the different tabulations (Fans, Power, etc.). Note the Fabrics and Sensors tabulations.
💡 TIP:
In each tabulation you can expand all items by clicking the
>sign of the first row.

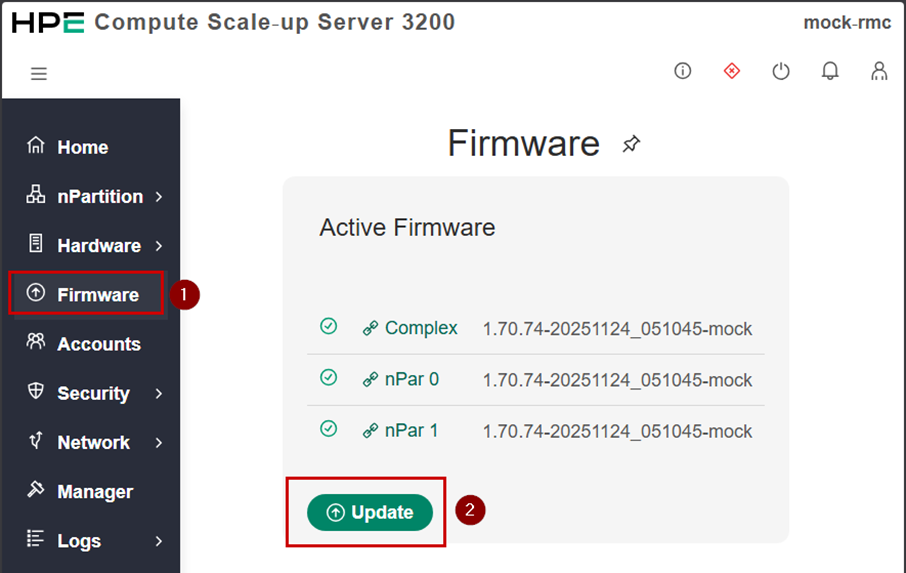
Firmware
From the left pane menu, Select the Firmware subsystem.
Review the content of the Active Firmware tile.
Click on the Update button.
In the Update Firmware pop up window:
Click on the Information icon and review the content.
Select the Remote File location and review the content of the different fields.
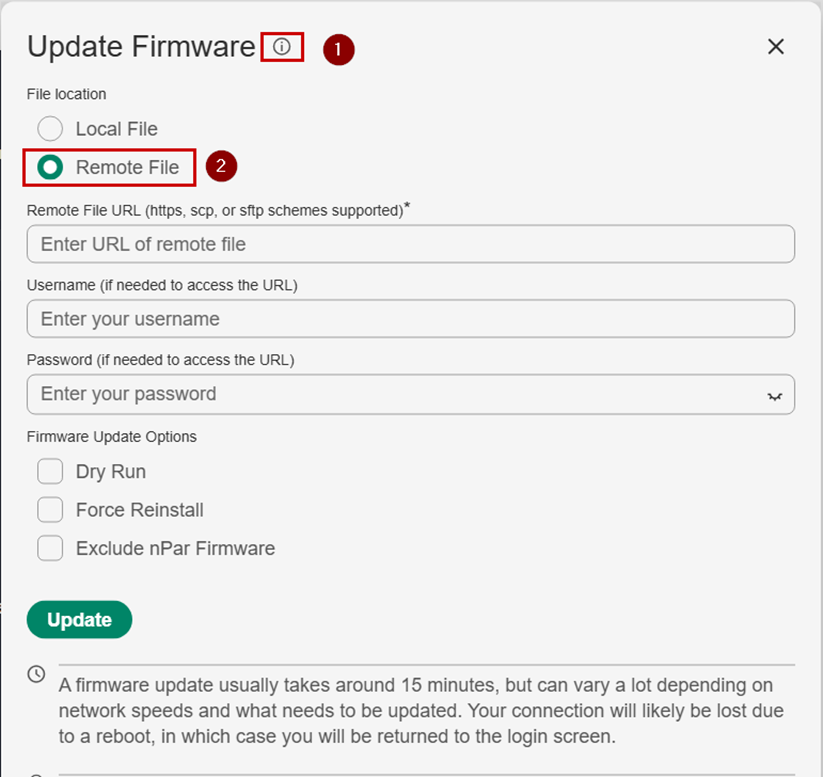
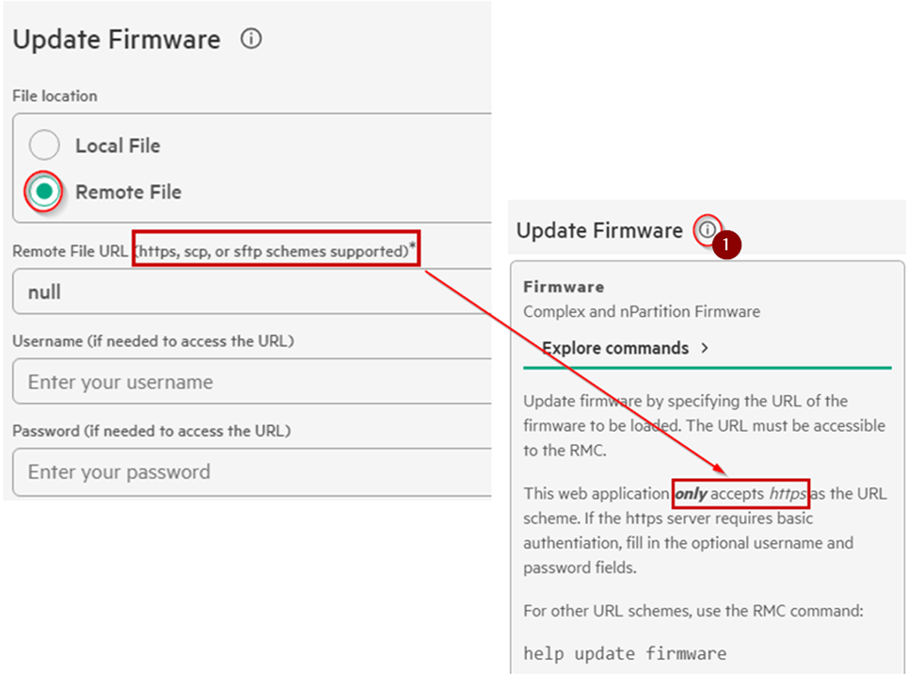
In the Remote File dialog boxes, notice the supported protocol list and the associated asterisk.
Click on the Information icon and read the explanation.
In the Information pop-up, expand the Explore commands and scroll down to view the CLI firmware update commands.
Escape from those pop-up windows with the ESC key and close the form.
Accounts
From the left pane menu, select Accounts subsystem from the left navigation pane.
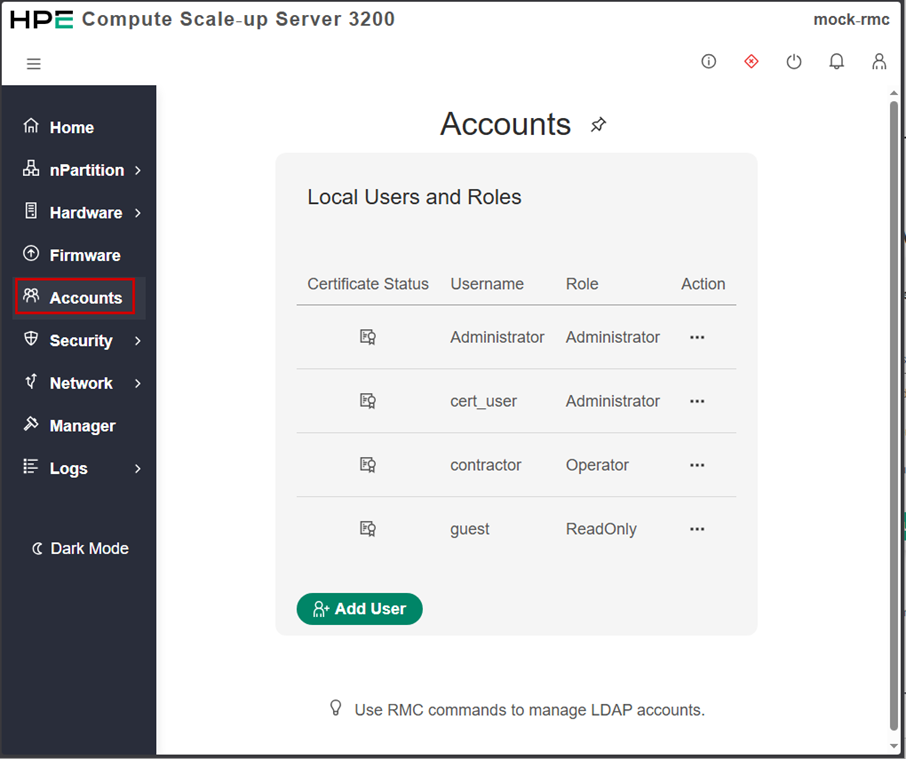
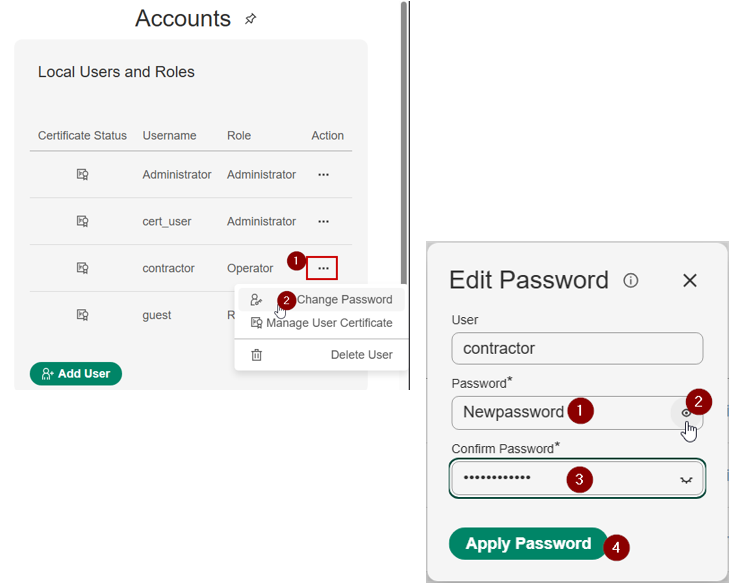
Change the password for user contractor:
Click on the three-dot icon right to the contractor user,
Select the Change Password menu
Type new password
Click the eye button to view the password.
Confirm password and apply password
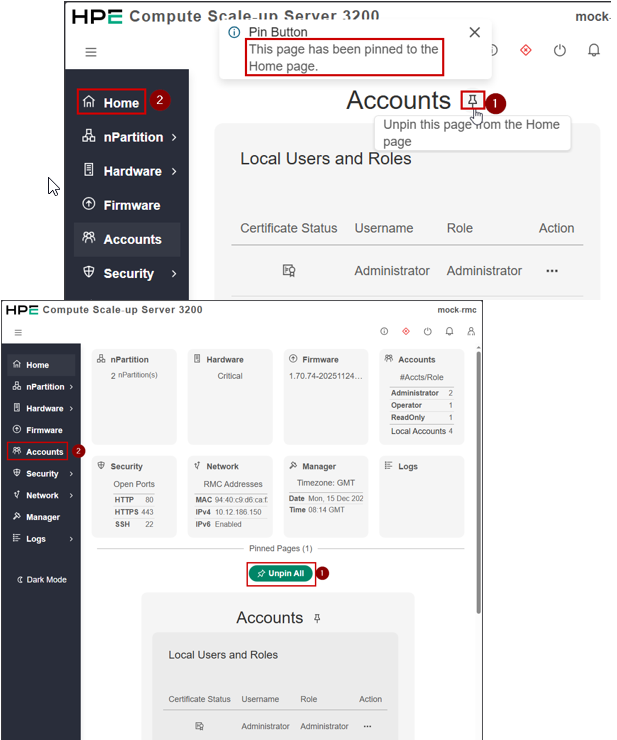
From the Accounts subsystem, click the pin icon and read the information text.
Select the Home page to view how it has been modified
From the Home page click on the Unpin All button and come back to the Accounts subsystem.
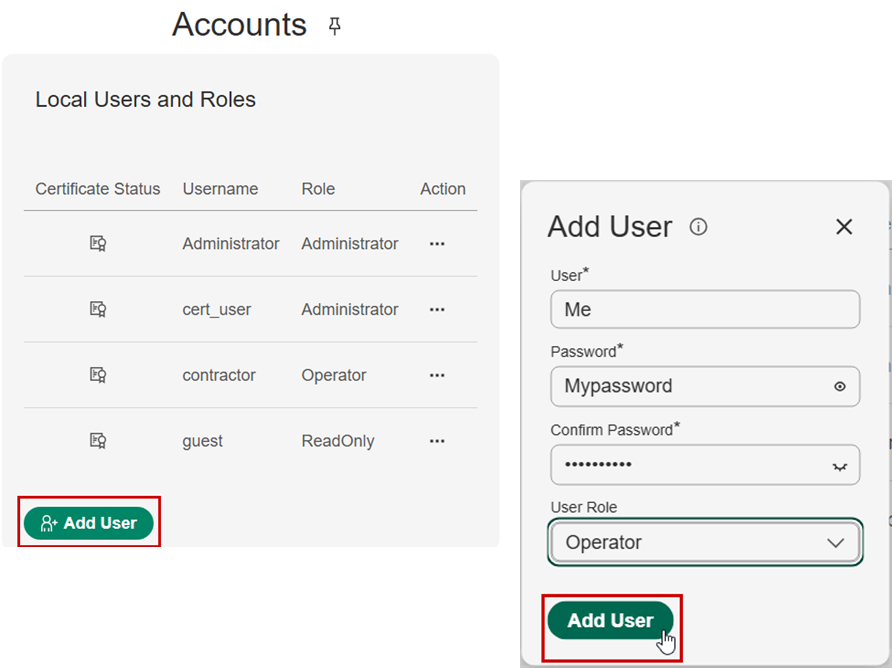
From the Account page, click the Add User button.
Complete the fields and click on the Add User button.
💡 NOTE:
With this simulator, no error will be generated but the user will not be created.
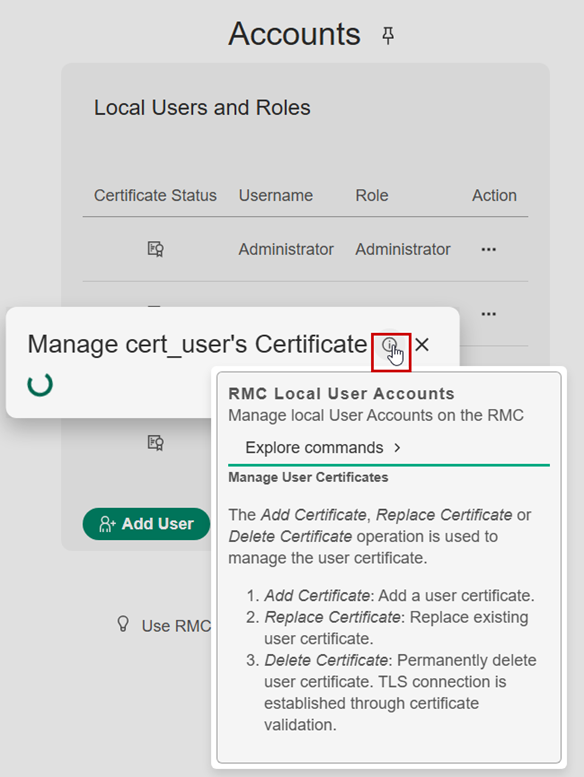
From the Account view, click on the Certificate Status icon of the cert_user.
The simulator pops up a window with an endless spinning circle.
Click on the Information icon and read the help message to understand what a real graphical user interface would provide.
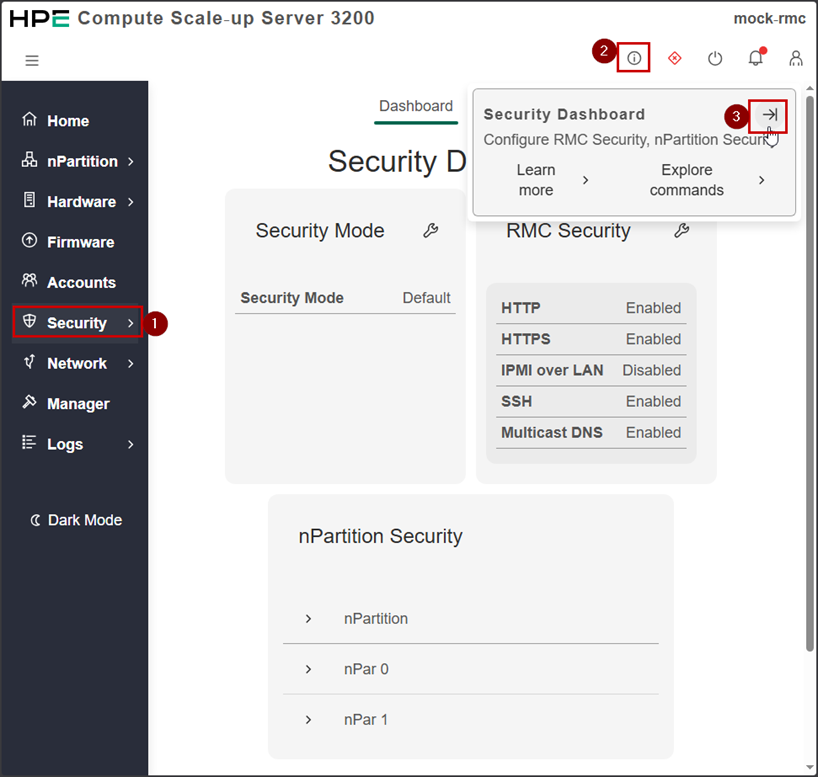
Security
Select the Security subsystem in the left pane.
In the Dashboard view, review the content of the three tiles.
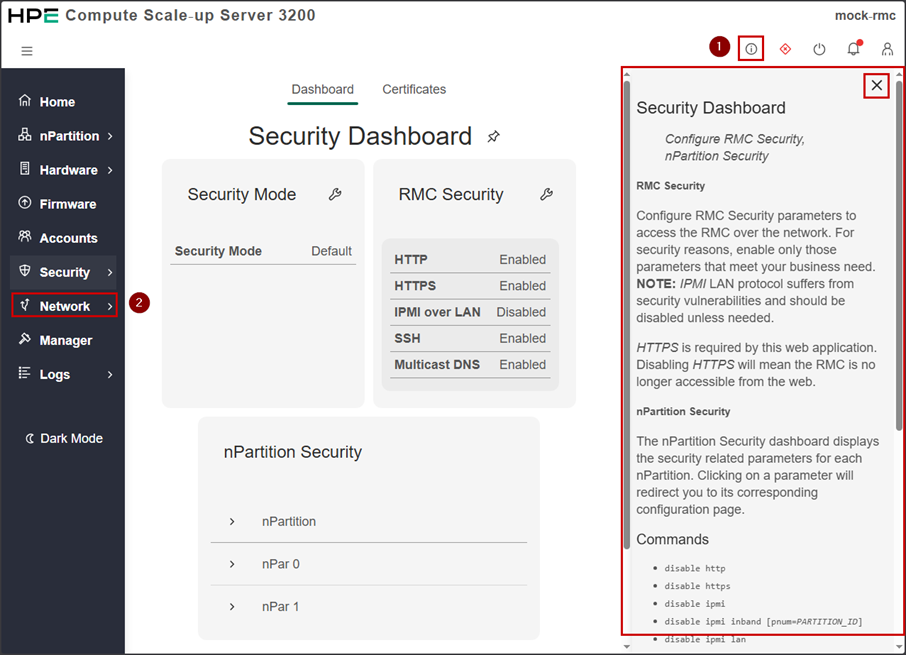
Click the upper right Information icon. Click the right arrow to display the information pane in the main pane.
Read the Security Dashboard documentation pane, including the IPMI and HTTPS notes.
💡 Note
The CLI security related commands at the bottom of this help sticky pane.
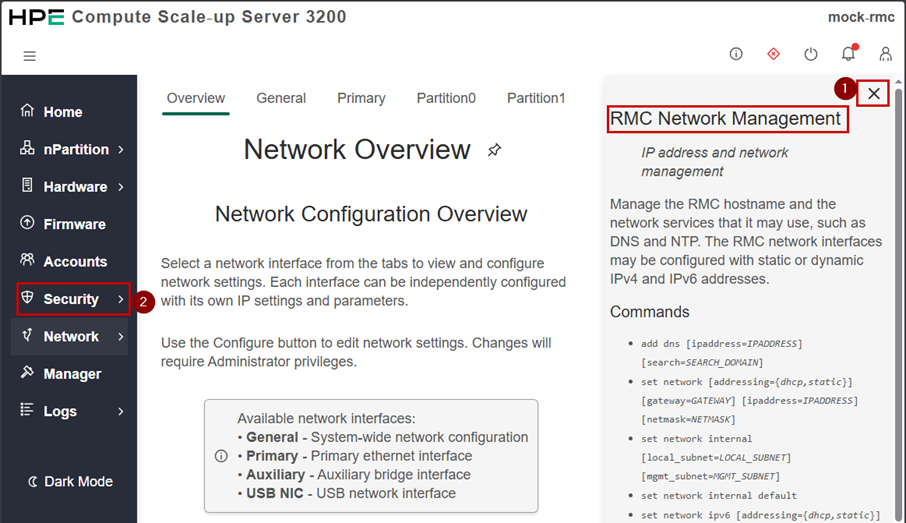
Click on the Network item in the left menu pane.
The sticky help pane is still present in the Network overview.
Click on the cross icon in the upper right corner of the help pane to remove it.
Come back to the Security dashboard.
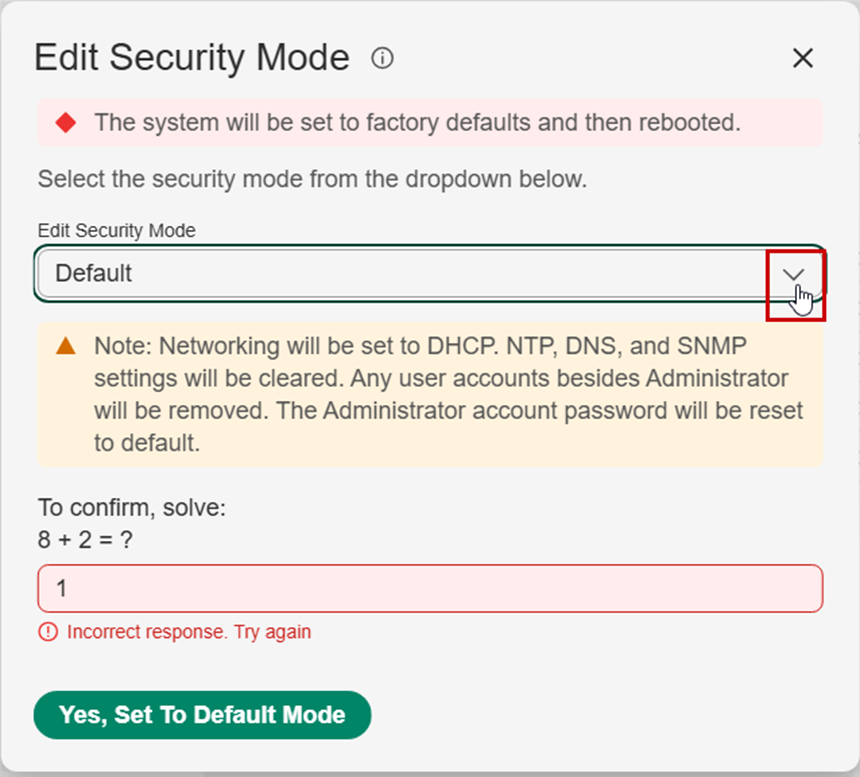
Click on the Security Mode wrench icon.
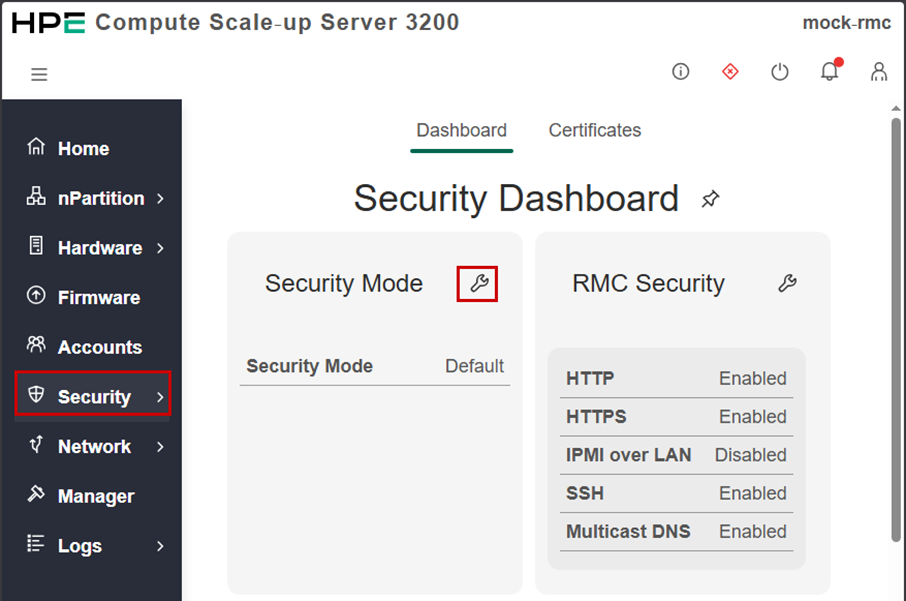
Read carefully the red and yellow warning blocks explaining the default factory settings.
Expand the Security mode pull down menu to list available security modes.
💡 Note
The math question is to proof that the GUI is used by a human being.
Exit from this configuration panel.
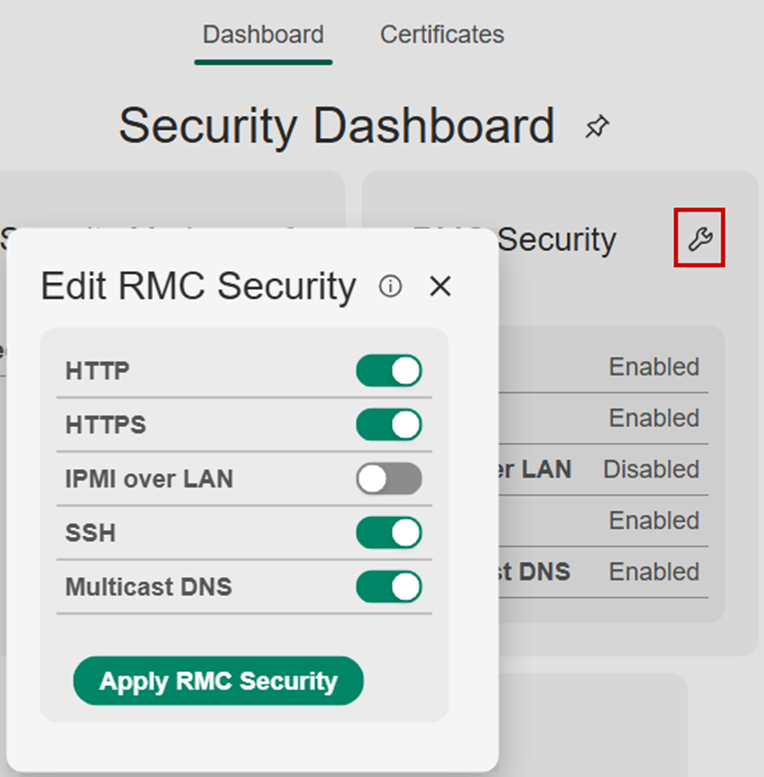
From the Security Dashboard view, click on the RMC Security wrench icon.
Review the different network protocol switches.
Exit from this edition mode.
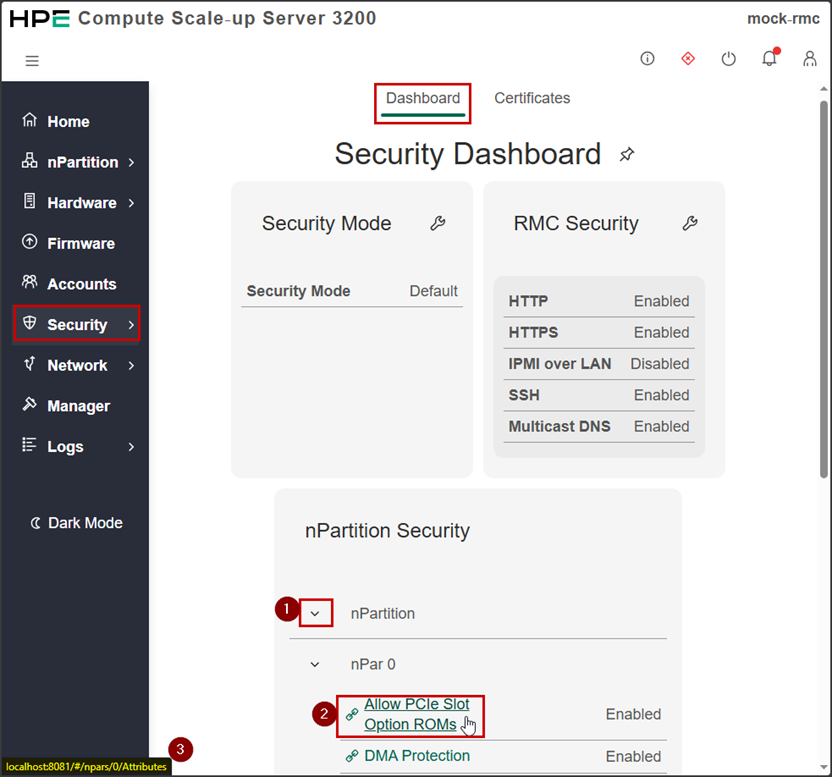
From the main Security Dashboard, expand the nPartition pull down menu to list the various components of the different partitions.
Hove over a component and notice it points to the partition attributes seen earlier in this guide.
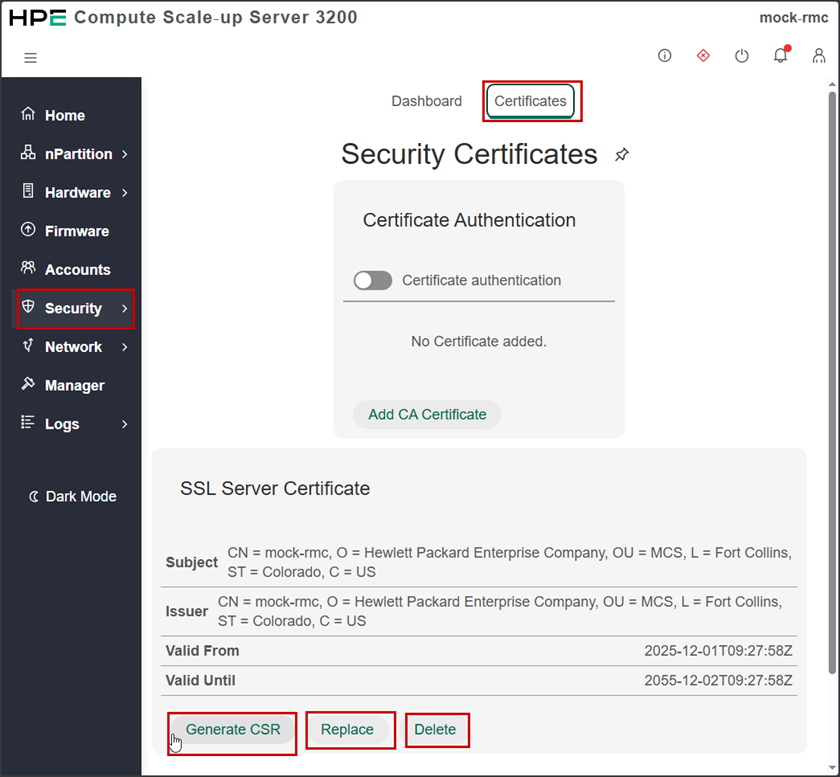
From the Security view, select the Certificates tabulation.
Click on the information icon and expand the associated help.
Read carefully the definitions and the requirements of the different certificate possibilities offered (authentication and SSL server)
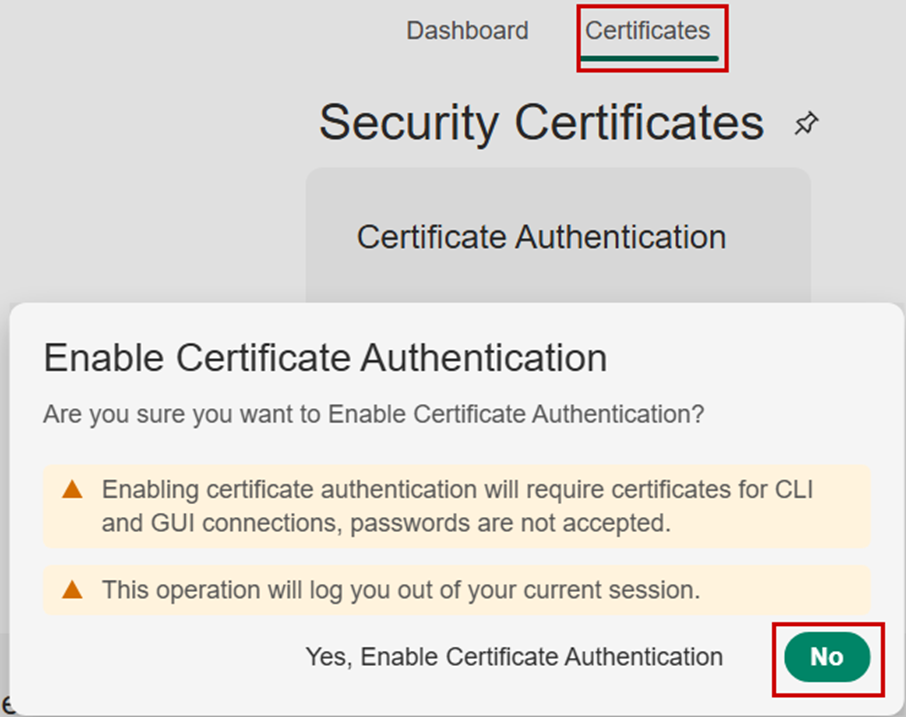
Click on the Certificate authentication button
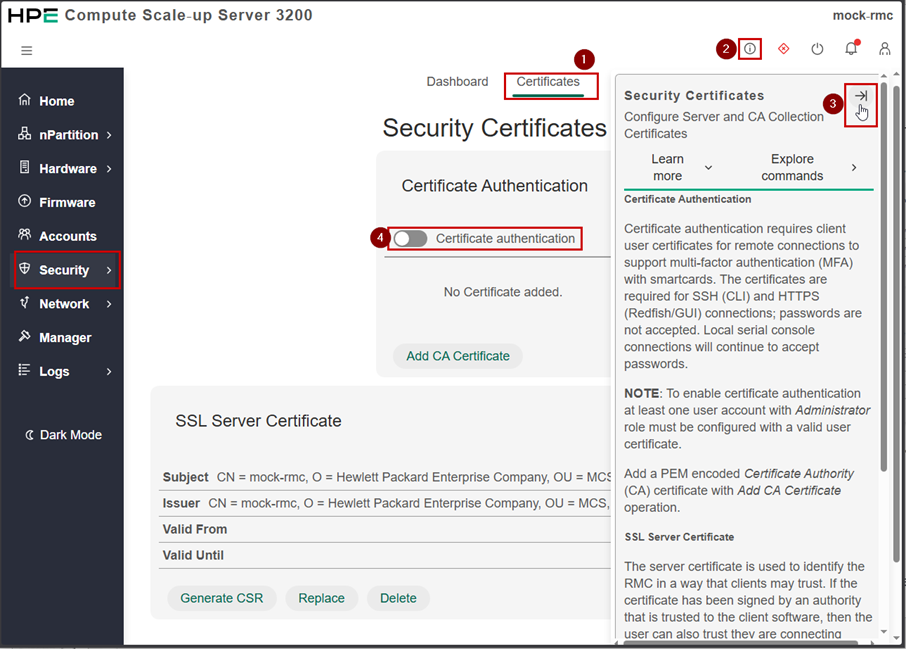
Read carefully the consequences of enabling the Certificate Authentication.
As the simulator cannot fully enable this feature, click on the No button to exit from this pop-up.
If you select the Yes, Enable Certificate Authentication. You will be logged out as mentioned in the second warning. Then, the simulator will not let you disable this feature. You will need to restart the it from scratch.
Review the content of the SSL Server Certificate tile and associated help information.
Click on the Generate CSR, Replace and Delete buttons and review their respective pop-up content.
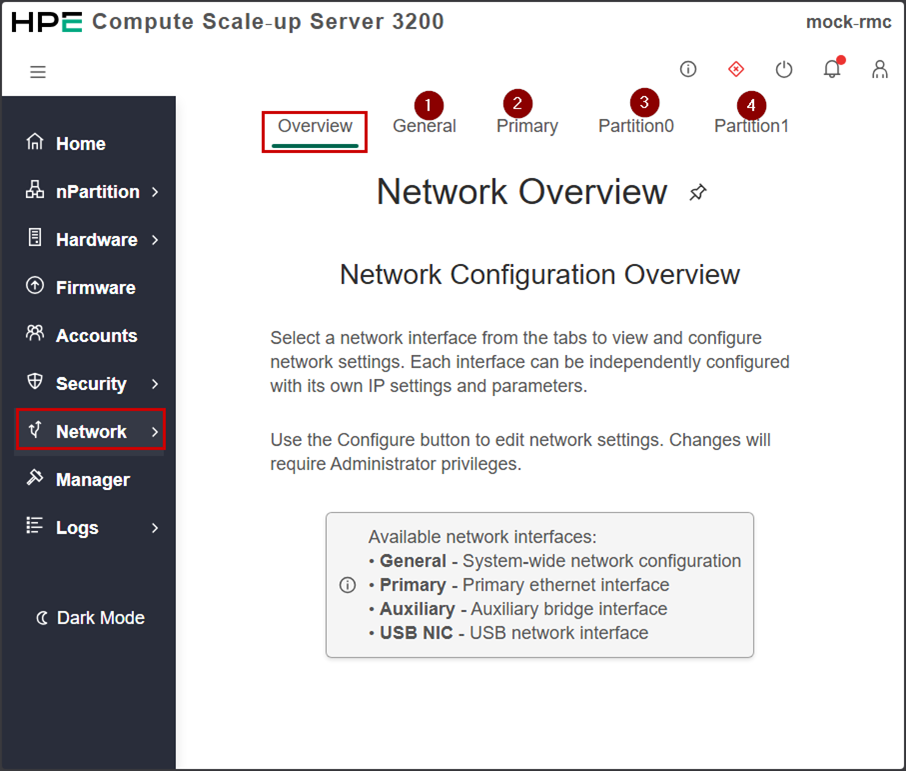
Network
From the left pane menu, select the Network item.
Read the content of the Overview tabulation.
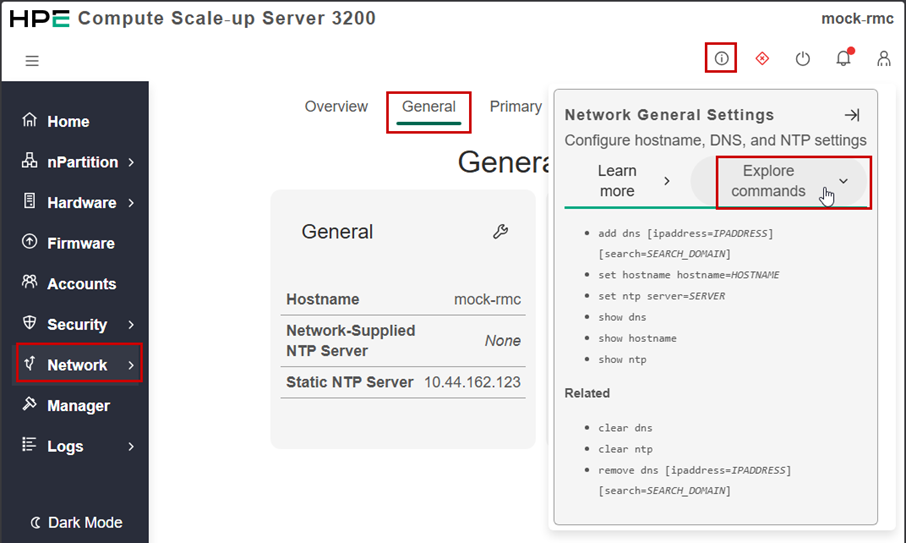
Select the different horizontal tabs (General, Primary, PartitionX) and review the configuration parameters for each tabulation.
In each Network tabulation, click on the information icon to explore CLI commands or learn more on the settable network parameters.
Manager
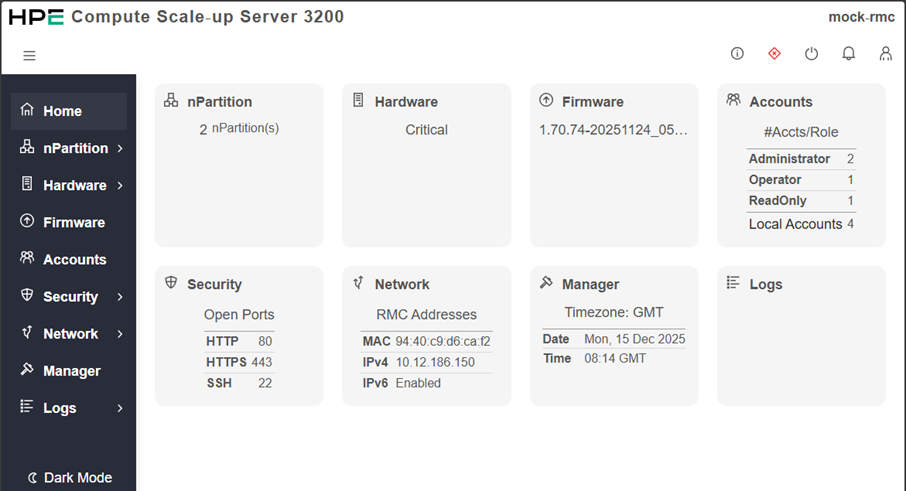
From the left pane select the Manager subsystem.
Review the content of the different tiles. Note you can edit the pre-login Banner with a custom message and modify the session timeout.
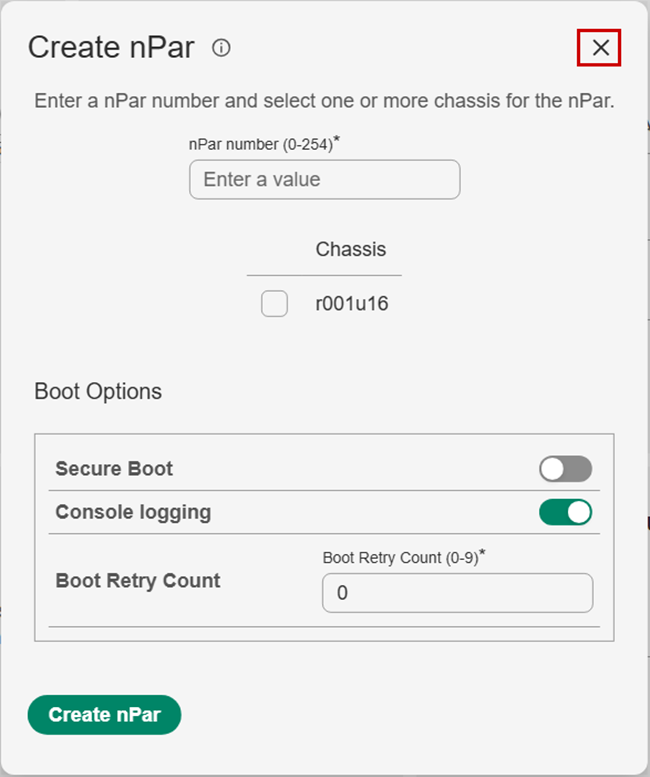
Click on the Create nPar button.

Click on the information icon to review the CLI commands for managing nPartitions.
Simulate the creation of a new nPar.
Hit the Create nPar button or kill the pop-up window to come back to the main Manager view.
The Redfish Event Subscriptions tile mentions events of type SSE. To learn more on SSE, follow these steps:
Click on the Information icon (top-right) and then on Learn more.
Search (press CTRL-F) for string SSE
Read the associated help concerning Event Subscriptions and Server-Side Events.

Logs
From the left pane, select the Logs subsystem
Review the content of each horizontal tabulation
Use the integrated help pop-up windows to better understand the content of those logs.
Don’t forget to review the Hardware History tabulation
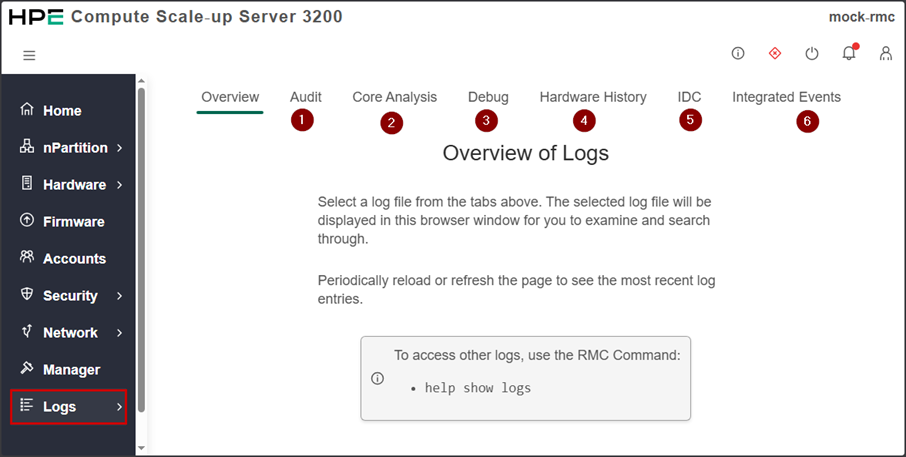
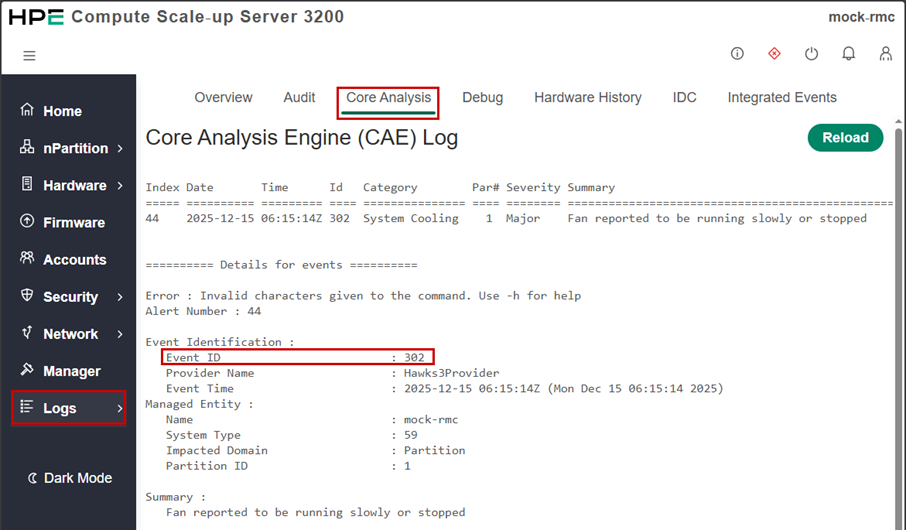
The Core Analysis Engine (CAE) provides detail of each records contained in this log.
From the Core Analysis Engine tabulation, search for the detail of first record (44)
Review detail of this event and how it is structured (Summary, Description, Cause, Actions…)

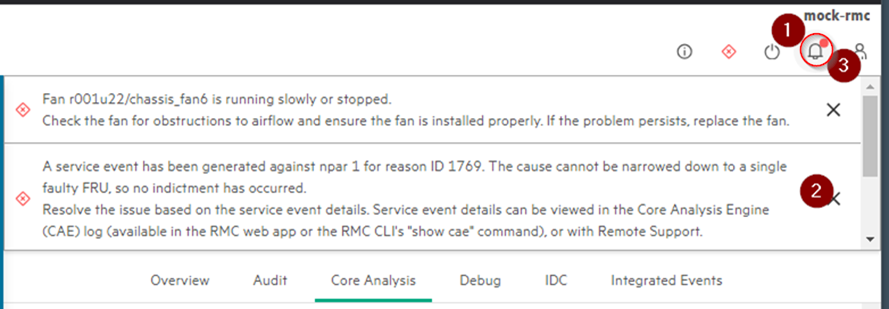
Notifications
To view notifications, click on the upper right bell icon.
If no notification, kill the browser as well as the two Python windows and double-click the ClickMe.baticon
You can delete notifications by clicking on the cross icon at the bottom right
Remove the notification pane by clicking again on the bell icon.
NOTE: Notifications with strikethrough text are related to non-relevant events. However, there are none in this simulator.

Follow the reds
To view notifications, click on the upper right bell icon.
If no notification, kill the browser as well as the two Python windows and double-click the ClickMe.baticon
You can delete notifications by clicking on the cross icon at the bottom right
Remove the notification pane by clicking again on the bell icon.
NOTE: Notifications with strikethrough text are related to non-relevant events. However, there are none in this simulator.
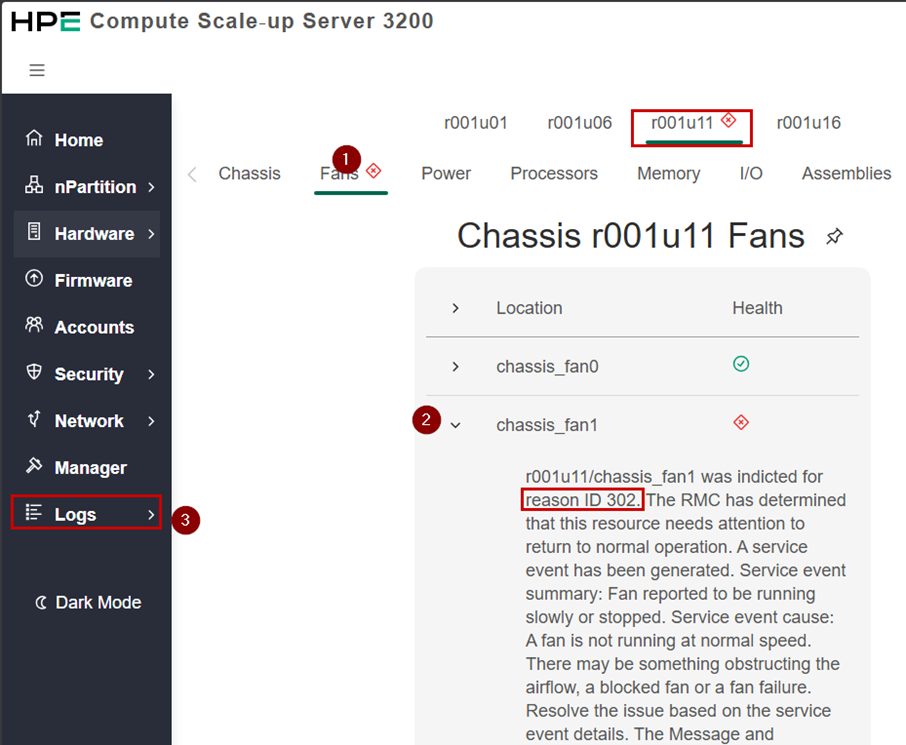
To quickly view issues, click on the Red icon in the upper right corner of the main pane.
Select a subsystem with a pre-pended red icon (i.e. chassis r001u11)
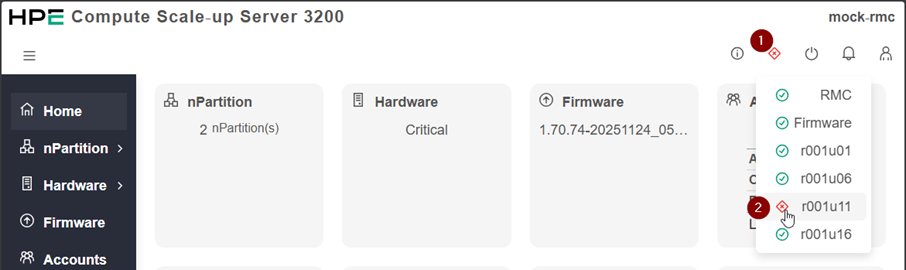
From the r001u11 chassis, click on the Fans tabulation to access problem detail
Expand the Chassis_fan1 item for more information on the issue
Fan1 was indicted for reason ID 302.
Select the Logs/Core Analysis subsystem to learn more on ID 302.
From the Logs/Core Analysis subsystem (CAE) search for string 302.
Read the description
Free navigation
Feel free to navigate at will in the different menus of this graphical interface.
Lab cleanup
If you want to leave this Hands-on Lab with a clean workspace, kill the following three windows:
- Browser
- Python script 1
- Python script 2
Summary
Throughout this lab, you navigated in the HPE CSUS 3200 Web-UI. The different main subsystems have been explored with a special focus on the help screens.
Want more?
🚀 Looking to automate the onboarding of HPE servers into HPE GreenLake and Compute Ops Management, see Onboarding-Script.
🚀 Looking to demonstrate the power of scripting with HPE GreenLake and Compute Ops Management, see HPE Compute Ops Management Zero Touch Automation Example. This script automates the entire lifecycle from workspace provisioning through server configuration, policy management, and optional cleanup. It showcases best practices for programmatic infrastructure deployment and provides a foundation for building production-ready automation workflows.
🔔 Explore a variety of sample scripts designed for the Compute Ops Management API, including Ansible playbooks, PowerShell, and Python scripts. These resources offer practical examples to help automate and streamline server management tasks. Visit the GitHub project.
🛠️ Interested in using Ansible with COM? Visit this open source GitHub project dedicated to server provisioning. Originally developed to support ESXi, RHEL, and Windows Server platforms, the project demonstrates extensive COM API capabilities—from initial setup (Day 0 operations), through activation and configuration (Day 1), to ongoing management and maintenance (Day 2), such as automated firmware updates.
🖥️ When you’re ready to dive deeper, schedule a personalized session on the HPE Demonstration Portal.
✨ You can also request a 90-day evaluation of Compute Ops Management to experience its full capabilities.