Integrating Compute Ops Management with VMware vCenter
Jump to:
- Introduction
- What’s new with HPE GreenLake for Compute Ops Management COM4VC plugin?
- Task 1: Configure the Appliance
- Task 2: Set up the new vCenter’s VLCM for Offline Bundle
- Task 3: Register the COM4VC plugin with the Team-Specific vCenter
- Task 4: Add and Configure the host.
- Task 5: Integrating COM4VC with vSphere Lifecycle Manager
- HOL Summary
Hands on Lab Guide
Introduction
Welcome to the HPE Compute 2026 Hands-On Labs (HOL). For the next two hours you will complete a self-paced lab using HPE ProLiant DL-series servers, VMware vCenter, GreenLake Compute Ops Management, and the Compute Ops Management vCenter Integration Plugin (COM4VC) that is now deployed along with the COM Secure Gateway.
Lab Objectives
-
Experience the first-time setup of COM Secure Gateway, the registration with vCenter and Compute Ops Management
-
Experience COM4VC’s integration with VMware Lifecycle Manager.
Team Assignments
This lab has 25 stations. Each station will have its own individual COM Secure Gateway instance and vCenter. Likewise, each team will be assigned 1 HPE DL-series server.
Your team assignments will be on a separate sheet of paper issued to you by your lab proctor. Please return the team assignment sheet to your proctor when finished with this lab.
Virtual Lab Environment
Upon access to the lab, you’ll be presented with a Windows 11 Virtual Desktop.
Each team will have the following physical and virtual infrastructure:
-
Administrator credentials to a unique VMware vCenter specific to your team.
-
Administrator credentials to a shared VMware vCenter where your Secure Gateway is hosted.
-
A freshly deployed COM Secure Gateway Appliance
-
One ProLiant DL-series server (vSphere host)
-
A login to HPE GreenLake
Connecting to the Lab
One of the HPE Discover HOL instructors will be happy to assist with getting you setup for this lab.
-
Open a Chrome or similar HTML5 capable browser and navigate to:
-
External to HPE (not connected to HPE VPN): https://labs.compute.cloud.hpe.com
-
Internal to HPE (or connected to HPE VPN): https://techenablement.hpecorp.net
-
-
Choose Omnissa Horizon Web Client:
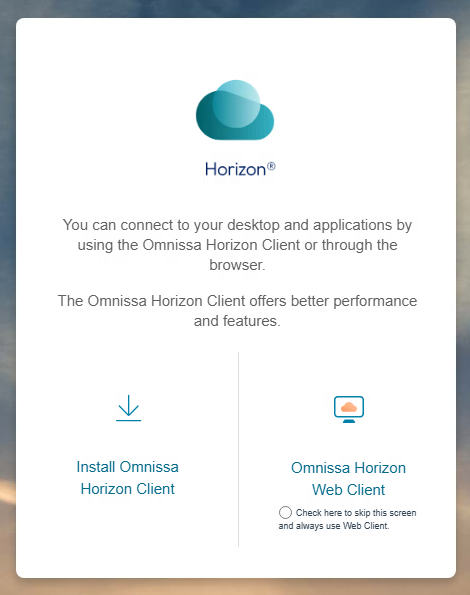
-
Login with your provided Horizon credentials
-
Choose the COM4VC Lab option
-
After a few moments, a Windows 11 Desktop will appear.
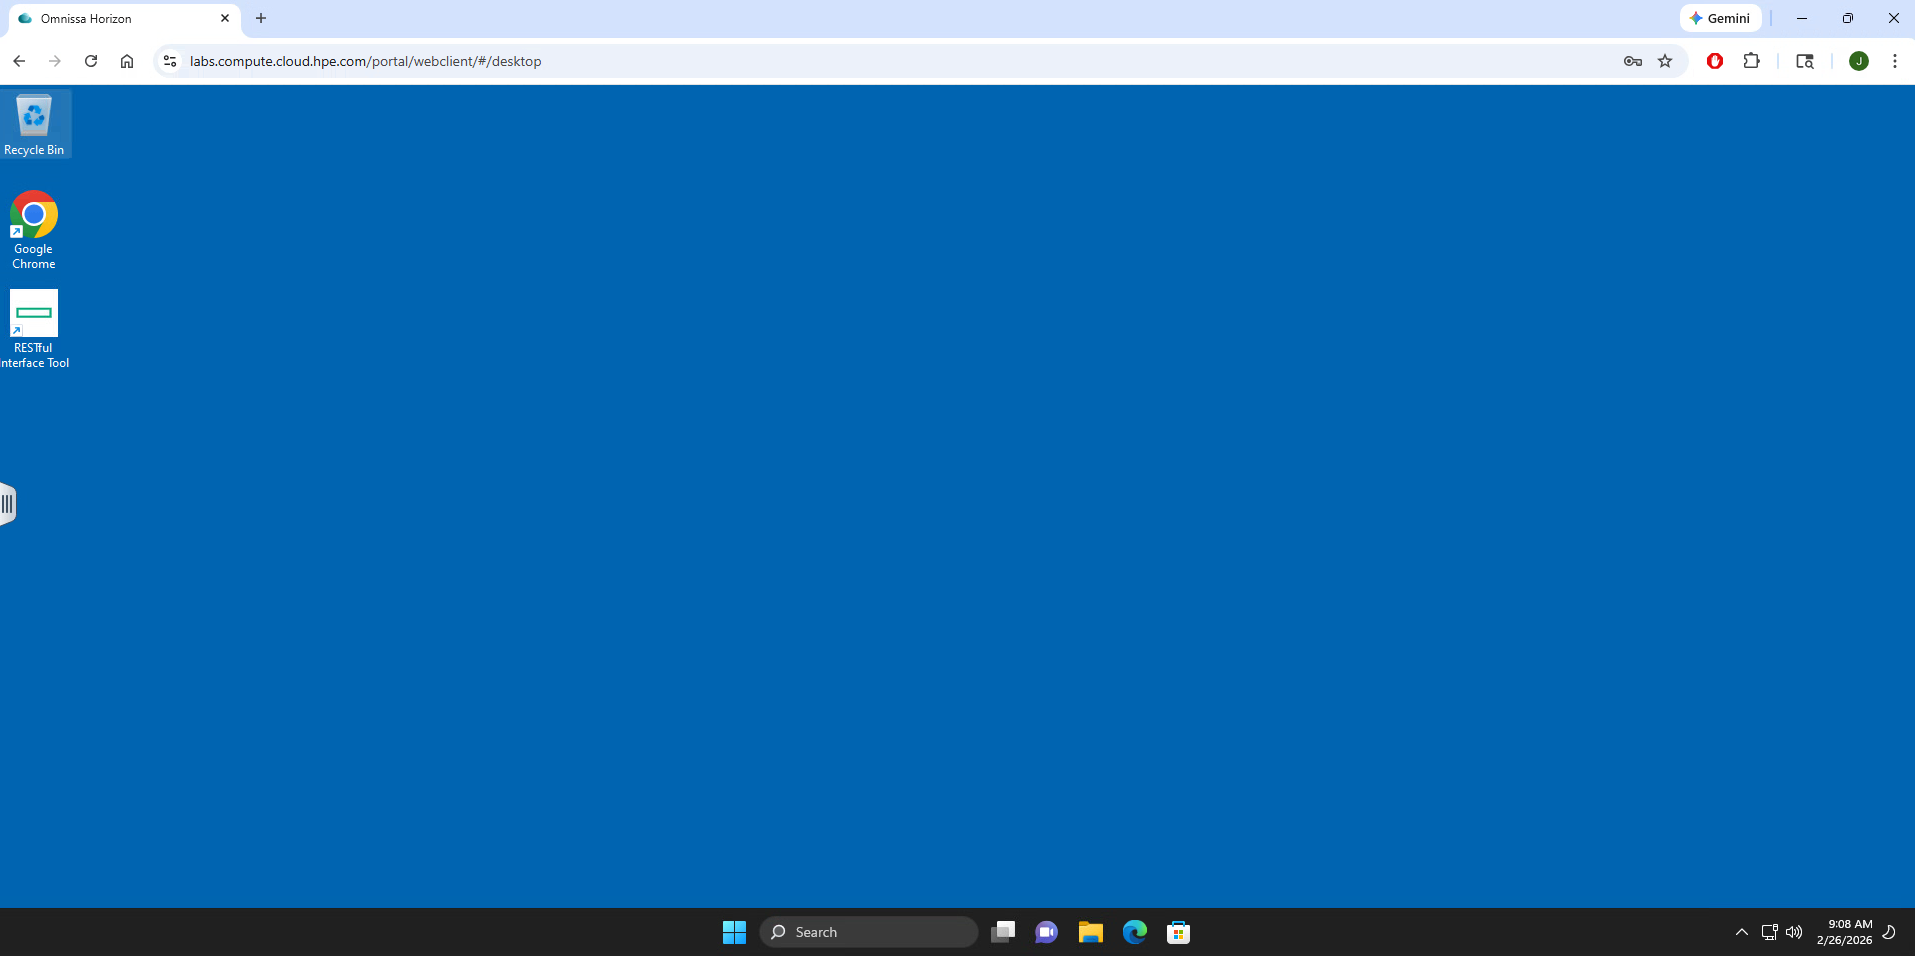
-
We will work in this virtual desktop environment for the remainder of the lab.
Reminder: This virtual desktop will appear inside your browser. When inputting URLs, pay special attention to which browser tab you are using.
What’s new with HPE GreenLake for Compute Ops Management COM4VC plugin?
The HPE GreenLake for Compute Ops Management plug-in for vCenter allows administrators to perform firmware updates on servers managed by HPE GreenLake for Compute Ops Management through VMware vCenter console.
The plug-in performs incremental firmware updates rather than downloading an entire firmware bundle. This solution also provides the latest firmware and hotfix supplement information for HPE servers that are managed through the VMware vCenter console.
Compute Ops Management simplifies compute management operations by providing a centralized cloud experience. It integrates with the VMware vSphere Lifecycle Manager (vLCM) to update the firmware and drivers of HPE ProLiant Servers from within the VMware vCenter console. It provides a single pane view and automates firmware updates for HPE ProLiant Servers.
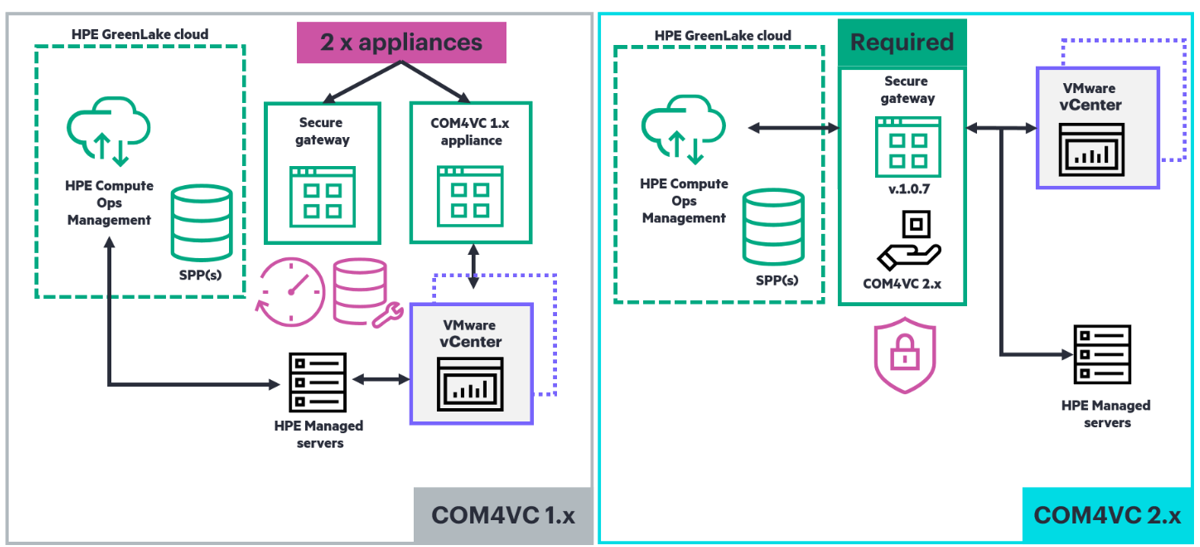
Starting with the release of COM Secure Gateway 1.0.7, the HPE GreenLake for Compute Ops Management plug-in for VMware vCenter is now delivered as a configurable service within the COM Secure Gateway appliance. This new architecture allows customers to eliminate “appliance sprawl” by consolidating the functions of both the Secure Gateway Appliance and the COM4VC appliance into a single OVA.
There are a number of notable improvements in the COM4VC 2.0 architecture as compared to previous versions.
-
Centralized Cloud Architecture: COM4VC 2.0 is a centralized, cloud-based design with less overhead on configurations and manageability
-
Simplified UX: Effortless administration is achieved using COM4VC, which now features simplified processes for registering and configuring vCenter instances.
-
Automated registration process: New Service Pack for ProLiant (SPP) bundles are automatically synchronized with connected vCenter Servers
-
Enhanced security: All external communications routed through the secure gateway, improving security and eliminating exposure to external networks.
-
Operational efficiency: Maintenance tasks, including secure gateway updates, are automated to reduce overhead and reduce operational cost.
-
Rapid updates: The As-a-Service approach lets fixes and new features reach users much faster. This reduces downtime and upgrade friction, accelerating innovation
Key differences from version 1.x:
| Feature | COM4VC 1.x | COM4VC 2.0 |
|---|---|---|
| Integration | Manual Setup | Seamless Onboarding |
| Registration | Manual for every | Auto-registration of service pack |
| Security | Multiple external paths | Single Gateway for all external communications |
| Maintenance | Manual plugin | Automatic management |
| Support | Slower release cycles | Faster fixes and feature availability |
How the Plugin Works
The steps to integrate the plugin with vCenter are significantly easier than in previous versions.
-
Download Secure Certificate
Users begin by downloading the secure gateway certificate from the COM user interface, ensuring a safe connection.
-
Upload to vCenter
The certificate is then uploaded to vCenter’s Certificate Management to establish trust and security.
-
Register vCenter
Users register the vCenter within the COM interface to link and authorize system components efficiently.
-
Select Secure Gateway
Finally, selecting the pre-configured secure gateway completes setup, enabling quick and user-friendly deployment.
It is important to note that while Secure Gateway is being used for the COM4VC plugin, HPE ProLiant-based vSphere hosts do not have to be connected to COM via Secure Gateway.
Task 1: Configure the Appliance
In this lab, you will log into Compute Ops Management, retrieve a Secure Gateway activation key, login to a vCenter server that hosts a pre-deployed Secure Gateway Appliance, and configure it to connect to COM.
Step 1: Logging into COM
The first thing we need to do is to login to HPE GreenLake Compute Ops Management and retrieve a Secure Gateway Activation Key.
From the browser in our VDI environment, open a new tab and go to https://common.cloud.hpe.com.
Note: Ignore any browser-cached user-id’s that may have been pre-filled.
-
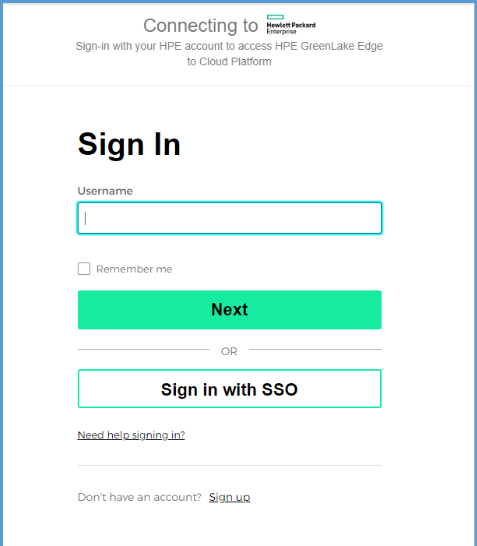
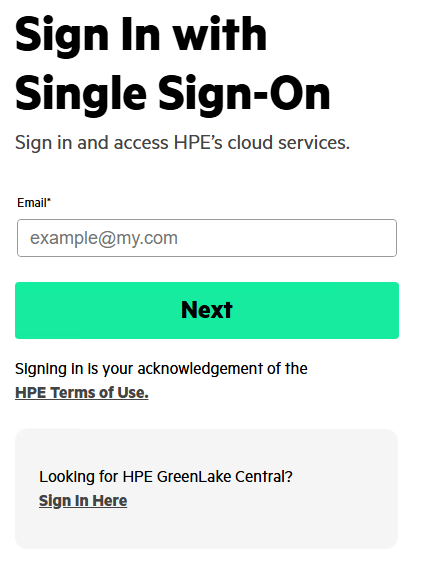
Do not enter any credentials here, instead click Sign in with SSO
-
In this new SSO screen, enter your GreenLake login credentials from your login sheet into the email field and choose Next.
-
You will be presented with a new login page – enter the same GreenLake credentials from your provided username and password on this screen.
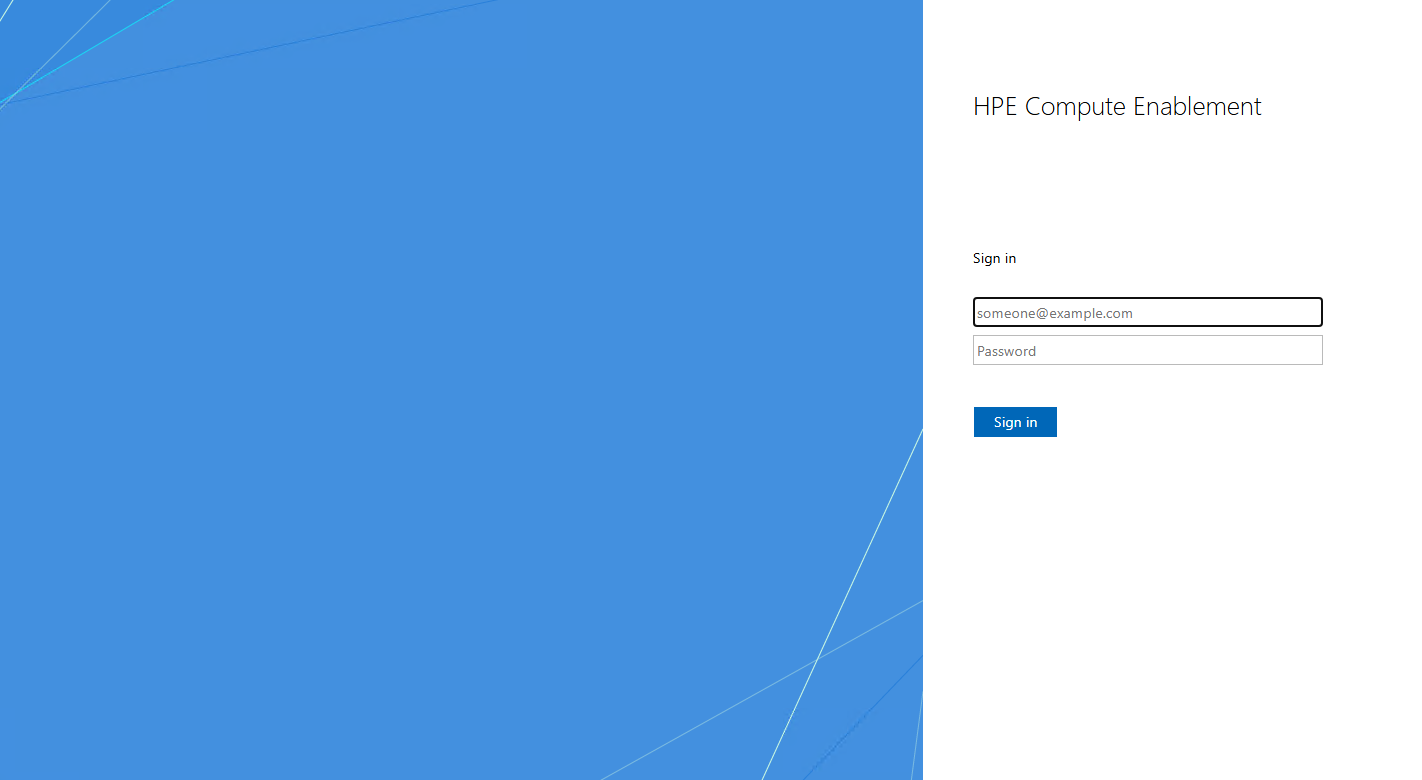
-
Upon login, you’ll be presented with the Getting Started / Recent Services page.
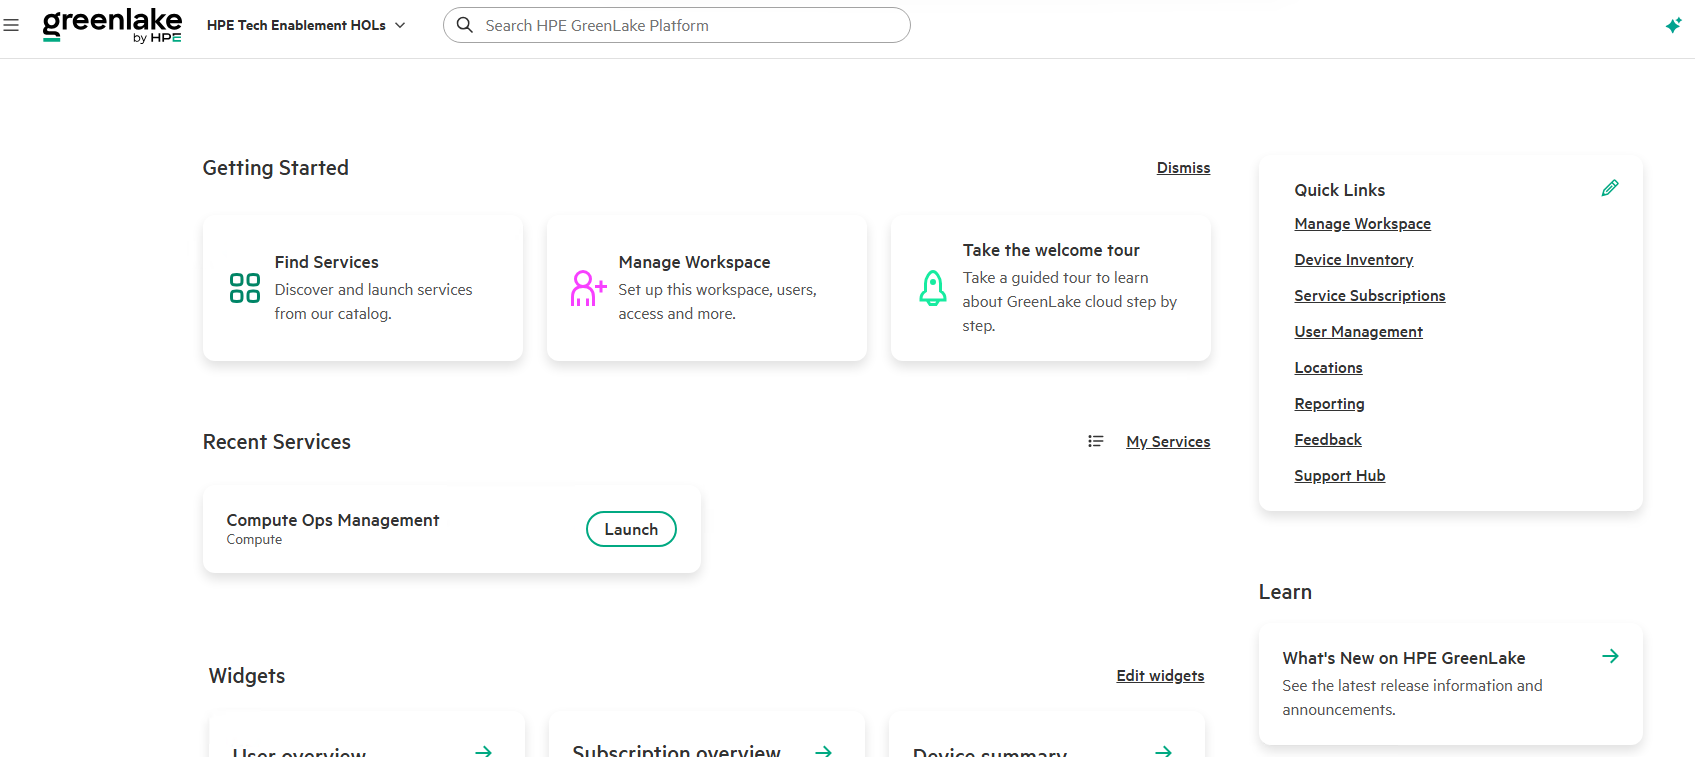
-
Click Launch on the Compute Ops Management tile under Recent Services.
-
Choose the US West deployment region.
-
Across the top menu, choose Inventory, and then choose Appliances.
-
Click Add Appliance.
-
Choose Secure Gateway and choose Next.
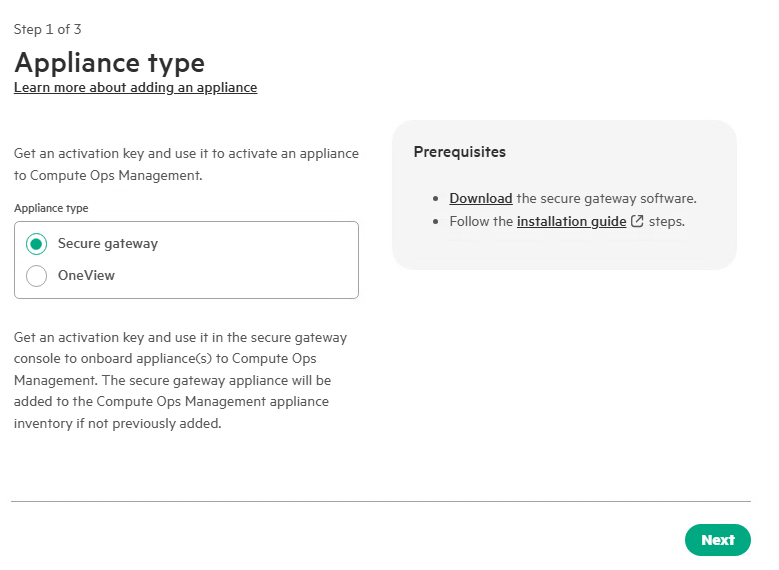
Notice the Download link here – this is where you would download the OVA in a greenfield installation. In this lab, the appliance has already been downloaded and deployed to a vCenter.
-
Change the default activation key time to 1 hour and choose Next.
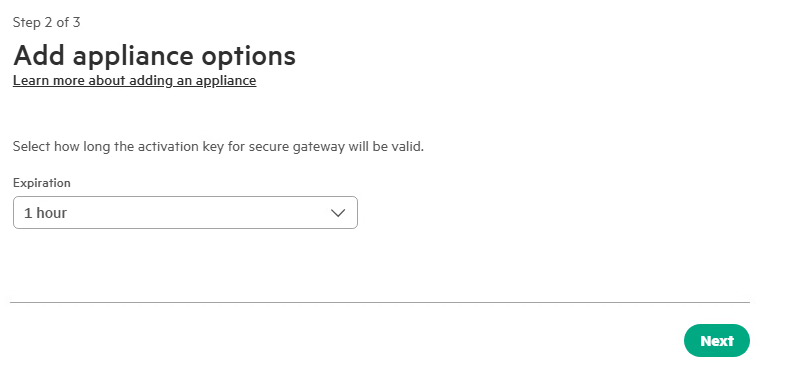
-
Choose Finish and generation activation key.
-
Keep this window open, and move to the next section.
Step 2: Configuring and Registering the Secure Gateway Appliance
Now that we have a Secure Gateway activation token, we can now configure and register our pre-deployed Secure Gateway appliance with Compute Ops Management.
- In a new browser tab, navigate to https://holsgwvc02.hol.enablement.local
Reminder: You are using the VDI environment’s browser for these steps…
-
Accept any credential / self-signed-cert challenges.
-
Login with the following credentials:
-
Username: administrator@vsphere.local
-
Password: < from your login sheet >
-
-
Expand the entries under Hosts and Clusters and find your team’s assigned Secure Gateway Appliance.
e.g. If you are Team-07, your appliance will be named “Team07-COM4VC”
-
Right click on your assigned appliance and choose Edit Settings.
-
Under Network Adapter 2 uncheck the box for Connect at Power On
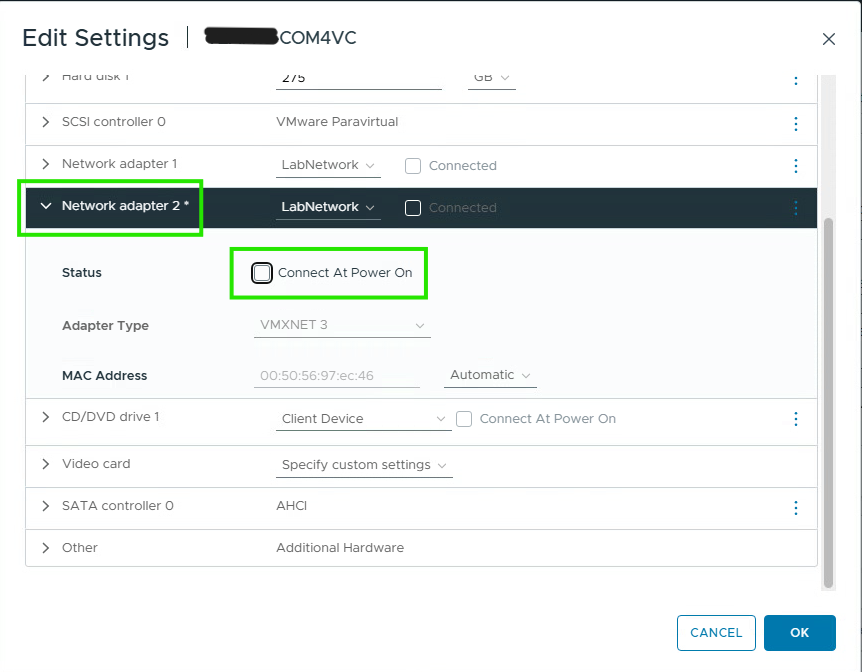
-
Choose OK. Find your VM again, right click, choose Power On.
In the Summary tab of your VM, open a console by either clicking in the console view or clicking Launch Web Console
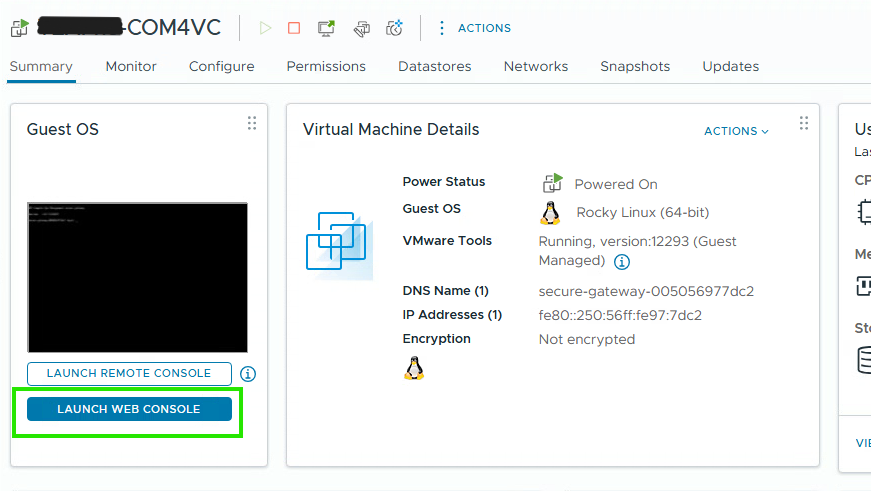
-
Login to your appliance for the first time using the following credentials:
-
Username: administrator
-
Password: admin
-
-
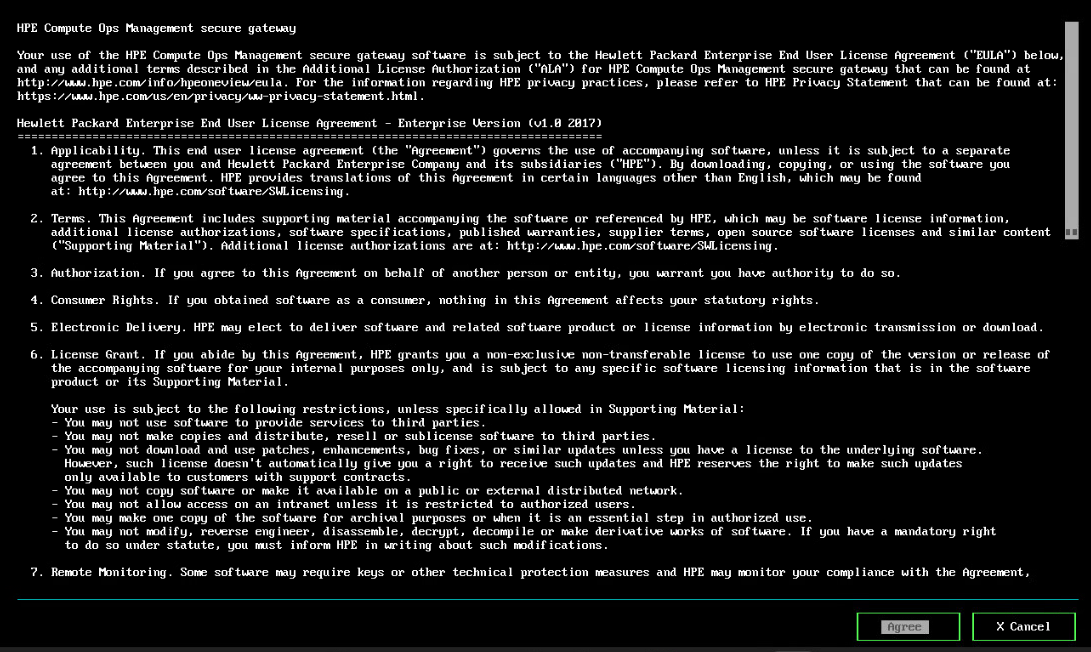
Accept the EULA by choosing Agree and choose Agree on the screen that follows.
-
Input a new password. The password must be 14 characters, contain one upper case character, one lower case character, one number, and one special character.
For this lab, we recommend taking the password from your login sheet and typing it twice. e.g. Password!Password
-
Click Next through the next screen to continue to the network setup.
-
Input the fully qualified domain name (FQDN) for your appliance - do not use the default value - Find your team from the table below and use the values for your team.
Note: The COM4VC integration is very DNS-sensitive. The setting of the proper FQDN is critical to the success of the lab.
-
Specify the IP address source as
Manualand input the IP information from the table below that corresponds to your team.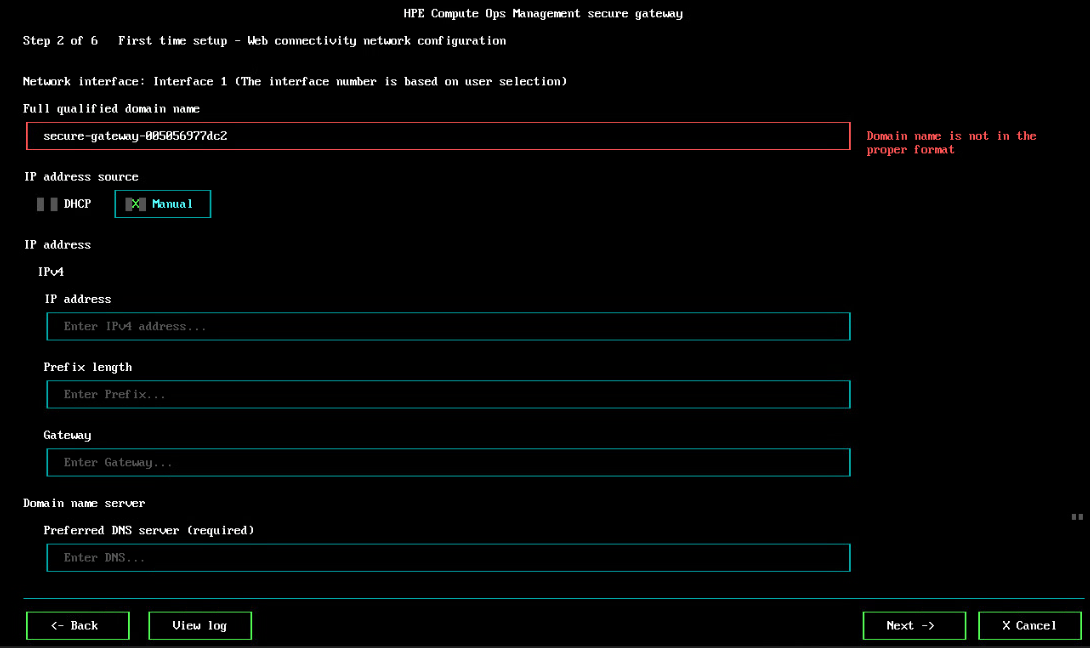
Com4VC Secure Gateway Appliance Name and IP Information:
Common for all teams:
- Prefix Length: 23
- Gateway: 10.18.22.1
- Domain Name Server: 10.18.20.111
Team FQDN IP Address Team 01 team01-com4vc.hol.enablement.local 10.18.22.51 Team 02 team02-com4vc.hol.enablement.local 10.18.22.52 Team 03 team03-com4vc.hol.enablement.local 10.18.22.53 Team 04 team04-com4vc.hol.enablement.local 10.18.22.54 Team 05 team05-com4vc.hol.enablement.local 10.18.22.55 Team 06 team06-com4vc.hol.enablement.local 10.18.22.56 Team 07 team07-com4vc.hol.enablement.local 10.18.22.57 Team 08 team08-com4vc.hol.enablement.local 10.18.22.58 Team 09 team09-com4vc.hol.enablement.local 10.18.22.59 Team 10 team10-com4vc.hol.enablement.local 10.18.22.60 Team 11 team11-com4vc.hol.enablement.local 10.18.22.61 Team 12 team12-com4vc.hol.enablement.local 10.18.22.62 Team 13 team13-com4vc.hol.enablement.local 10.18.22.63 Team 14 team14-com4vc.hol.enablement.local 10.18.22.64 Team 15 team15-com4vc.hol.enablement.local 10.18.22.65 Team 16 team16-com4vc.hol.enablement.local 10.18.22.66 Team 17 team17-com4vc.hol.enablement.local 10.18.22.67 Team 18 team18-com4vc.hol.enablement.local 10.18.22.68 Team 19 team19-com4vc.hol.enablement.local 10.18.22.69 Team 20 team20-com4vc.hol.enablement.local 10.18.22.70 Team 21 team21-com4vc.hol.enablement.local 10.18.22.71 Team 22 team22-com4vc.hol.enablement.local 10.18.22.72 Team 23 team23-com4vc.hol.enablement.local 10.18.22.73 Team 24 team24-com4vc.hol.enablement.local 10.18.22.74 Team 25 team25-com4vc.hol.enablement.local 10.18.22.75 Before continuing to the next step, verify the FQDN and IP you entered matches the values in the previous table.
-
On the Internal Network Usage Configuration page, leave the default selection of No and continue to the next screen.
-
On the NTP and Web Proxy Screens, leave the defaults and continue to the next screen.
Bug Alert: Sometimes the appliance will post an error when you ‘next’ past the Web-Proxy screen. Use the “Back” function to go back to the “Internal Network Usage Configuration” screen, and then ‘Next’ forward again.
-
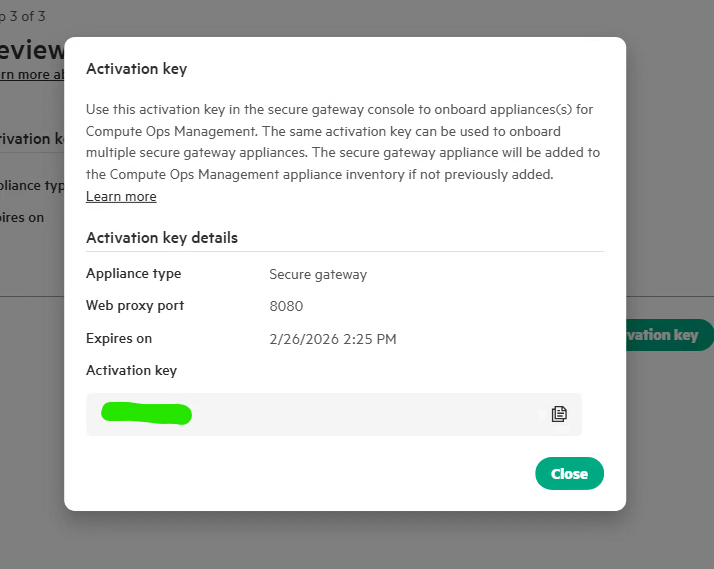
Enter the Appliance Activation Key you retrieved in the previous section.
-
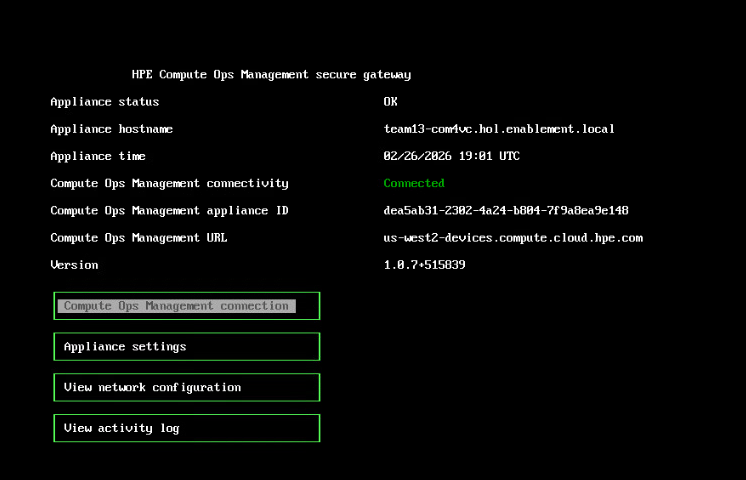
If your activation was successful, you’ll move the final screen where you are provided with an Appliance ID and a Compute Ops Management URL. Choose Close.
-
Verify on the final screen that your appliance status is OK and your Compute Ops Management Connectivity is Connected.”
-
Close this browser tab, as well the vCenter browser tab you used to connect to the appliance. They will not be used for the remainder of the lab.
-
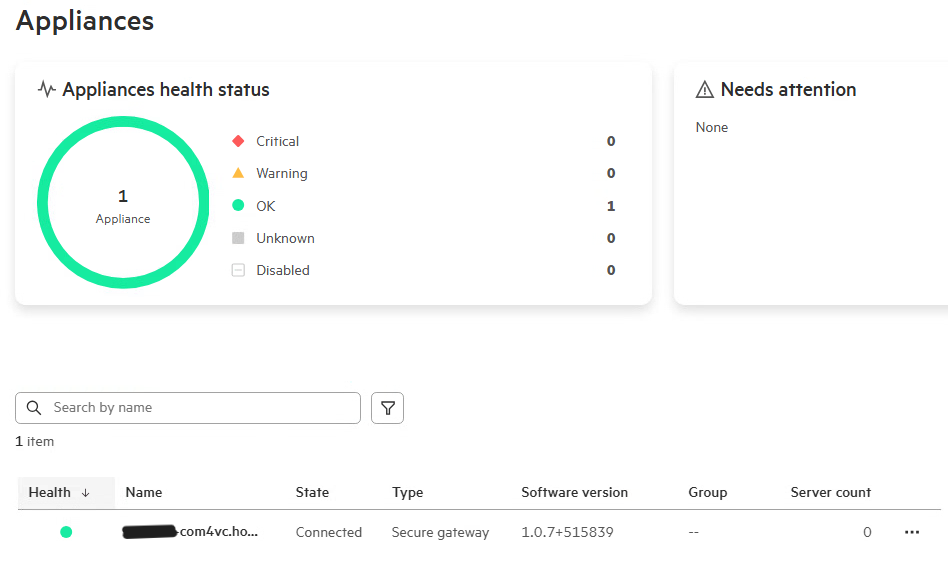
In your HPE GreenLake browser tab, you should now be able to see a health appliance for your team.
Task 2: Set up the new vCenter’s VLCM for Offline Bundle
In this next section, we will now focus our work on a different vCenter – one that is specific and unique to your team.
Step 1: Logging into your assigned “Team vCenter” and configuring for Offline Bundle.
Open a new browser tab and navigate to your team-assigned vCenter.
Remember, this is not the vCenter that you logged into to configure the Gateway Appliance. That tab should be closed if it is still open.
The URL is: Teamnn-vcsa.hol.enablement.local where nn is your team number (e.g. team01-vcsa.hol.enablement.local)
- Username: administrator@vsphere.local
- Password: < from your login sheet >
Verify that you are in the correct vCenter before moving on to Step 2.
Step 2: Importing an Offline Bundle
Starting April 23, 2025, Broadcom now requires a valid support subscription to download updates and leverage VLCM. The public-facing hostupdate.vmware.com URLs are no longer available. Instead, the customer creates a client-specific token and a custom URL to fetch update packages.
See: https://knowledge.broadcom.com/external/article/390098 for more information.
The steps for generating a token or customizing the URL are out of scope for the purposes of this lab.
Instead, this lab will utilize an OFFLINE DEPOT and we will import an offline depot zip image.
-
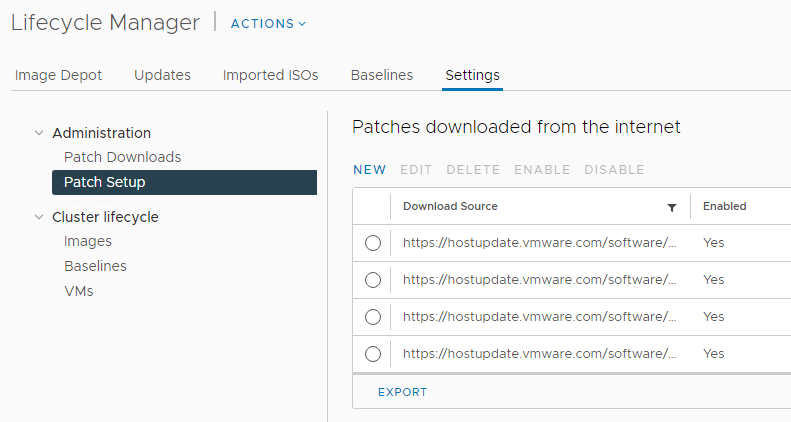
Once you have verified that you are in the right vCenter, In the upper left hand corner of vCenter, click the 3 horizontal bars to open the vCenter shortcut menu, and choose Lifecycle Manager.
-
Click Settings, and on the left hand side of your screen, choose Patch Setup under Administration.
-
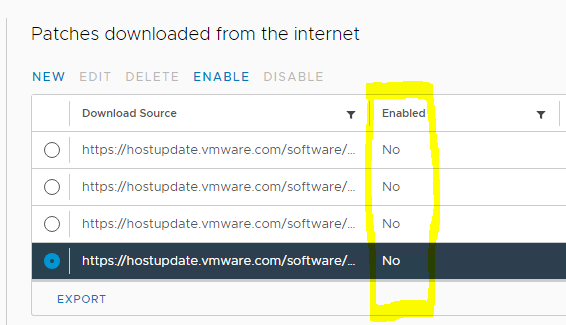
For each download source, select it, and then mark it disabled.
-
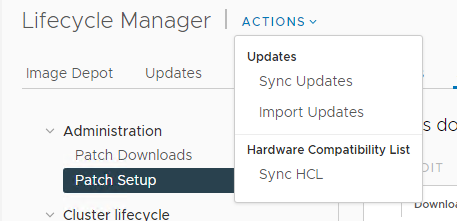
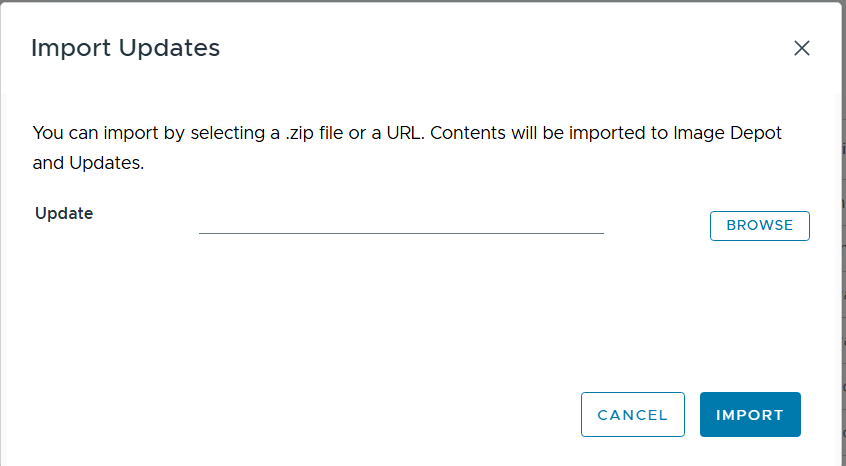
Under Actions choose Import Updates.
-
In the dialog box, choose Browse
-
Navigate to
C:\OfflineBundleand select the depot.zip file in this directory. The contents will be uploaded to the VLCM repository. -
After the update is uploaded, wait for the update to process and be added to the repository.
-
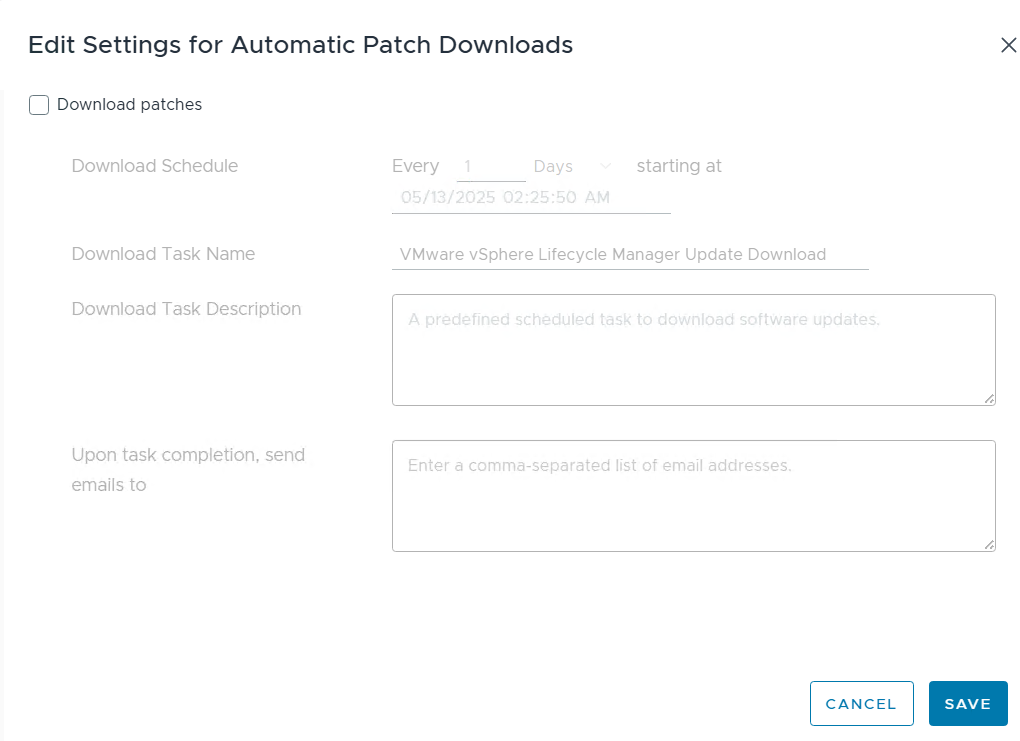
Next, choose Patch Downloads, click Edit, and Uncheck patch downloads and then Save
Task 3: Register the COM4VC plugin with the Team-Specific vCenter
COM4VC 2.0 has a different method of registering itself with the vCenter as compared with previous versions. In this version, the RDA certificate is downloaded from COM and then uploaded into the target vCenter. Next, the vCenter browser certificate will be registered with the plugin inside the COM UI.
Step 1: Download the Appliance Certificate and upload to vCenter.
Naviate back to your HPE GreenLake Compute Ops Manager Browser Tab
-
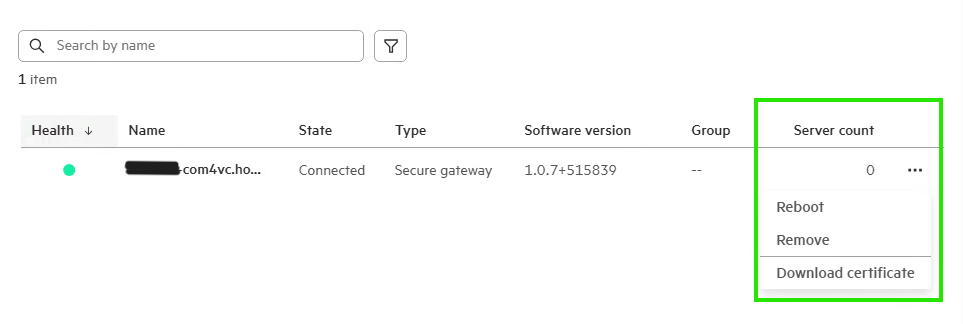
Find your Secure Gateway Appliance, and in the “…” section, choose Download Certificate
-
Switch back over to your vCenter browser tab, click the three bars menu, and navigate to Administration. At the bottom of this list, find Certificate Management
-
Switch to Trusted Root , choose Add Trusted Root Certificate and upload the certificate you downloaded in the previous step to the vCenter certificate store.

-
You should now have 3 entries in the Trusted Root Store.

Step 2: Configure vSphere Integration in COM
-
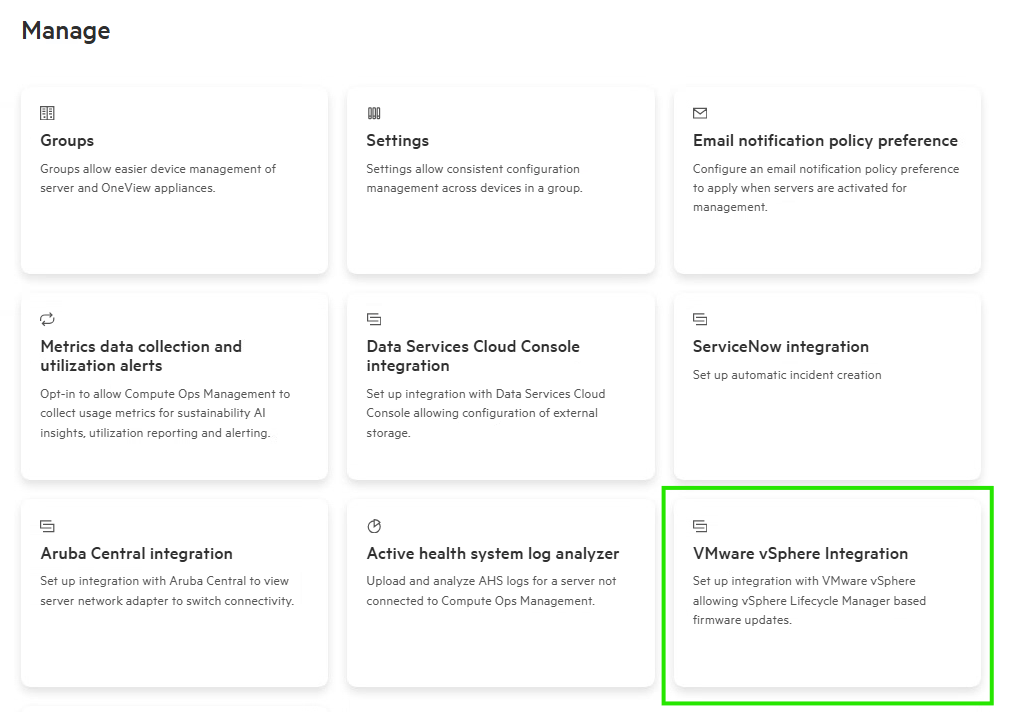
Switching back to the HPE GreenLake tab, across the top menu, choose Manage, and then select the VMware vSphere Integration tile.
-
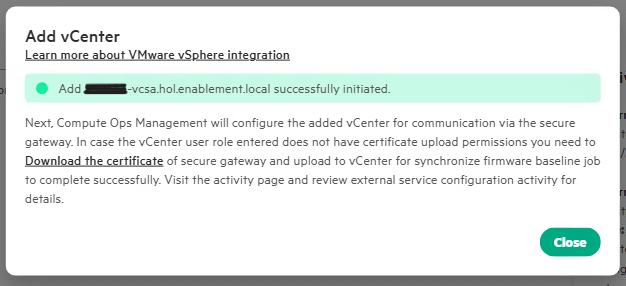
Choose Add vCenter and enter the appropriate information for your team-specific vCenter.’
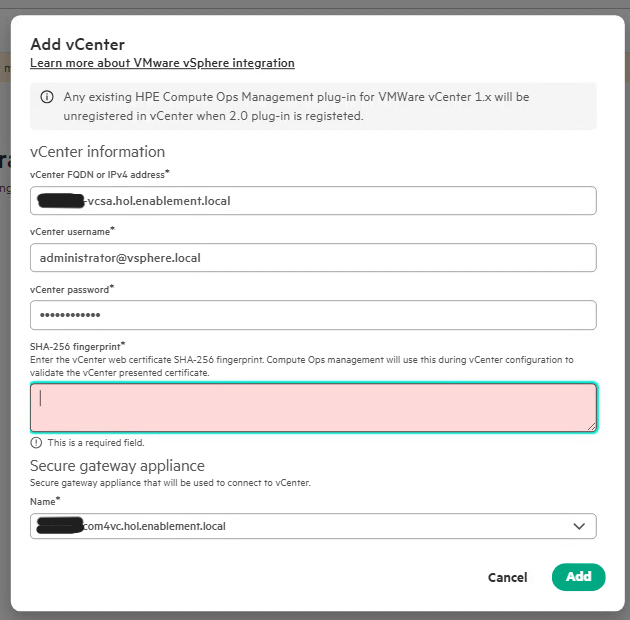
You are entering YOUR TEAM’s vCenter here - the image above is just an example.
-
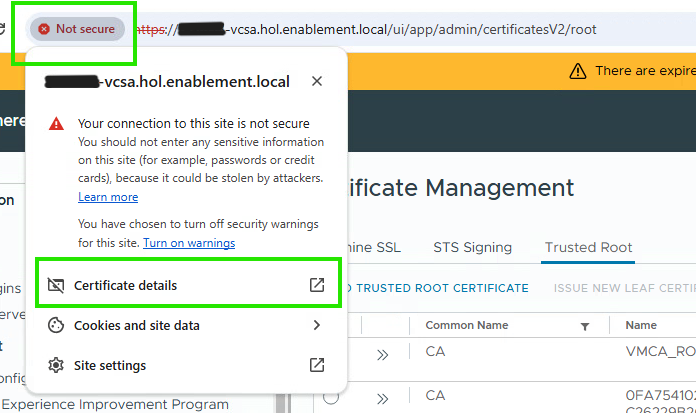
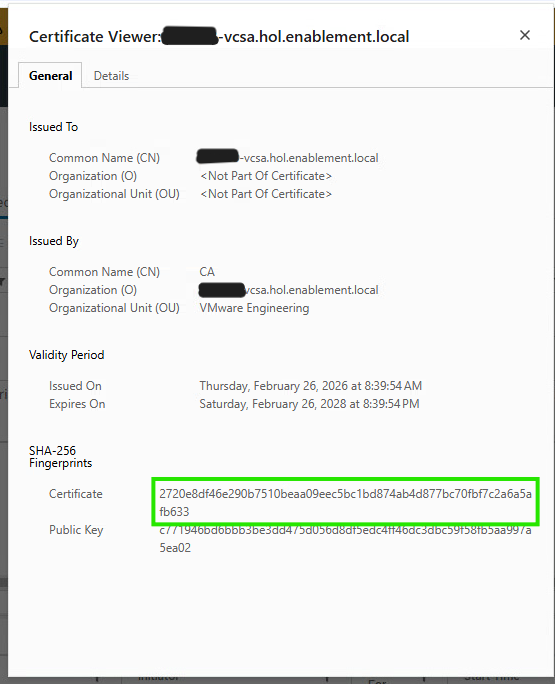
For the SHA-256 Fingerprint – navigate back to your vCenter tab, in the URL bar where it says Not Secure, click, and then select Certificate Details
-
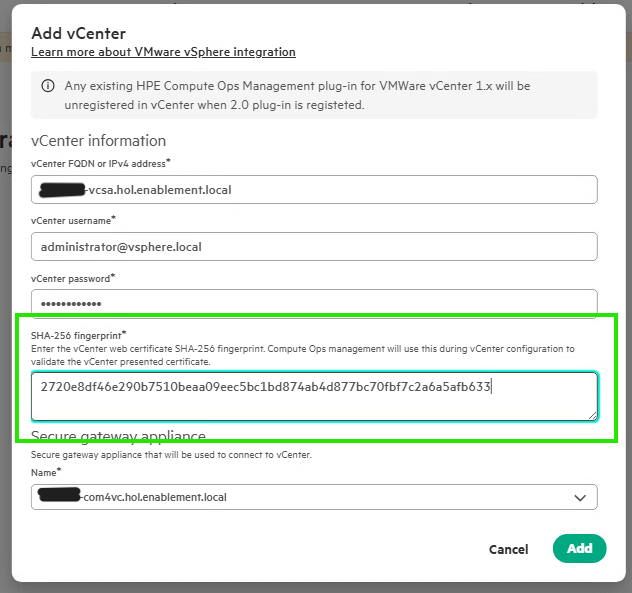
At the bottom of this window, the SHA-256 Fingerprint information is displayed. Copy this data and paste to the appropriate field in HPE GreenLake.
-
Choose your team’s secure gateway appliance from the bottom selection and click Add.
-
At this time, your vCenter will be registered and an initial bundle sync will start.
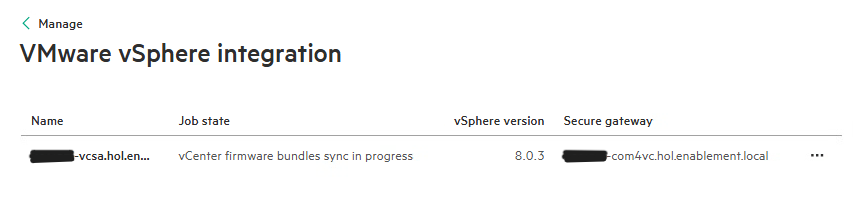
Wait for the vCenter Bundle Sync task to begin before continuing to the next Task. If you get a “vCenter Registration Failed” error, go back and verify your work. Once the vCenter Bundle Sync begins, it will run for 6-7 minutes. While it runs, continue to the next section.

Task 4: Add and Configure the host.
While the vCenter bundle sync job is running, we will add our host to vCenter, and verify that all components are in the required state to be used with VMware LifeCycle Manager.
Step 1: Adding a Host to vCenter
Before adding our ESXi host, there are a couple prerequisite setup items to be completed.
-
With the Shortcuts screen still displayed, click on Hosts and Clusters .
-
In the left-hand column, right click on the vCenter name, and choose New Datacenter

-
Keep the default name of Datacenter and choose OK.
-
Right Click on the Datacenter object you just created and select New Cluster.
-
Uncheck Manage all Hosts in the cluster with a single image. (We will do this in a later step in the lab). Click Next, and then Finish.
-
Right click on the Cluster object you just created and choose Add Hosts.
-
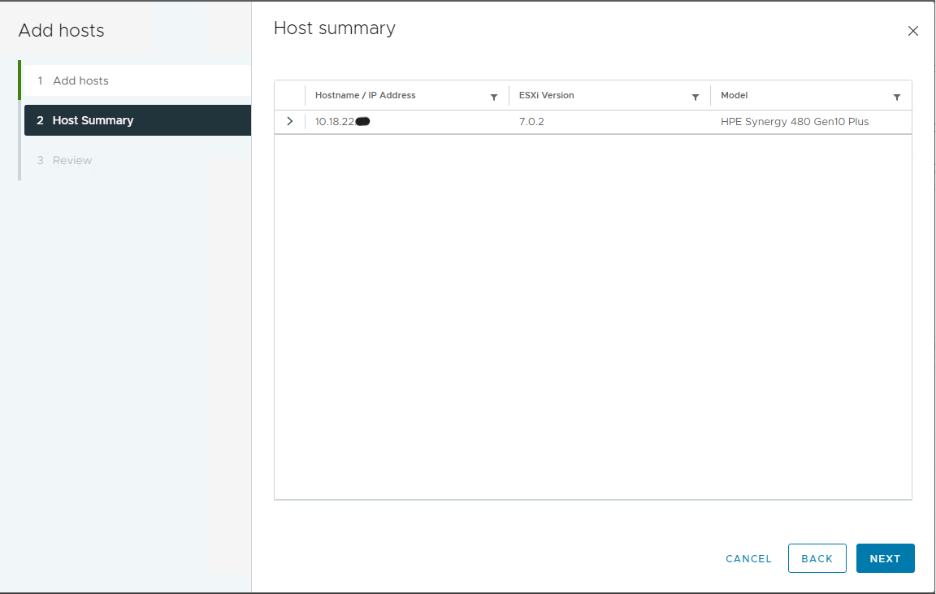
Add the ESXi host using the information that corresponds to your team name in the table ESXi hosts at the end of this section.
You may add the host by IP address or by FQDN
-
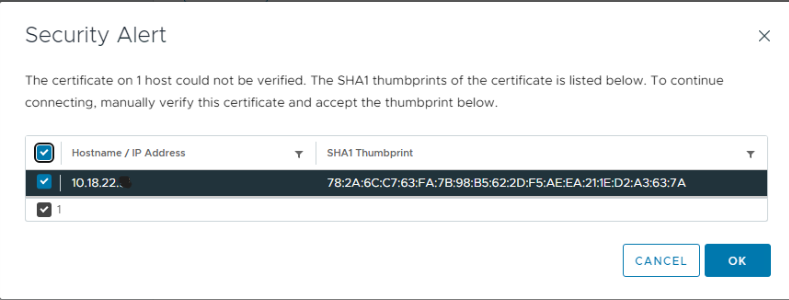
Accept the Security Alert and continue through the Add Hosts wizard. Click the checkbox next to your host, and click the OK button
-
Click Next to continue
-
Click the Finish button
-
Within vCenter the new host will display disconnected for a few seconds, then change to maintenance mode
ESXi Username and Password for All Hosts:
-
FQDN: <hostname>.hol.enablement.local
For example: com-team01.hol.enablement.local for team 1
-
Root Password: < from your login sheet >
Team IP Address Hostname Username Team 01 10.18.22.101 com-team01 root Team 02 10.18.22.102 com-team02 root Team 03 10.18.22.103 com-team03 root Team 04 10.18.22.104 com-team04 root Team 05 10.18.22.105 com-team05 root Team 06 10.18.22.106 com-team06 root Team 07 10.18.22.107 com-team07 root Team 08 10.18.22.108 com-team08 root Team 09 10.18.22.109 com-team09 root Team 10 10.18.22.110 com-team10 root Team 11 10.18.22.111 com-team11 root Team 12 10.18.22.112 com-team12 root Team 13 10.18.22.113 com-team13 root Team 14 10.18.22.114 com-team14 root Team 15 10.18.22.115 com-team15 root Team 16 10.18.22.116 com-team16 root Team 17 10.18.22.117 com-team17 root Team 18 10.18.22.118 com-team18 root Team 19 10.18.22.119 com-team19 root Team 20 10.18.22.120 com-team20 root Team 21 10.18.22.121 com-team21 root Team 22 10.18.22.122 com-team22 root Team 23 10.18.22.123 com-team23 root Team 24 10.18.22.124 com-team24 root Team 25 10.18.22.125 com-team25 root -
Step 2: Verify iSUT and AMS Status
COM4VC integration with vSphere Lifecycle Manager is supported on HPE Gen10 servers and newer that are registered in HPE GreenLake Compute Ops Management.
In order to fully leverage VLCM on HPE Gen10 or newer hardware, the host must be installed using the HPE ESXi Custom ISO and the integrated SmartUpdateTools (iSUT) settings modified to support the VLCM update workflows. Lastly, the host must be in a member of a Compute Ops Management server group.
Unlike COM4VC 1.x, COM4VC 2.0 no longer has a “Readiness Checker” built into the vCenter UI. Intead, we will need to putty into our host and verify the iSUT and amsd status.
-
In vCenter, select your host, choose Configure, and scroll down to Services
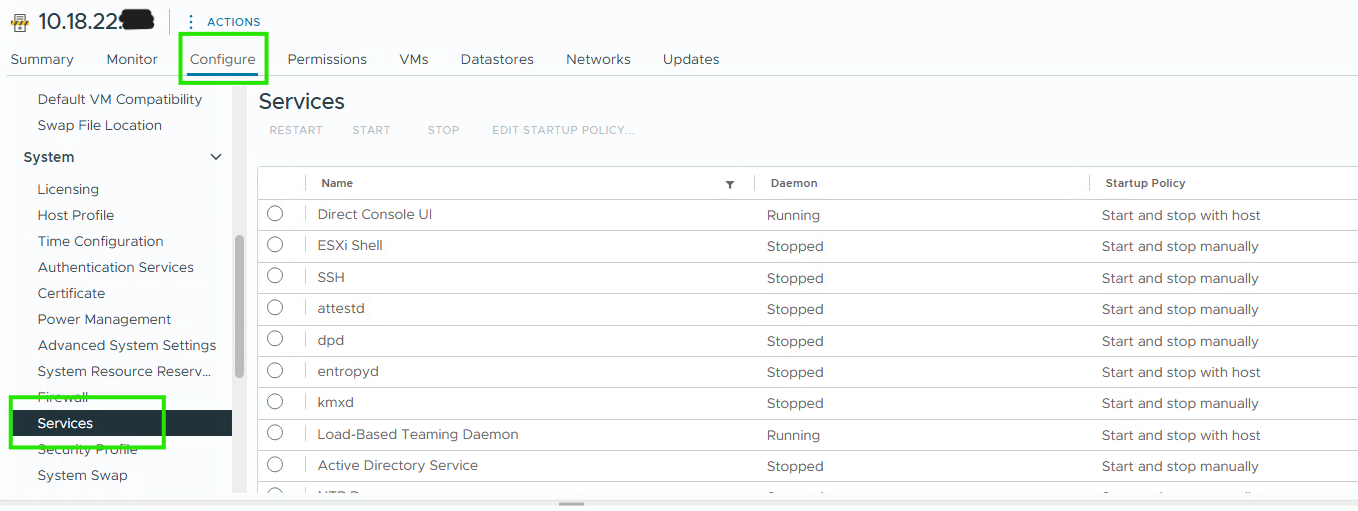
-
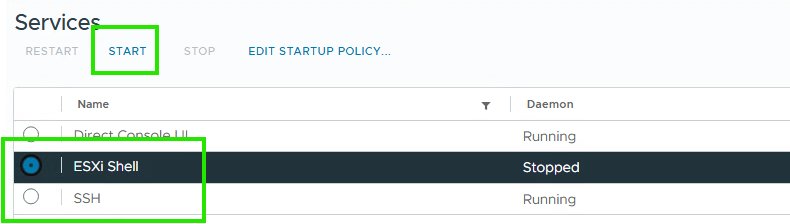
Select the SSH Service, and choose Start.
-
Do the same for the ESXi Shell service.
-
Click the Windows 11 start button, and type:
Putty -
Putty into your host – accept any credential challenges.
-
Login to your host using the root username.
-
Check the iSut status by inputting the command
sut -status -
Check the Mode of Operation If it is anything other than AutoDeployReboot set the mode using the following command:
sut -set mode=AutoDeployReboot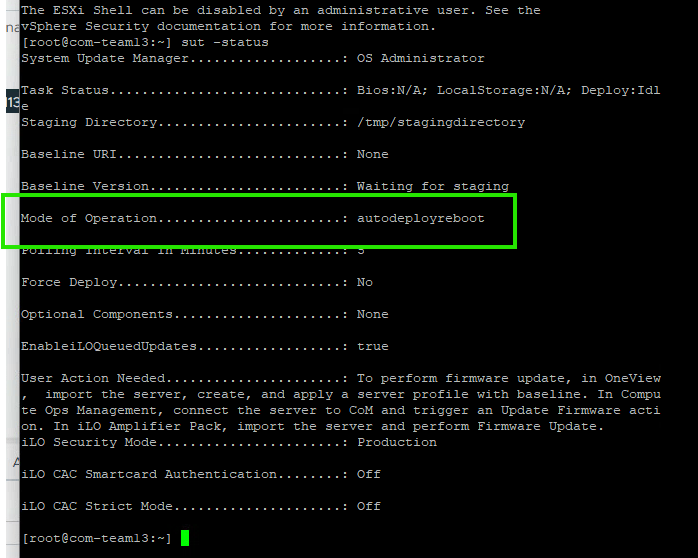
-
Check the amsd service by running
/etc/init.d/amsd status(If your server is a DL365 Gen 11, you will not see the AMSd running - this is normal - please continue)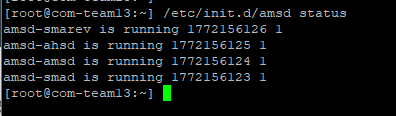
4 processes should be running.
-
Type
exitto logout of the Putty Session and automatically close the Putty window.
Step 3: Creating a Server Group in HPE GreenLake for Compute Ops Management
-
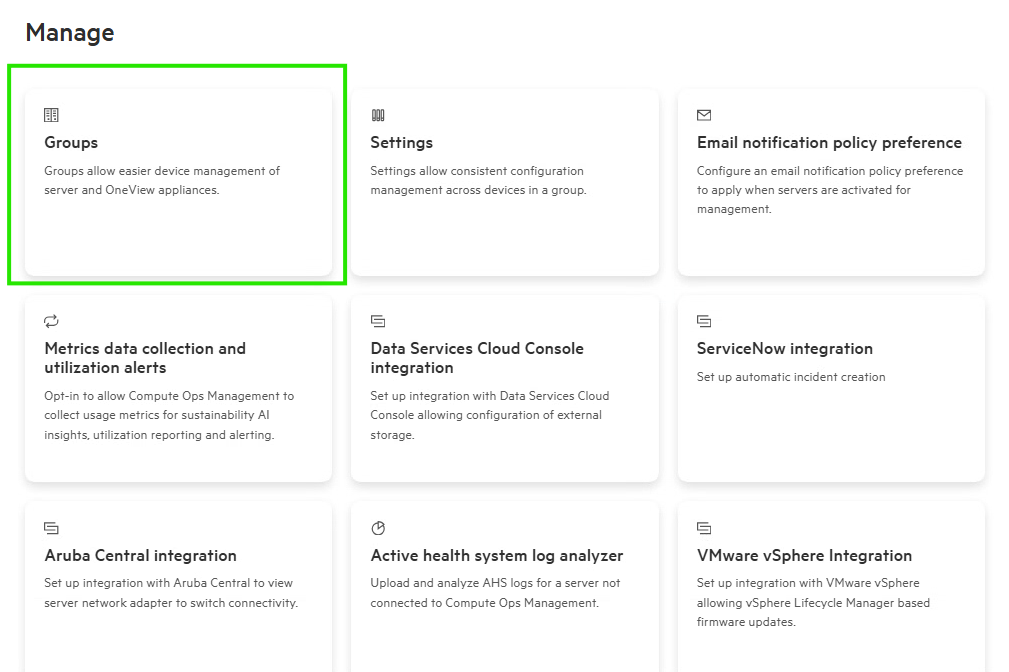
Switch to your HPE GreenLake browser tab. From the top menu, navigate to Manage

-
Select Groups
-
Select Create Group

-
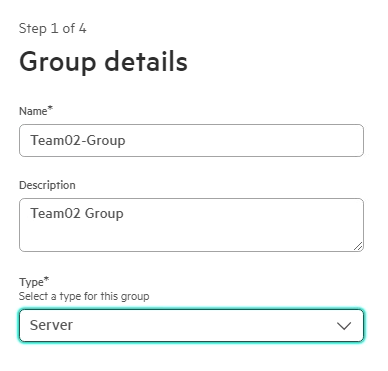
Name your server group the same name as your team, optionally fill in a description, select type of Server and choose Next
-
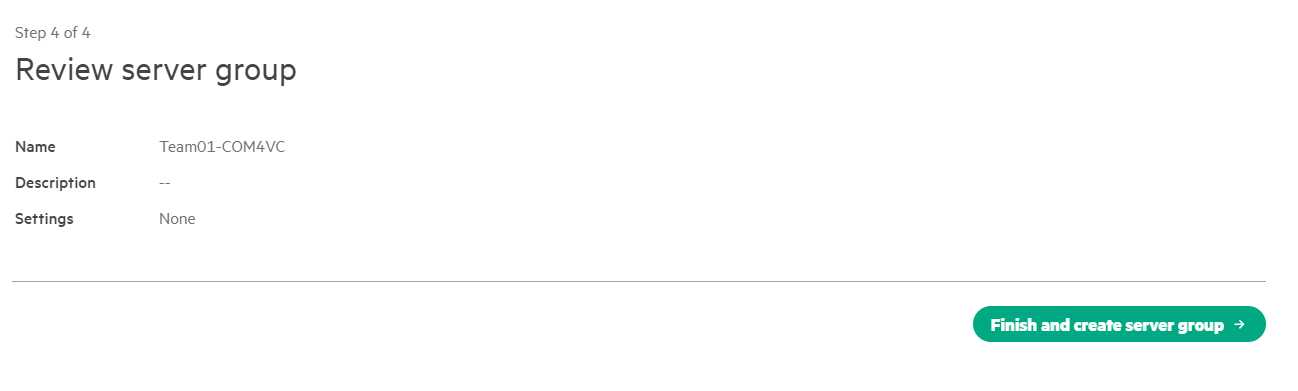
Leave everything else blank on the next several screens, choosing Next to continue without providing any values. At the final screen, choose Finish and create server group.
-
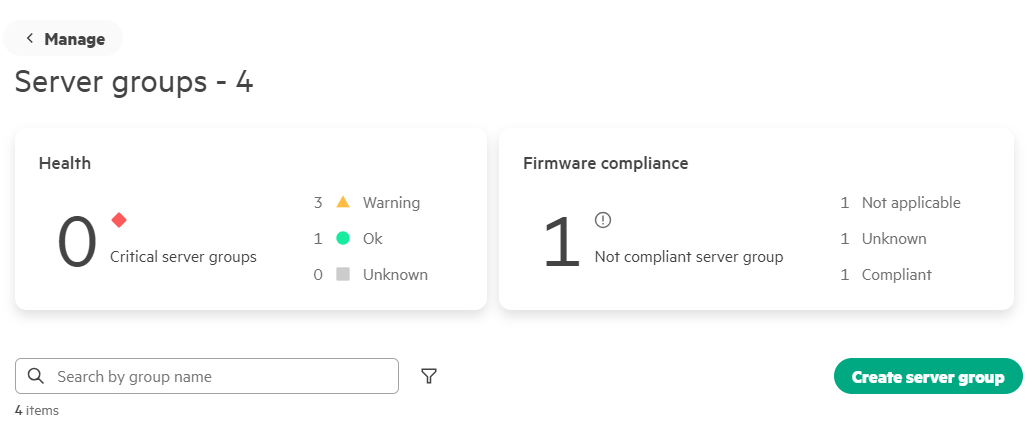
Servers can be added to the group from this screen, but due to the number of servers in this environment, we will add from the servers screen instead. At the top of the screen, click Servers to return to our list of servers.
-
In the Server list, find the search box labelled Search Server Attributes – and find your server. Type com-teamNN where NN is your team number.
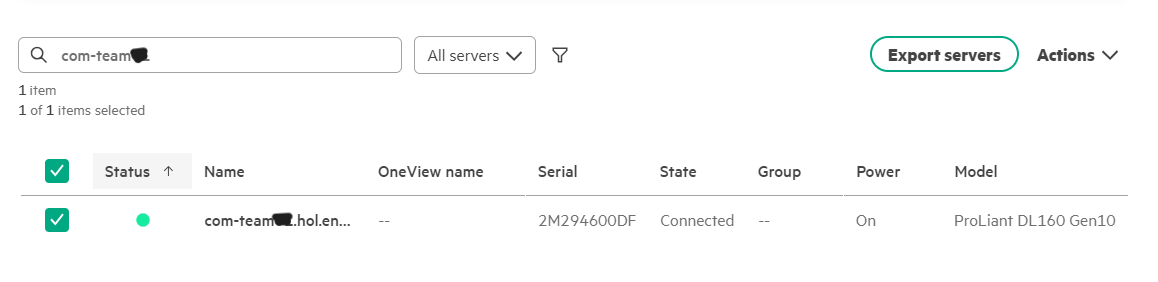
-
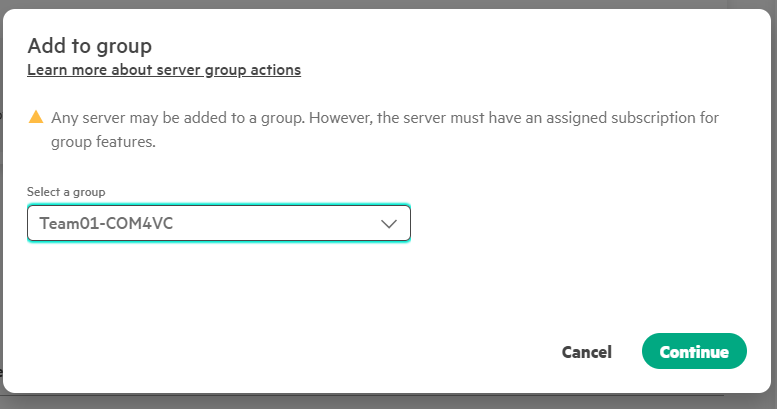
Tick the check box , and under Actions select Add to Group
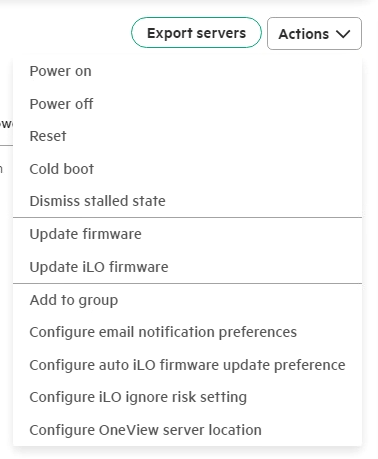
-
Add this server to the group you previously created, choose Continue and confirm the add.
Task 5: Integrating COM4VC with vSphere Lifecycle Manager
vSphere Lifecycle Manager or VLCM is the next version of Update Manager that enables centralized, automated patch and version management for VMware vSphere. It offers support for VMware ESXi hosts, virtual machines, and virtual appliances. With vSphere Lifecycle Manager, a user can upgrade and patch ESXi, and update third-party software on hosts. vSphere Lifecycle Manager can also perform firmware updates on hosts in addition to OS, drivers, and software updates by way of an integration with a server hardware vendor-provided hardware support manager, or “HSM.”
COM4VC provides the HSM functionality to vSphere Lifecycle Manager.
Our final step in the lab is to set up a VLCM cluster image and check compliance on a host.
Step 1: Creating a Cluster Image
A cluster image in VLCM is a definition consisting of 3 parts:
-
The first part is the ESXi Version. This is the “base” ESXi depot image.
-
The second part is the Vendor Add-in. The vendor add-in contains the OEM vendor supplied drivers and utilities.
Note: these two items together are what make up an OEM Custom ISO.
-
The third part is the Firmware definition.
An optional 4th component can be selected. This is usually when a 3rd party driver needs to be added into the cluster definition.
It is important to verify that all three of these components are compatible and supported with each other.
For ProLiant hosts, the following document shows the valid combinations:
https://vibsdepot.hpe.com/customimages/Valid-vLCM-Combos.pdf
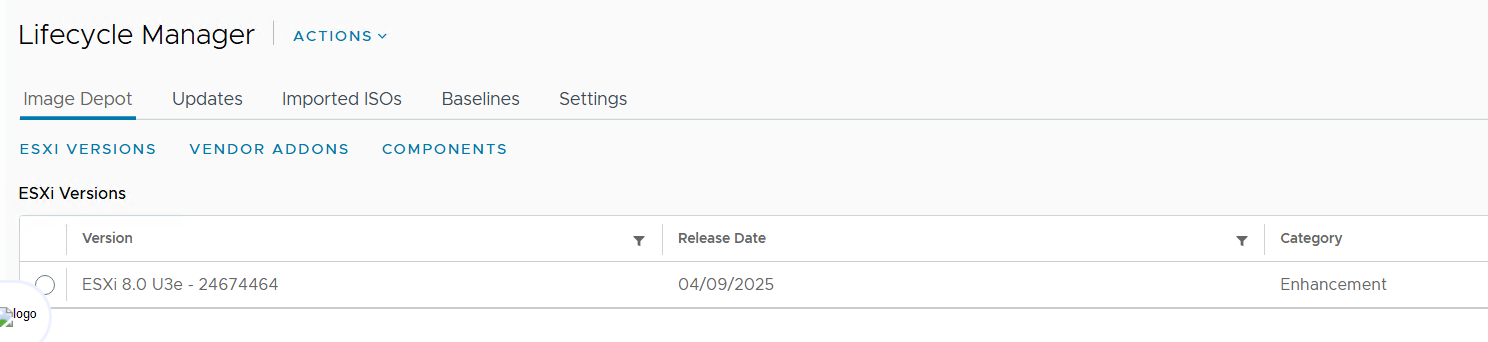
For this exercise, we are upgrading to 8.0U3e and applying the 2025.03 patch bundle.
For 8.0U3e, and when using the 2025.09.00 SPP, the vibsdepot document specifies the following:
-
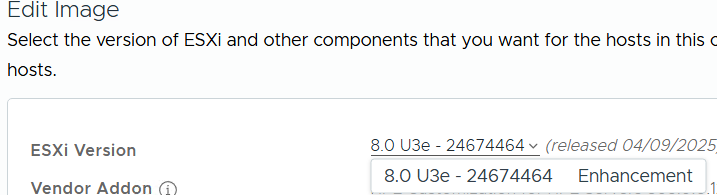
VMware Base Image: ESX 8.0U3e Build 24674464
-
HPE Add On: HPE ESXi 8.0 U3 Add-On 803.0.012.1.0-11
-
HPE VUP/SPP: Gen 10/Gen 11 Patch Bundle version 2025.09.00.00
Now that we know the supported combinations, let’s set up your cluster for VLCM.
-
Click the vCenter Menu option and navigate to Inventory.
-
Select your cluster.
-
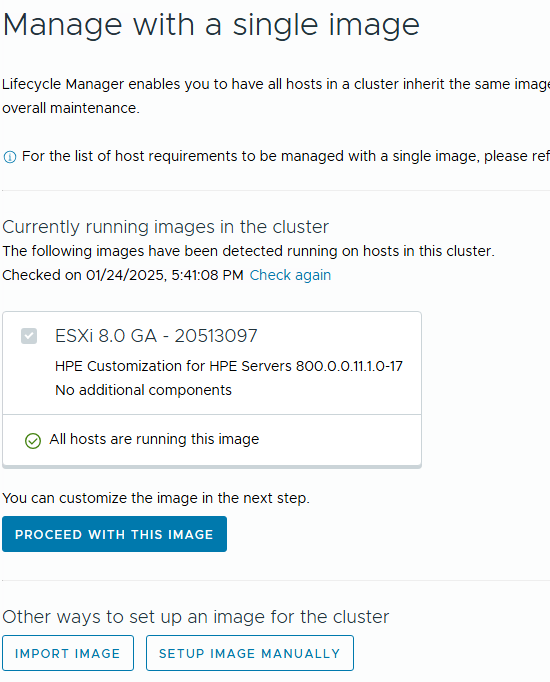
Click Updates and then click Manage with a Single Image
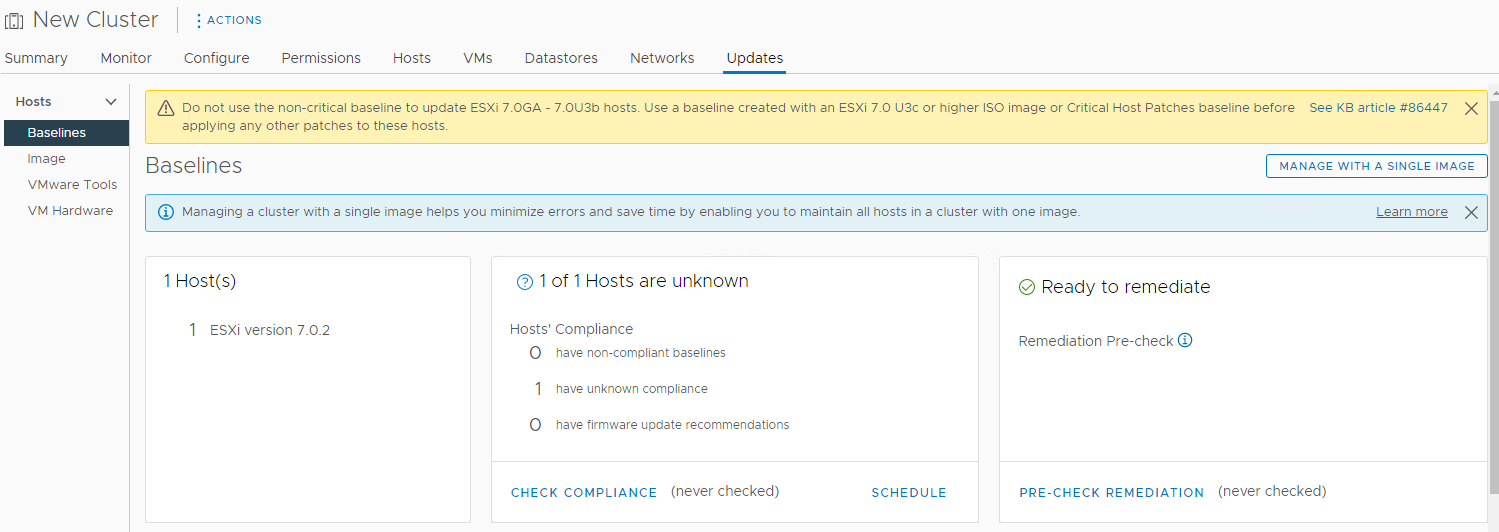
-
With vCenter 8.0 U3, it will attempt to detect the image already present on the host. We wish to skip that, and instead define our own. Therefore, scroll down and at the bottom, choose Setup Image Manually:
-
Next, we will define our three components for the cluster image.
-
Choose ESX 8.0U3e Build 24674464 as the Base ESXi Version.
-
Under Vendor Add-in, select the HPE ESXi 8.0 U3 Add-On 803.0.0.12.1.0-11 selection.

-
Under Firmware, select the HPE GreenLake for Compute Ops Management HSM, and then select the appropriate firmware bundle that is for ESX 8.0.3 and your model server (Gen10 or Gen11).

A completed cluster image should look like this:

-
-
Save the Image definition. A Check Image Compliance operation will now be started. Wait for it to finish (just a few minutes) and then click Finish Image Setup.
Note: Sometimes, the compliance check will not finish successfully due to timing. If this happens, Click “Finish Image Setup” and then “Check Compliance” again. Otherwise, continue to the next step.
Step 2: Exploring Image Compliance
Once a cluster image has been created, all members of the cluster will be inspected for their compliance against the image.
In the example above, we have one member in the cluster. If we had more than one host, it would be listed in a table – and selecting each host would show its compliance report in the righthand screen.
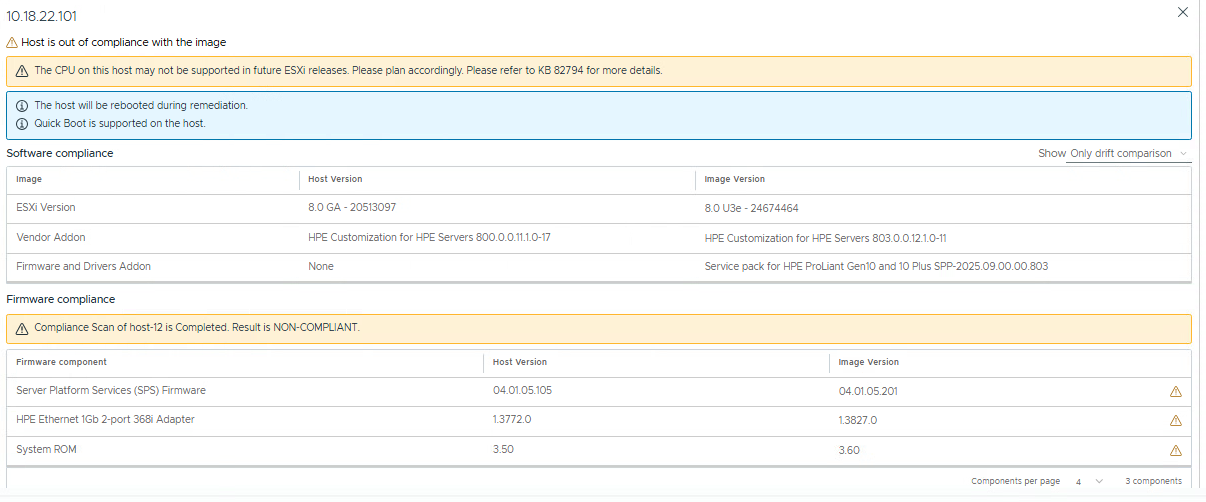
Our host is showing to be out of compliant with the cluster definition.
-
Our host is running vSphere 8.0 GA , but our Image requires 8.0 U3e.
-
Our host is running the 800.0.0.11.1.0-17 Server Customization, but our Image requires an 803-based Server Customization.
-
Finally, our host has no firmware definition defined, but one will be set with this image definition.
Scrolling down, if there were deviations from the firmware deployed on the host vs those firmware packages in the Synergy Service Pack, they would be displayed in the Firmware Compliance section.

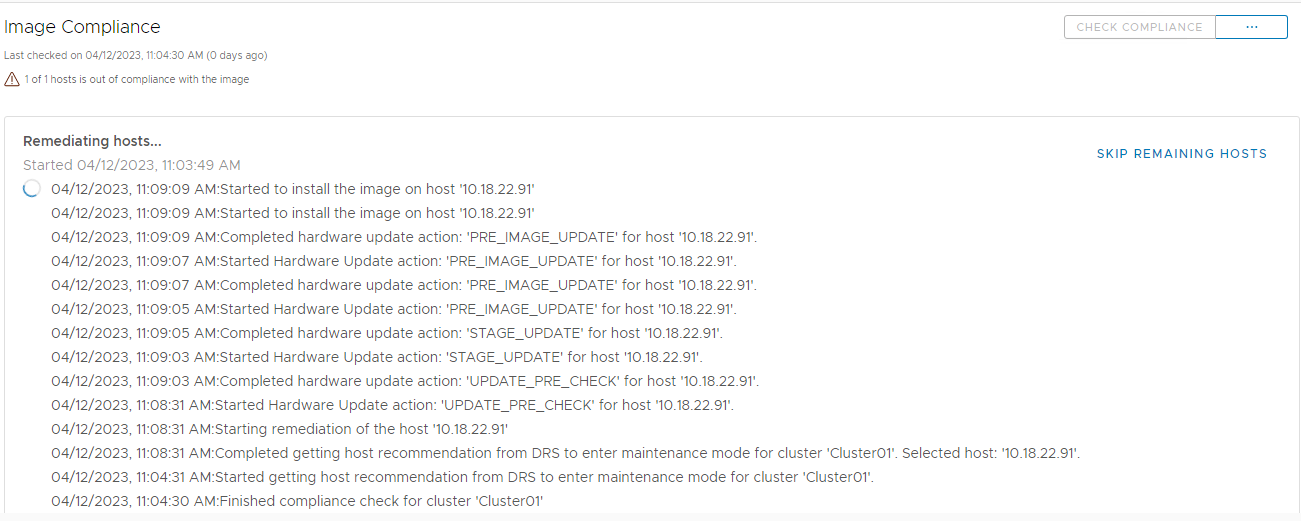
Step 3: Remediating a Host.
Note: Remediation can take some time to complete – up to 45 minutes in some cases, especially if new firmware is being applied.
Please only view the screenshots for this section and continue to the lab summary.
If we were going to remediate a host, the following steps would be performed.
⚠️ Please do not perform the following steps – only follow along with the lab guide!
-
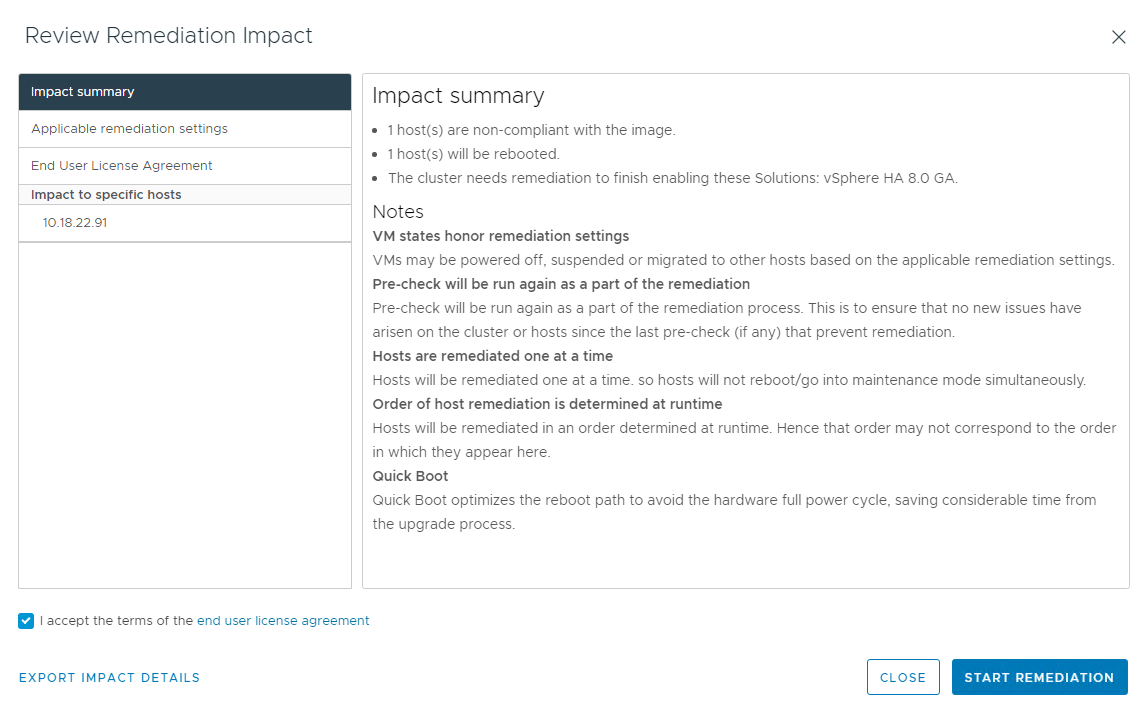
On the same screen, click Remediate All
-
Review the Remediation Impact and then select Start Remediation
-
The remediation can be monitored in the middle section of the screen.
-
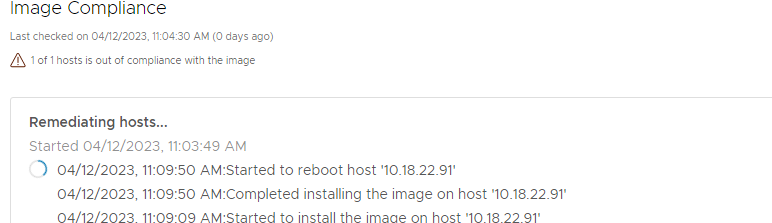
If the host was not in maintenance mode, it would enter maintenance mode at this time, and all running VMs would be vMotioned to other hosts in the cluster.
-
Once all software has been staged, the host is rebooted.
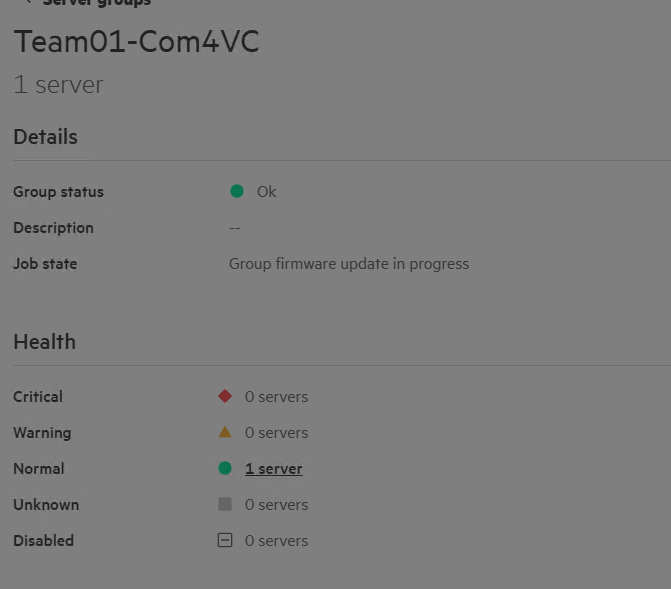
-
If any firmware was to be applied, once can switch over to the Compute Ops Management server page and see that there is an update in progress.

-
Drilling into the details we can see the follow:
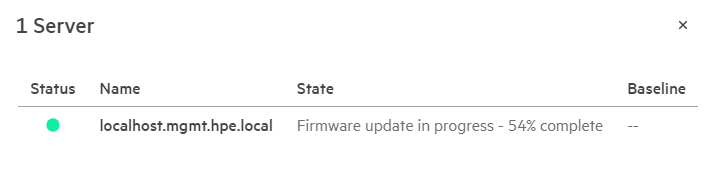
-
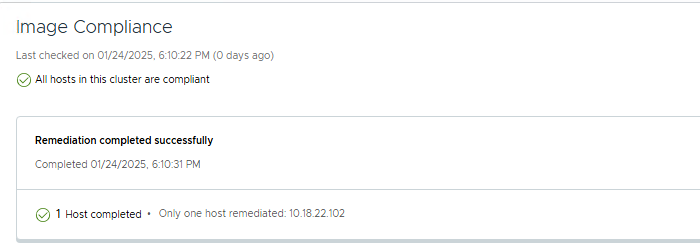
After the remediation is complete, the cluster will be checked for compliance again:
HOL Summary
This Hands-On Lab is now complete. Thank you for taking the time to participate, hopefully you received a deeper understanding of HPE GreenLake for Compute Ops Management vCenter Integration leveraging the HPE COM Secure Gateway and COM4VC 2.0
-
In the exercises you accomplished you were able to:
-
Configure and Register a Secure Gateway with COM
-
Register a VMware vCenter with COM
-
Add a host to vCenter and check VLCM prerequisites
-
Set up a VLCM Cluster Image and check compliant on a host.
-
Please return your team assignment sheet to your lab proctor.